Java 1.1 Unleashed
- 40 -
Creating Your Own Beans
by Michael Morrison
IN THIS CHAPTER
- Designing a Bean
- Installing the BDK
- Testing Beans with the BeanBox Test Container
- Packaging Beans with JAR Files
In this chapter, you learn some practical aspects of JavaBeans programming that take you a step closer to being able to develop your own beans. Even though you don't actually create any beans in this chapter, you learn all about the tools and techniques necessary to do so. By the end of this chapter, you will have all the information you need to begin constructing and using your own beans.
This chapter recaps the major parts of a bean and what types of decisions you have to make in terms of these parts when you are developing a new bean. With these design concepts out of the way, you move on and learn how to install and configure the JavaBeans Development Kit (BDK). You then move on to possibly the most interesting topic of the chapter: the BeanBox. The BeanBox is a test container in which you can try out beans while you are developing them. You can use the BeanBox to easily test out all aspects of your beans, including visual property editing, event wiring, and bound property management. The chapter finishes with a look at Java Archive (JAR) files and how you use them to compress and group beans together for distribution.
Designing a Bean
Although beans typically are small development projects in terms of the amount of code involved, the fact that they are reusable makes their initial design critical. It's important for you to fully evaluate the functional requirements of a bean before you jump into writing code. Of course, this wisdom is good to apply to any programming situation, but it is especially important in JavaBeans because of the nature of bean components and how they are used. For example, the very fact that a bean must be backward compatible as it evolves is reason enough to make sure that the interfaces you define are extensible enough to provide room for future functionality.
The planning process you go through when you initially design a bean pays off in many ways when you start developing the bean as well as when you maintain the bean in the future. Too many programmers fall victim to the urge to get an object working in a hurry without thinking of the larger picture in which it will be used. Even though this narrow-minded approach can work in some limited environments with a certain degree of success, it must be strictly avoided when it comes to JavaBeans. Trying to hack together a bean in a hurry when the overall aim is to make beans widely reusable in a variety of different ways simply isn't smart.
Stepping down from my soap box, let me now soften the tone and add that the initial design phase for a typical bean isn't very involved. Beans usually are such small pieces of software that they just don't warrant a large or complex design. Furthermore, because beans are geared toward being simple and minimal at the very core, it only makes sense that bean developers should carry on with this tradition in the design of beans at a higher level. All I'm really suggesting is that you spend a little time pondering exactly what your bean is going to accomplish, how it will be practically used, and in what ways it might evolve in the future. Just so you get the idea, let me divide these ideas into three questions you can ask yourself while you are designing a bean:
- 1. What does the bean do?
2. How is the bean used?
3. How might the bean change in the future?
The first question is probably the easiest to answer because it is probably the question that drove you to design a bean in the first place. Even so, it's important to clearly identify what the bean is going to accomplish as a piece of reusable software. The second question is also fairly straightforward because you probably already have an application in mind that can use your bean. You may even be developing a bean as a specific part of an application, in which case you decided to make it a bean so that you would have the option of reusing it in other projects. Regardless of the motives that drove you to develop your bean, make sure that you have a good idea of how the bean is going to be used by an end user, whether that user is yourself or thousands of developers who are going to buy your bean for use in their own projects.
The third and final question is the one you probably haven't given much thought to because most people tend to think in terms of the present and the problems to be addressed immediately. However, a little insight on the front end of a bean development effort can make things infinitely easier for you later when, inevitably, you want to add a new feature or alter an old one. Try to assess any potential features or changes you see as being possible in the future, along with how they impact the bean in its current state. You might see that a small concession in an initial design can leave the door open for future enhancements. On the other hand, you may decide that your bean is fine for your purposes and that it will never have to evolve. That's a perfectly acceptable attitude to have--as long as you understand that it limits your options in the future. How far you want to go in assessing the future direction of a bean is ultimately up to you. All I can do is encourage you to at least entertain the thought of making a bean more open for future modification.
NOTE: Personally, I know I'm sometimes fickle enough to feel better with a design that is very extensible. I like the idea of knowing that decisions I make today are open for change in the future just in case I manage to figure out a better way of doing things. This attitude is actually useful far beyond the realm of programming and JavaBeans, but that's another book!
Now that I've grilled you about approaching bean development with at least some amount of planning, it's time to move on to some specifics. The design of a bean ultimately should culminate in a detailed description of the various parts of the bean. The following sections are devoted to the design issues surrounding the three primary parts of a bean:
- Properties
- Methods
- Events
NOTE: Technically, events are implemented in beans through methods because methods are responsible for registering event listeners and responding to event notifications. So, it's a little misleading to mention events as if they are a part of a bean completely separate from methods. However, the conceptual role events play is very different than the role methods play, so it's worthwhile to consider events separately from a purely conceptual point of view. Just keep in mind that events rely on methods to function properly.
Laying Out the Properties
The heart of a bean is its internal state. Similar to normal Java classes, the internal state of a bean is reflected by the bean's member variables. Properties are public member variables that are accessible externally. Even though all member variables are important to a bean's functionality, properties take on a more critical importance because they enable you to query a bean for information or to modify a bean's state from outside the bean. Of course, you can never directly read or write properties externally; you must always do so through accessor methods.
Even if you aren't sure about all the data your bean needs to function properly, you should make a solid attempt to define all the bean's properties during the initial design. Trust me, this isn't asking too much. Properties are usually fairly easy to determine because they often directly relate to a piece of functionality. For example, it's pretty obvious that a button bean requires a property representing the label drawn on the button. In addition, you can define properties for the background and foreground colors of the button.
When you lay out the properties for your bean, be sure to decide whether the property is read-only, write-only, or read/write, because it will impact the accessor methods you have to implement later. Again, this should be a very simple and straightforward task because you've no doubt already thought about the characteristics of the bean that map to properties. At this point, you should also decide whether any of the properties are bound or constrained, because these decisions also impact methods you must implement later.
Although defining properties is an important step in the design of a bean, it is by no means something you can't go back and change later. It may happen that you later think of additional properties for the bean based on some new functionality you want to add. By all means, feel free to add or modify the properties of your bean while you are coding. I just want to encourage you to think about a core set of properties to begin with, because those properties will become the first member variables you define when you begin to code.
Defining Public Methods
After you've determined a set of suitable bean properties, you are ready decide on some methods that interact with them. At this point, you should focus on the public methods that are going to be accessible outside the bean. If you happen to already have an idea about nonpublic methods, go ahead and make note of them; just don't feel that you have to worry about them just yet. The primary goal here is to define the public interface that will be used to access your bean. This public interface is determined by the public methods implemented by the bean.
The first place to start when you are defining public methods is with accessor methods, which enable you to read and write the values of properties. Because you've already defined the properties for the bean, defining accessor methods is a simple task of listing getter and setter methods for each property based on its read/write capabilities. Keep in mind that these methods form the only direct link between a user and your bean's properties.
After you establish your bean's accessor methods, you have to check whether any of the bean's properties are bound or constrained. If so, you must add methods for registering and removing appropriate bound and constrained listeners. This process is very straightforward because these methods come in pairs and conform to a strict design pattern.
After the property-related methods are squared away, you have to assess any other public methods required by your bean. These methods are entirely bean dependent, so deciding what other public methods are required of your bean is totally up to you. Typically, public nonaccessor methods are used to perform some type of more involved function, as opposed to the simple getting and setting of properties performed by accessor methods. For example, you may have a bean that performs some complex calculation that impacts a variety of properties. Because you obviously want this functionality available externally, you place it in a public method.
Keep in mind that the constructors for your bean should also be defined at this stage. You can provide as many or as few constructors as you want; just remember that it's nice to give users a variety of constructors that use default values for some properties and require less explicit information.
Communicating with Events
The last major design area you have to assess is events. In terms of bean design, there are two different ways events come into play. The first has to do with the events a bean is capable of firing. The functionality of a bean determines the types of events it is capable of firing. Your bean can fire standard events defined in the Java API, or you can choose to define your own custom events and go from there. In the latter case, remember that you have to implement a class for each type of custom event you are going to use. Regardless of whether you decide on standard events, custom events, or a mixture of the two, the next step is to define the registration methods for listeners of each type. These methods are very similar to the methods defined for bound and constrained property listeners because they conform to similar design patterns.
The second way in which events come into play when you are designing beans relates to events a bean handles for itself. For example, a button bean has to catch and respond to mouse clicks, focus changes, and some key presses. These are the types of things you should decide how to handle up front so that you'll have fewer surprises when you start coding. The events processed by a bean basically result in overriding methods that handle different groups of events. Because most beans are derived from an AWT class such as Canvas, these event-processor methods are simply overridden in your bean class. Even so, go ahead and try to determine which ones you plan to override and why.
Now What?
After you have carefully designed the three major parts of your bean, you are ready to start actually building the bean. Although the initial design work isn't always the most thrilling part of bean development, it pays huge dividends when you begin coding. For example, you should be able to put together a pretty solid skeletal bean based on the properties and methods you planned for in the design phase. In other words, by merely defining properties and creating empty methods for the methods you listed in the design of the bean, you have a pretty good start on your bean class.
With a skeletal bean class in hand, you are ready to push on to the meat of JavaBeans development. Unfortunately, you'll have to wait until the next chapter to get into the gory details. However, the rest of this chapter covers some critical tool-related issues that are necessities for practical bean development.
Installing the BDK
Turning a bean design into reality wouldn't be possible without the JavaBeans Development Kit (BDK), which is freely available from JavaSoft. You can download the latest version of the BDK from JavaSoft's Web site at http://www.javasoft.com. The BDK comes complete with all the classes and documentation necessary to create and test your own beans. Please note that the BDK requires the Java Development Kit (JDK) version 1.1 or later, which provides all the core Java functionality used by JavaBeans.
NOTE: The BDK and JDK are both included on the CD-ROM that accompanies this book. Even so, you may want to check JavaSoft's Web site to ensure that you have the very latest version. Development kits like these tend to evolve rapidly, so new versions are released periodically.
The custom bean which you learn about in the next chapter was developed using a beta version of the BDK, which has a few caveats about how it must be installed. Because of these subtle installation details, I felt compelled to at least describe how I installed the JDK and BDK so that they work together seamlessly for bean development. Again, you can download both of these development kits for free directly from JavaSoft's Web site.
First, it's important that you install the JDK before you install the BDK because the JDK has all the core support required by the BDK. Although you are free to install the JDK however you choose, I recommend creating a jdk directory just below your root directory. Copy the JDK installation executable to this directory and execute it to install the JDK. The JDK expands into a java directory beneath the jdk directory you created.
After you install the JDK, you can install the BDK. Copy the BDK installation executable to the top-level jdk directory just as you did with the JDK executable, and then execute it to install the BDK. The BDK expands into a beans directory beneath the jdk directory.
NOTE: When you finish installing the JDK and BDK, be sure to delete the setup files used for the installation of each. These files are not cleaned up automatically and must be manually deleted.
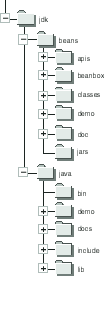
After you install the JDK and BDK, you should have a directory structure like
the one shown in Figure 40.1.
Figure 40.1
The directory structure for the JDK and BDK installations.
This directory structure is by no means a strict requirement for JavaBeans development, but it is consistent and has worked well for me. The consistency comes from the fact that the JDK and BDK are separate development kits for Java, which implies that they should reside at a similar level hierarchically. By creating a common jdk directory and installing different development kits below this directory, you have a very clear picture of how the development kits relate to each other.
Testing Beans with the BeanBox Test Container
As you learned in the previous chapter, one of the key benefits of JavaBeans is the capability for beans to be used in visual application builder tools. You've learned a great deal about the inner workings of JavaBeans that make this type of functionality possible, and now it's time to see it all in action and learn how to work with JavaBeans in a visual environment. The BDK ships with a test container called the BeanBox that enables you to lay out, edit, and interconnect beans visually. The BeanBox isn't intended to be a fully functional development tool for creating applications with beans; instead, it provides a simple example of how beans can be manipulated visually. Even so, the BeanBox is an indispensable tool for bean development because it provides a simple test bed for trying out beans.
The BeanBox is a standalone application executed using the JDK interpreter. Rather than running it directly using the interpreter, however, the BeanBox comes with a batch file, run.bat, which is in the BDK's beanbox directory and is responsible for setting the CLASSPATH environment variable before executing. You should use this batch file to run the BeanBox because it sets CLASSPATH to values specific to using the BeanBox. Following are the contents of the run.bat batch file used to execute the BeanBox:
set CLASSPATH=classes;unjar
java sun.beanbox.BeanBoxFrame
As you can see, the batch file first sets CLASSPATH to a few different
paths; then it executes the BeanBox within the JDK interpreter. Don't worry too much
about the CLASSPATH settings, because they are based on the internal workings
of the BeanBox. To run the BeanBox, just execute the run batch file. When
you run the batch file, the BeanBox executes and displays three different windows.
Each of these windows performs a different function within the scope of the BeanBox.
The first window is the ToolBox, which lists all the beans registered for use with
the BeanBox.
Figure 40.2
shows the BeanBox's ToolBox window.
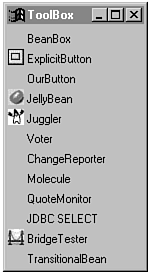
As you can see, the ToolBox lists a variety of available beans. These beans are all demo beans provided with the BDK to demonstrate the development and use of beans. Notice that some of the beans have graphical icons associated with them. These beans use a bean information class to specify the icon to be displayed in visual development environments. Other beans are listed in the ToolBox by name only.
The second window associated with the BeanBox is the main container window, shown
in Figure 40.3.
Figure 40.3
The BeanBox's main container window.
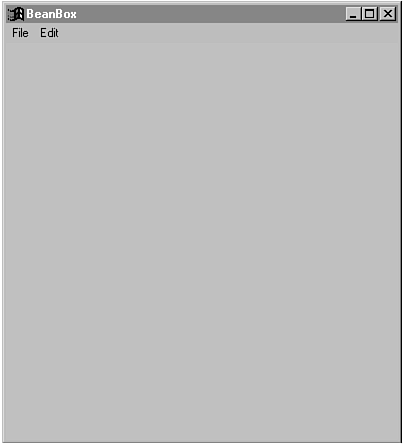
The main container window is the central BeanBox window because it is where you actually lay out beans. The main container window is very similar in function to form windows in other types of visual development environments such as Visual Basic. This window has two menu items: File and Edit. You use these menus to load and save BeanBox files and connect beans together.
The last window in the BeanBox is the PropertySheet window, which lists the properties associated with the currently selected bean. Figure 40.4 shows the PropertySheet window.
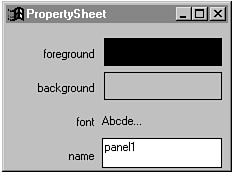
The BeanBox's PropertySheet window.
The PropertySheet window is responsible for providing the visual editing capabilities of the BeanBox because it displays a property editor for each property defined in a bean. When you first run the BeanBox, the PropertySheet window displays the properties for the BeanBox container itself. You can try to edit these properties by clicking one of them with the mouse. For example, try clicking the background property to change the background color for the container. Figure 40.5 shows the property editor dialog box displayed for changing the background color.
The property editor dialog box for the background color property.
This property editor dialog box enables you to easily change the background color for the container either by entering RGB (Red Green Blue) colors or by selecting a standard color from a drop-down list. Try selecting a different color and clicking Done to see how your choice affects the container.
NOTE: For beans that have an associated customizer, the Edit menu in the BeanBox includes a Customize command that runs the customizer on the bean.
Working with Beans in the BeanBox
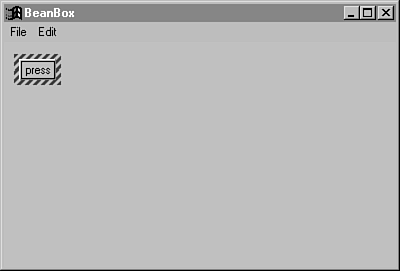
Working with beans in the BeanBox is easy and demonstrates the real benefit of visual editing with beans. The first thing you do is select a bean from the ToolBox and add it to the main container window. You do this by clicking a bean's name or icon in the ToolBox window; this action turns the mouse pointer into a cross. Then click in the container window where you want to place the bean. A new bean appears in that location with a default size and set of properties.
Try laying out one of the demo beans that comes with the BDK. Click the OurButton bean in the ToolBox window, and then click somewhere in the container window to place the bean. After you do this, the container window should look similar to Figure 40.6.
The main container window after adding the OurButton bean to the BeanBox.
Notice that the new bean is drawn with a hashed boundary. This indicates that the bean is the currently selected bean, which means that the PropertySheet window reflects the properties for this bean. Beans are selected by default when you add them to the container window. To select a bean that isn't selected, just click outside the bean in the area where the hashed boundary is to appear. Some beans enable you to click anywhere on them to select them, but in the beta version of the BDK, this behavior is somewhat inconsistent. The version of the BeanBox in the final release of the BDK will no doubt be more robust.
In a moment, you'll use the OurButton bean you just laid out to control an animation bean, but first you have to change its label property. You do this using the PropertySheet window: Change the bean's label property to read Start Animation. Now add one more OurButton bean using the steps you just went through (click the bean in the ToolBox and position it in the container). Edit this button's label property and set the value to Stop Animation. After you've done this, the container window should look similar to Figure 40.7.
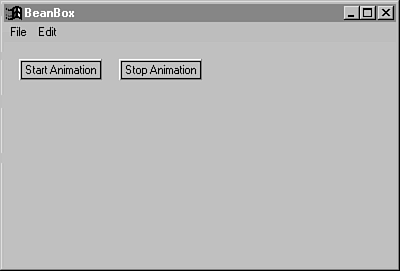
The main container window after adding two OurButton beans to the BeanBox.
Now it's time to throw in a little excitement by adding a bean that displays an animation. Select the Juggler bean from the ToolBox and add it to the container just below the OurButton beans. After you've done this, the container window should look similar to Figure 40.8.
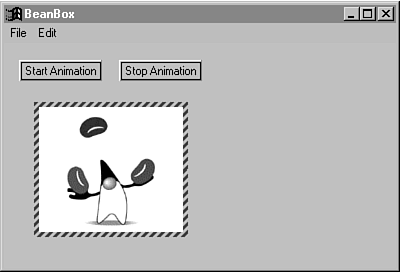
The main container window after adding a Juggler bean to the BeanBox.
If your beans aren't lined up quite the way they are shown in the figure, feel free to move them around. You can do this by selecting one of the beans, clicking the hashed border and holding down the mouse button while you drag the mouse. With these actions, you can move the bean around in the container. You can also resize beans that support resizing by clicking one of the corners on the hashed border and dragging the mouse. There is no need to resize any of the beans in this example because they automatically size themselves to fit their content.
Wiring Beans Together with Events
A particularly useful function of the BeanBox is that you can wire beans together using events. For example, you can easily connect a bean's event to a public method defined in another bean, which effectively ties the two beans together functionally. The BeanBox enables you to do this visually, which makes the task very simple. As you might guess, the two buttons you've laid out thus far are perfectly situated to control the Juggler animation bean. Let's wire them up to see what happens.
Select the Start button and click the Edit menu in the BeanBox. You'll
see an Events menu item that has a group of event types beneath it. Select the action
event menu item and then the actionPerformed command beneath it. You'll
see a line originating from the button that moves as you move the mouse around. Move
the mouse over the Juggler bean and click to connect the button bean's action
event to the Juggler bean. You'll be presented with a dialog box that shows
the available target methods defined in the Juggler bean (see Figure 40.9).
Figure 40.9.
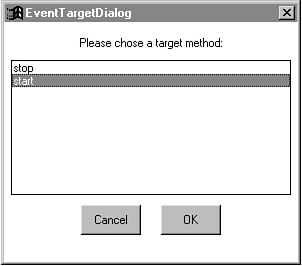
The Event TargetDialog dialog box for the Juggler bean.
Select the start() method from the dialog box to specify it as the receiver
of the event action. When you do this, the start() method is called on the
Juggler bean any time the Start button is clicked. Repeat this
procedure to connect the Stop button to the stop() method of the
Juggler bean. After you do this, you can test the buttons by clicking them
to start and stop the animated Juggler bean. It's as simple as that!
NOTE: It's worth noting that the beta 3 version of the BeanBox available as of this writing is a little tricky to use at times. The selection of beans tends to be inconsistent at times, occasionally resulting in the addition of a new bean when you really wanted to select an existing bean. I think it's safe to assume that the final version of the BeanBox will be much more robust.
Saving Your Work
You can easily save the contents of the BeanBox using the Save command from the File menu. When you save the contents of the BeanBox, the persistence features of JavaBeans are used to store away the state of each bean. You then can reload the beans later using the Load command; the persistence features are used to reconstruct the beans just as you left them.
Packaging Beans with JAR Files
After you have developed and tested your bean, you have to consider packaging it so that others can use it. Things aren't so simple as they were in the good old days of Java 1.0 where you could just provide executable class files and everyone would be happy. The standard method of distributing beans involves packaging them into compressed archives called JAR (Java Archive) files. JAR files are similar to other types of compressed files such as ZIP or TAR files, except that they are specifically tailored to packaging up Java classes and resources. For more information about JAR files, refer to Chapters 36, "JAR Basics," and 37, "Code Signing and JAR Security."
-
NOTE: JAR files use a compression scheme based on the one used in ZIP files. Check out Chap- ter 11, "The Utilities Package," for more information about the java.util.zip package in Java 1.1.
JAR files basically enable you to group the classes and resources for beans into one compressed unit to organize them and conserve space. Bean resources can include anything from images and sounds to custom resources such as data files. Being able to group resources with the classes for a bean cleans up the delivery of beans considerably because it eliminates the chore of keeping up with a bunch of different support files. Additionally, having a single file for beans being delivered over an Internet connection results in only one HTTP transaction, which is much faster than transferring multiple individual files.
Just in case you are thinking you don't have to worry about bundling your bean in a JAR file, understand that most visual development tools expect beans to be included in JAR files. The BeanBox is an example of such a tool because it looks specifically for JAR files when it assembles the beans in its ToolBox. You may be wondering how a tool such as the BeanBox knows which beans are included in a JAR file--because JAR files are ultimately just a bunch of classes and associated resources. The answer to this question is found in the manifest files, which are text files that describe the beans contained in a JAR file (along with encryption information if so desired). The encryption information is used for code-signing purposes, which is a topic beyond the scope of this chapter. You learn about bean security and code signing in Chapter 37, "Code Signing and JAR Security." You learn more about manifest files in Chapter 36, "JAR Basics," and in the following chapter when you create your first bean.
NOTE: JAR files can store multiple beans. Just as with individual beans, the manifest file is responsible for formally listing all the beans contained in a JAR file.
The JDK version 1.1 ships with a tool called jar that enables you to create and modify JAR files. The jar tool works in a way similar to PKZip or tar in that you can combine and compress multiple files into a single archive. The jar utility also enables you to sign individual files in a JAR file for security purposes. The syntax for jar follows:
jar Options Files
The Files argument specifies the files to be used when working with a JAR file and varies according to the options. The Options argument specifies options related to how the jar utility manipulates a JAR file. Following is a list of the jar utility options:
| Option | Description |
| c | Specifies that a new archive is to be created. |
| m | Specifies that the manifest file for the archive is to be created based on an external manifest file. The external manifest file is provided as the second file in the list of files following the options. |
| t | Used to list the contents of an archive. |
| x File | Extracts all the files in an archive; extracts just the named files if additional filenames are provided. |
| f | Specifies the name of the archive in question, where the name is provided as the first file in the file list. The f option is used in conjunction with all the other options. |
| v | Causes the jar utility to provide verbose output, which results in greater information about the actions being performed on a JAR file. |
CAUTION: Unlike most command-line utilities, the jar utility doesn't require the use of a slash (/) or hyphen (-) when specifying options.
So that you can see how the jar utility works in a practical scenario, here is a jar command that compresses and adds all the Java classes in the current directory into a JAR file called BigStuff:
jar cf BigStuff.jar *.class
In this example, the c and f options are used to specify that a new archive is to be created with the name BigStuff.jar. The files to be added to the archive are specified by the wildcard *.class. As you can see, there's nothing complicated about JAR files. Granted, it gets a little messier when you start dealing with code signing, but you don't have to worry with any of that at this point.
Summary
This chapter tackled some practical issues concerning bean development. You first learned about initial design issues relating to beans, including the importance of carefully defining the different parts of a bean before you write any code. You then moved on to the installation of the JavaBeans Development Kit (BDK), which has a few caveats to consider if things are to work smoothly. From there, you dove straight into visual bean manipulation with the BeanBox test container. The BeanBox is perhaps the most significant tool provided by the BDK because it enables you to test the capabilities of your beans in a minimal environment. Finally, you ended the chapter with a look at JAR (Java Archive) files, which enable you to compress the classes and resources for a bean into a single file for distribution.
This chapter covered a variety of different topics to prepare you for developing your own beans from scratch. You now are ready to get into the specifics of building your own beans and testing them. Sure, concepts and theories are great, but at some point you want to see something real. The next chapter takes you through the design and development of a complete bean, a process that puts your newfound knowledge to the test and lets you have some fun along the way.
![]()
![]()
![]()
![]()
![]()
©Copyright, Macmillan Computer Publishing. All rights reserved.