


Shockwave is a great tool for creating a dynamic Web site. The biggest drawback that Shockwave, and consequently everything else on the Web, suffers from though, is bandwidth. The other thing is that the end user needs to install the Shockwave plug-in in order to see the movies. This can be seen as a drawback because not everybody who uses the Internet knows what a plug-in is. While veteran users are familiar with the requirements, new users may be confused and might not be capable of actually downloading and installing the plug-in on their systems.
So, if you are targeting a demographic that consists of "Internet Newbies," or are planning on creating HTML documents for a larger Intranet whose users will have to install the driver on every single system, you may want to consider some alternatives. If you add to this the fact that embedding more than one movie to a page is not recommended, the need for an alternative is even greater. Here are some of the options available that this chapter explores:
Bear in mind that these "alternatives" do not replace the easy customization, ease of use, or advanced interactivity that is responsible for making Shockwave as popular as it is (besides the fact that there was and still is a large user base of Director users before Shockwave was available). But there may be certain applications of Shockwave that can be just as easily done in other ways, and knowing when to use one or the other is the mark of a good Web page designer.
First, a look at the seemingly not-so-powerful-but-frequently-used GIF. Many people are not aware that the GIF 89a specification for the GIF file format allows for multiple images to be embedded within the file. Also, it is possible to control the placement as well as the transition times from one image to the other. This means that you can have a navigation bar, for example, that has smaller images embedded within that file that change from one to the other, while relevant information on the navigation bar's controls remain static. Add a client-side image map to this example and you have something that's dynamic and takes less time to download than a comparable Shockwave movie. An extra bonus is that browsers that support animated GIFs but not Shockwave will see your animation. Concerning GIFs, here are a few things to consider:
Compatibility
Building an Animated GIF
Extra Features of GIF Construction Set
The downside is that, like Shockwave, Netscape 2.0 and above are currently some of a handful of browsers that take advantage of the extra information that the GIF89a file format can contain. Another browser that recognizes animated GIFs is Microsoft's Internet Explorer, which actually supports more features of the GIF 89a file format than any of the Netscape browsers.
As these two browsers are the two most popular browsers being
used (accounting for well over 75 percent of the market), you
can be sure that the time you spend creating your animated GIF
won't be in vain.
| Tip |
In the event a browser doesn't recognize animated GIFs, only the first image of that GIF is displayed. If you make sure that the first image does not rely on the other elements to make sense, you will have a built-in work around for non-compatible browsers. |
Building an animated GIF is an easy thing to accomplish as long as you have the right tools. The tool of choice is Alchemy Mindwork's GIF Construction Set (http://www.mindworkshop.com/alchemy/alchemy.html). A 32-bit version is available for Windows 95 and NT and is included on the CD-ROM.
GIF Construction Set has been updated with some cool new features. One of them is an "Animation Wizard." In Windows 95, "Wizards" will take you, step-by-step, through some processes, asking you relative questions on the way. When you're done, you'll have your finished product as the "Wizard" uses the answers you supplied to do the work for you. While this makes it incredibly simple for new users to create an Animated GIF, more advanced users will prefer getting their hands dirty so that they may have more control. The "Animation Wizard" is available from the "File" menu. Below, you'll do everything by hand.
Now you're going to take an animation created in Director, export it as a series of BMP files, and create an Animated GIF. The images used in this and succeeding tutorials are located on the CD-ROM under the "tutor/anim" directory. The reasons behind using Director-created animations will become apparent later on.
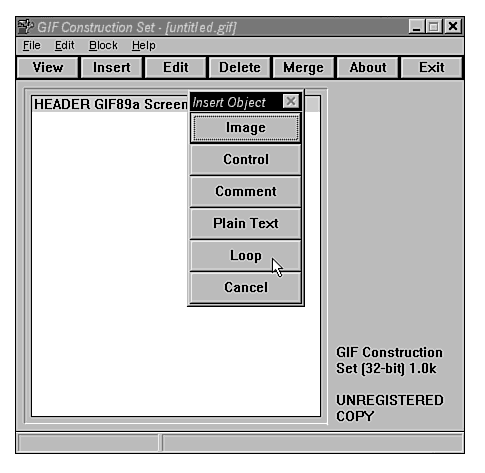
After installing GIF Construction Set, click "File" then "New." At this point, all the options necessary to build your GIF are available from the tool bar. The first thing you need to do is insert a "Loop" block. First, click the "Insert" button. You will see several buttons available, but for now, select the "Loop" button.
Next, insert a "Control" block in the same manner that you added a "Loop" block (figure 17.1).
Figure 17.1 : Select "Loop" from the insert dialogue.
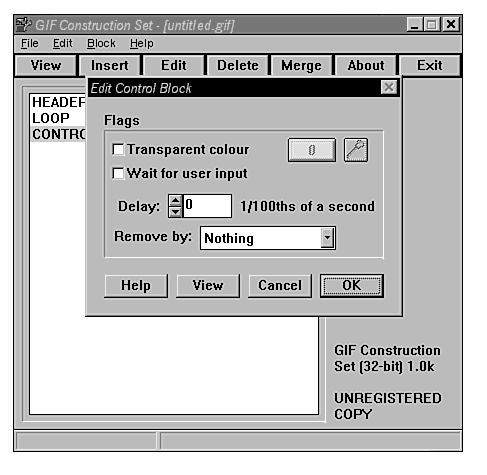
The "Loop" block specifies how many times the GIF should run through all the "frames" that you will be adding. Although Netscape 2 does not yet support this feature, Microsoft Internet Explorer 3 and Netscape 3 do. By default, they loop indefinitely (2000 times). To change how many times the GIF loops, though, simply double-click the "Loop" block and a dialog with the relevant options appears. Double-clicking any block reveals more information.
The "Control" block (figure 17.2) sets how the image you insert is treated. Double-click it and you see that you can control whether or not there is going to be a transparent area, whether or not it should wait for user input (not yet supported by any browsers), how many milliseconds to wait before proceeding to the next frame, and how it's to be removed by the next frame.
Figure 17.2 : The "Control" block dialog.
Because you're making a simple animation, insert a time of 30
milliseconds and select "OK." Now you need to insert
the frames that you exported from Director.
| Note |
It's not necessary to convert all your frames to GIFs because the GIF Construction Set supports a wide variety of file formats. Those file formats are: *.ART (PFS: Publisher), *.BMP (Windows Bitmap), *.CUT (Dr. Halo), *.DIB (Windows), *.GIF (Compuserve), *.HRZ (SSTV), *.IFF (Amiga), *.IMG (Ventura), *.LBM (Amiga, Deluxe Paint), *.MAC (MacPaint), *.MSP (Microsoft Paint), *.PCX (PC Paintbrush), and the list goes on… In this example, though, the frames are already GIFs. |
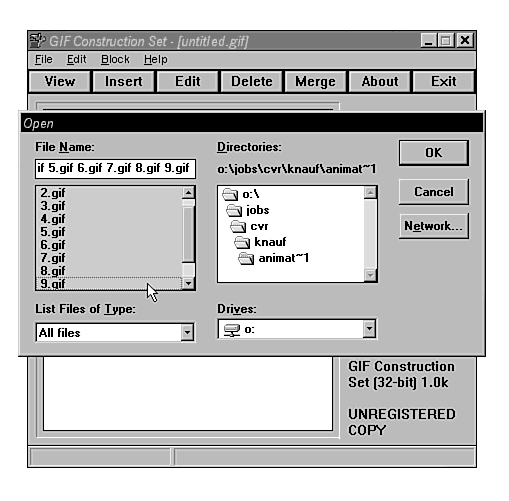
Insert your first frame by selecting the "Insert" button and then selecting "Image." The "Open" dialog then pops up. GIF Construction set allows you to import a series of images, relieving the user of the hassle of importing each frame individually. To do so, locate your frames then select the first frame. Hold the SHIFT button on your keyboard and select the last frame of the animation (figure 17.3) to select all the frames.
Figure 17.3 : Importing a series of images into GIF Construction Set.
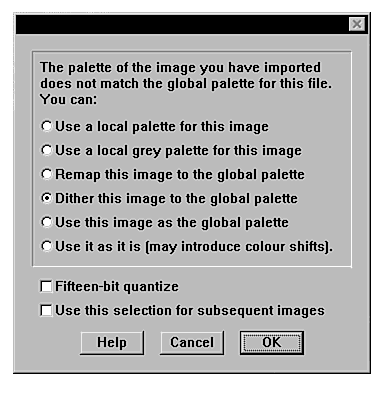
Curiously enough, Director is the perfect tool for creating the individual frames for an animated GIF for a couple of reasons. One is that Director excels in cell animations, making it very easy to create a 2-D animation, and the other is that Director exports a movie as a series of BMP files that use the same palette. This is very important if you want your images displayed correctly because at this point, the first frame loads when you select "OK." GIF Construction Set informs you that the image does not match the system palette and presents you with a list of choices.
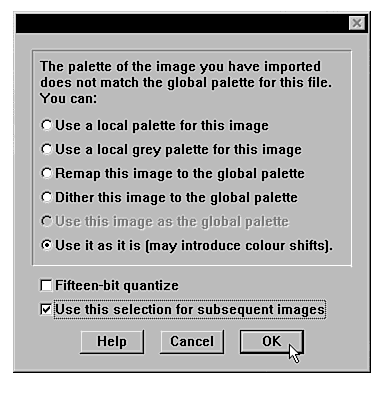
Because you know that every image has the same palette, select the "Use this image as the global palette" option and select "OK." If the palettes are different, you may have to do some experimenting. Going with your system palette is an easy way to go-just be sure that all your images are remapped to the same palette (figure 17.4).
The next image that loads also triggers the palette dialog. Again, you know that all the frames have the same palette, so this time select, "Use it as it is" and "Use this selection for subsequent images" (figure 17.5).
Figure 17.5 : Setting the palette dialog to import subsequent images "as is".
If you are using a series of images that were not created in Director, the palette issue will need to be resolved. Using your system pallete is the easiest way to go. Select "Remap this image to the global palette" as well as "Use this selection for subsequent images." This works most of the time, but if you don't get satisfactory results, experiment with the other settings.
The rest of the frames will be imported according to the settings that you have just made.
If all your frames are the same size, that is, your animation does not consist of a large image with smaller images animating over the top of the first frame, then you are almost done. If you do need to position an image, double-clicking an "Image" block lets you input, in pixels, how far away from the upper left-hand corner the smaller image needs to be.
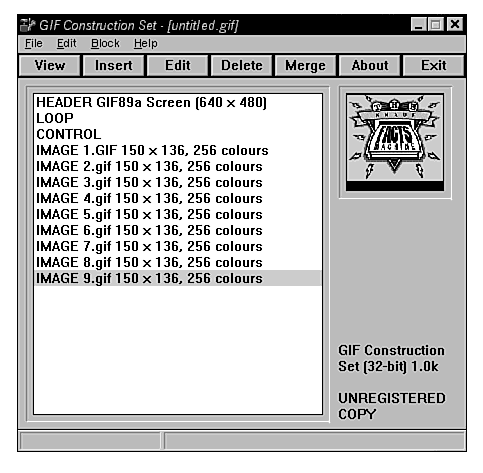
Look at the main window. Notice that the "Header" block reflects a default image size of 640¥480 and that all the frames reflect an image size of 150¥136 (figure 17.6).
Figure 17.6 : The "Header" and "Image" dimensions do not match.
Saving your work now results in an image that is 640¥480 pixels in size (the default setting). The size in the "Header" block sets the size of the GIF. Change that dimension so that it matches the dimensions of our frames by double-clicking the "Header" block and changing the sizes accordingly.
One of the last things that you need to do is to insert a "Control" block before every image. Because you already set the first control block, highlight that block, then copy it by pressing Ctrl+C from the keyboard and pasting it (Ctrl+V) before every image.
To preview the animation, click "View." The speed that your animation runs from the "View" option may not reflect how fast it runs inside of a browser, but at this point you may see each frame appear in succession. If everything looks okay, then save your file and place it as you would normally place any GIF into your Web page.
Try not to go overboard on your Animated GIF. Remember that everything on a page competes for bandwith when it comes time for someone to view it. Keeping the file small and efficient, which is the credo of every Web designer, should be first and foremost on your mind. What's the point of having an 80K Animated GIF, when Shockwave's compression schemes will shrink it down to 30K? Applications for Animated GIFs typically are animated bullets, banners, and small logos. These types of things make sense when implemeting them as a GIF. If your application is something larger, use your best judgement.
Another way to add an animation to a Web page is through the use of Java. Of course, as mentioned in the first chapter, programming in Java is not for the faint of heart, but one does not need to be familiar with C++ to take advantage of Java. There are numerous applets (Java programs) available for free downloading off the net from sites that serve as virtual Java libraries of sorts. If you are able to find an applet that accomplishes what you want, then you're in luck. Realistically, this is probably the only way the average person will be able to use Java in his or her Web pages.
As mentioned above, Director can be used to create your 2-D animations; for example, the infamous Animator Java applet. The great thing about this is that the Animator applet merely takes a series of frames or GIFs from a Web server and displays them in sequence so that the question of whether or not each image has the same palette is no longer a concern. The Animator applet is available from one of the best Java resource sites around:
http://www.gamelan.com.
Hundreds of other useful applets are available there as well. A great Java reference published by Que is Java by Example.
It takes a while to decipher the documentation that comes with most applets because the creators assume that the person who ends up with his or her applets is computer literate. But, with a little effort and some trial and error, it usually isn't that hard.
Now embed the animator applet into HoTMetaL Pro 3 and animate the same series of GIFs that were used for the previous GIF Animation. After that, do the same in Backstage Designer.
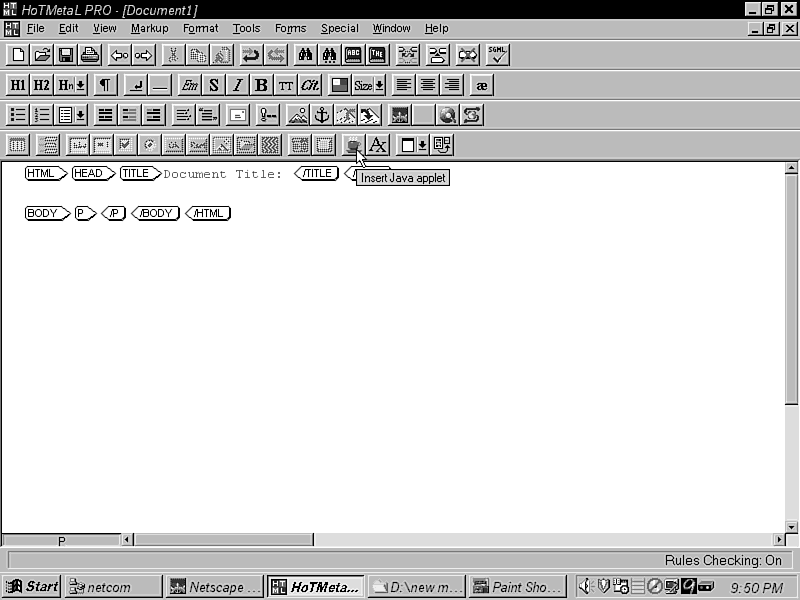
Once you have HoTMetaL Pro booted up, select the "New Page" button (remember that if you leave the cursor over a button for a couple of seconds, that a description of that button appears), then click the "Paragraph" element button, and lastly, select the icon from the bottom row of buttons (figure 17.7) that resembles a "nice hot cup" of Java.
Figure 17.7 : Select the Java button from the bottom toolbar.
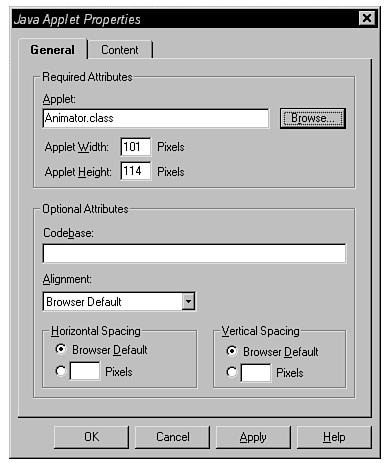
In the window that pops up, locate the "Animator.class" file and double-click it. Delete the statement that is in the "Alt" field. You can ignore the rest of the fields in the dialog as you will change those parameters as necessary later. Select "OK."
The first thing you need to do is save your new HTML document in the same directory as the "Animator.class" file. Next you need to change the absolute URL that links the applet in your page to a relative link. The link that you now have won't work on a Web server because that link refers to files that are on your computer.
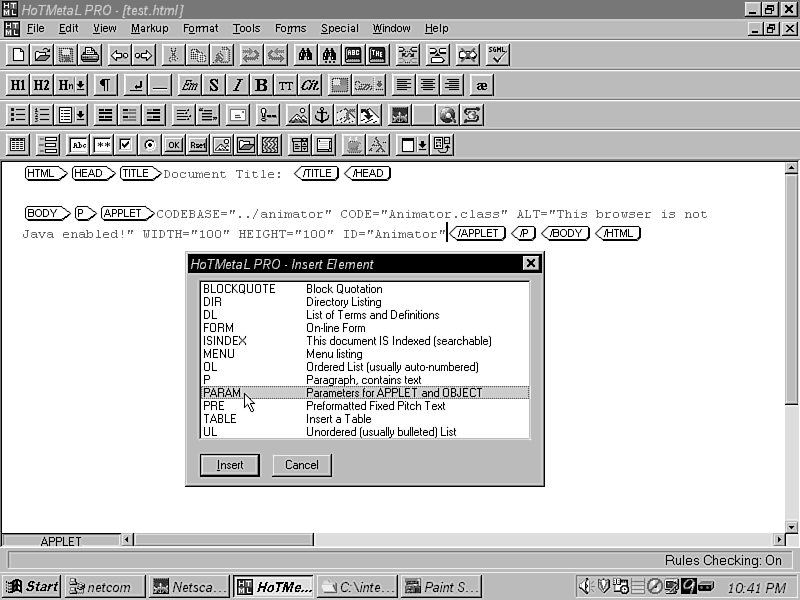
Remember that in the tutorial for embedding Shocked Director movies into HoTMetaL, a right-click anywhere between a start and end tag results in available options for those tags. As you get further into this tutorial, it may be confusing as to where a tag starts or ends as additional tags are inside them. You can try right-clicking immediately to the right of a start tag to be sure that you get the properties for that tag. For now, go ahead and right-click anywhere in between the <APPLET></APPLET> tags and select "Element Attributes" (figure 17.8).
Figure 17.8 : Edit the attributes for the <APPLET></APPLET> tags.
At the top of the resulting dialog, in the text field entitled "Codebase," delete everything except for the directory that holds the HTML document and the Java Applet. In this case, the directory is called "animator." Put the following characters, "…/" before the directory.
The "Codebase" of any Java applet is the directory where the applet and the other associated class files and configuration files, if any, can be found by the applet. Actually, this PARAM is not required if the applet and supporting files in question are in the same directory as the HTML file that calls it. This is a good exercise that you need to learn: The importance of specifying correct paths not only to our applet, but to anything else that is linked to your Web page, be it an image, a Java applet, or a Shocked file.
Leaving just the directory where the applet resides (without the "…/") tells the applet to look for that directory above where the applet currently is, which is incorrect. You need the applet to look in the same directory that it's in, so by putting "…/" before the name of the directory, the applet starts looking for the relevant information one directory below where it currently is. It will then look up one directory for the "Animator" directory (remember that this directory exists in this example only, unless you are using the same directory structure as this example). It sounds a little confusing, but it works.
Next, before you start adding the parameters that tell the applet what to do, set the dimensions. Again, right-click between the <APPLET></APPLET> tags and select "Element Attributes." This time you edit the width and height fields. Because you are using the same graphics as in the previous animated GIF example, you'll enter that information here, which is 150¥136 pixels.
According to the documentation that came with the applet (or should have come with it) the following are available parameters and instructions that can be passed to the applet:
These are the options that produce external results as far as what you see and hear. In order to duplicate the Animated GIF, simply tell the applet what files to use and the amount of time to display each file, which involves items 1, 3, 4, and 5, as well as some other attributes that affect the above options.
What you have just done is instructed the applet to generate a series of nine file names based on the letter "T," followed by the numbers 1 through 9 (T1.GIF, T2.GIF… T8.GIF, T9.GIF). The "%N" portion of the value entered for NAMEPATTERN gets substituted by the number range 1 to 9. These are in fact the names of each GIF used in the GIF Animation. If you would have put in a value of "T%3.GIF," the file names would be T0001.GIF, T0002.GIF and so on. The "3" after the percent symbol tells the applet that there are three zeroes in the names of the files to be used. The "N" simply tells the applet not to put any zeroes before the predefined range of numbers (1 to 9).
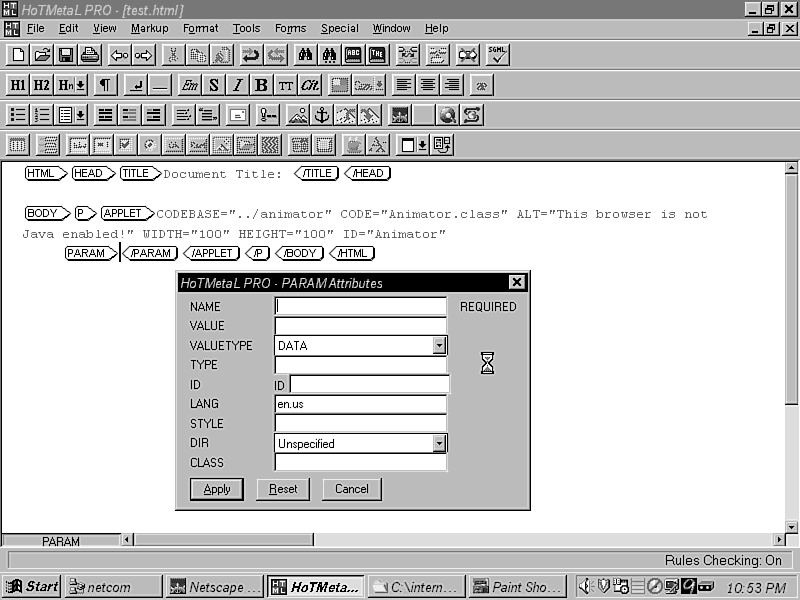
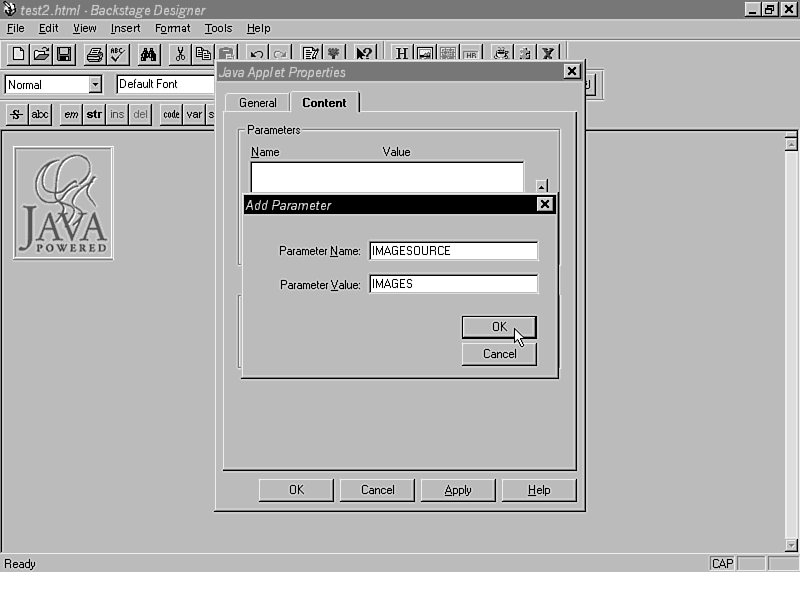
One last PARAM that needs to be inserted is the PAUSE PARAM. As you did before, insert a new pair of <PARAM></PARAM> tags and bring up the "PARAM Attributes" dialogue by right-clicking on the PARAM tags and selecting "Element Attributes." Enter "PAUSE" for the name and enter a value of "100" into the "Value" field.
The PAUSE PARAM tells the applet how long in milliseconds to pause on each frame before displaying the next frame. You've instructed the applet to display each frame for 100 milliseconds.
You could have specified one last PARAM, the one that specifies how many times to repeat the animation, but if this PARAM is absent, the applet loops the animation by default.
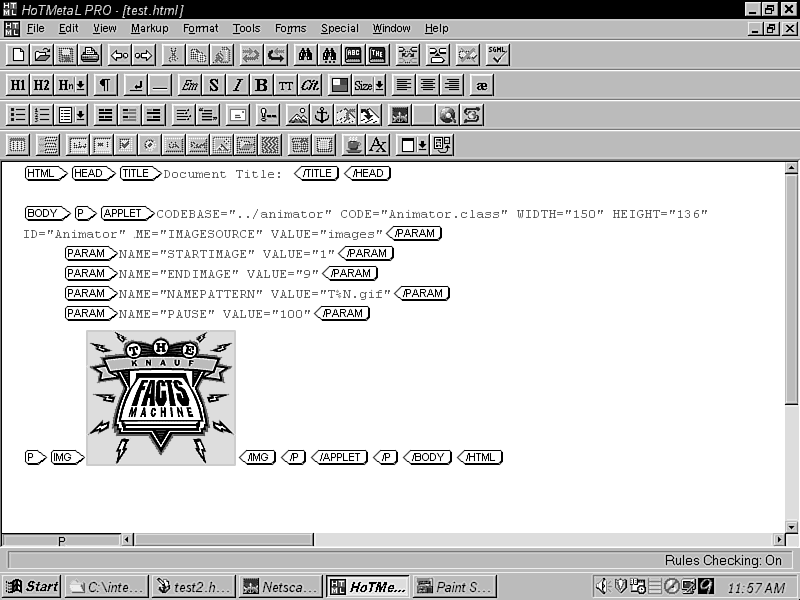
The last thing you need to do is insert one of the frames as an image between the <APPLET></APPLET> tags. This serves as an alternative image should someone try to view your Web page and not have support for Java in his or her Web browser.
Place the cursor just to the right of the applet end tag (</APPLET>). Next, click the "Insert Image" button from the tool bar. It's the one that resembles a small outdoor scene of some mountains and the sun (remember that leaving the cursor over any button for a few seconds reveals the function of that button). You use the image T9.GIF, so in the "Image File" field from the resulting dialog box, type in images/t9.GIF and select "OK." All of your images are in a directory of the same name (images). This directory happens to be in the same directory as the applet and HTML document, so all that is necessary to link the alternative image is the name of the directory and the file name (this is referred to as a relative link).
You're done! Your screen, if you've duplicated this tutorial, should look like figure 17.11. Save the page and preview it in Netscape. It takes a few seconds for it to kick in, so be patient.
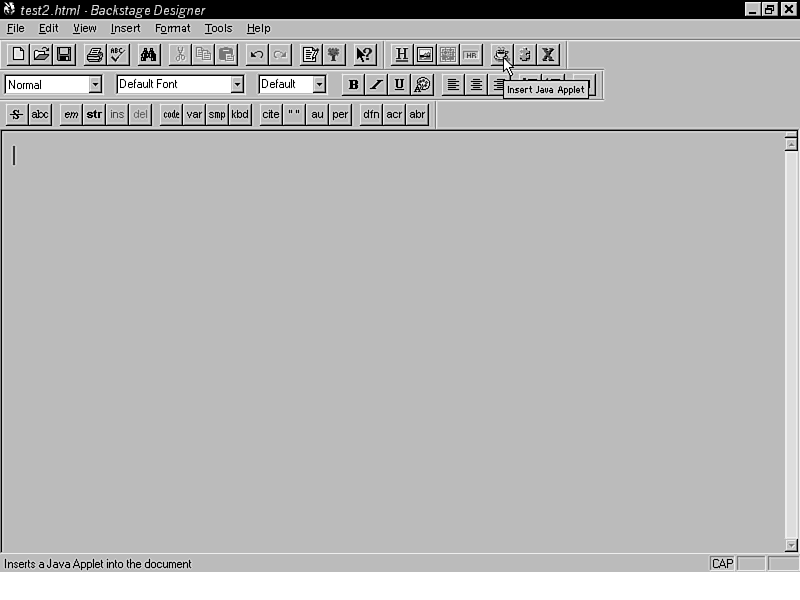
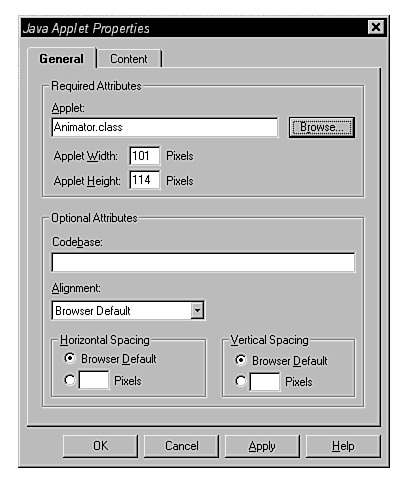
Backstage Designer offers an easier way to embed Java Applets than HoTMetaL Pro by giving the user a single dialog box with all the necessary options to completely install an applet. To begin, boot up Backstage Designer. If it is not already installed, go to the included CD-ROM and find the "mmbsd" directory that contains the install file. Double-click it and follow the installation instructions.
Before you proceed, save your document in the same directory as the applet you did in the preceding tutorial.
When using different applets, they all use the same basic structure. Read the accompanying documentation on the applet you wish to use closely, as sometimes they aren't too clear. Again, as mentioned earlier, there are many applets available for free downloading off the Internet. You can go to a search engine such as Yahoo (www.yahoo.com) and do a keyword search such as "Java Applets" to find some sites that have them. On the CD-ROM under the HTML directory is a file called index.html. View this file in your browser and you will see links that are not only related to Java, but to HTML and Shockwave as well.
When Real Audio came out, it was the first technology able to deliver streamed audio. That is, as the audio arrived at your computer over the Internet, you heard it. Previously, Audio files had to be downloaded completely on a user's system before they could hear what they had. Real Audio is used on many "Radio Stations" across the Internet as well as in some Intranets.
Unlike Shockwave, where only the MIME type for the data you wish to serve up needs to be added to a Web server (besides the fact that the end user needs to have the Shockwave plug-in installed), to offer Real Audio to prospective Web surfers requires that you install the Real Audio Server on your Web server. This is subject to certain compatibility issues as there are a wide variety of Web servers being used, the majority being UNIX-based Web servers. This is a minor issue really, because the people who plan on offering this kind of service won't have piecemeal systems and cheap Web server software.
Real Audio Servers require a lot of bandwidth and a fast server. On top of these requirements, you must purchase what is referred to as "streams." Each "stream" is used when someone dials up your Web site and starts to receive audio. For the entire time it takes to stream the audio from the server to the user's system, that stream is unusable by anyone else.
So, if you have a popular site, you may want to have anywhere from 25 to 75 or even a hundred "streams" available. You need even more streams if the audio being served up is of long duration, meaning that the stream will be occupied for a long period of time before being released for someone else to use.
That aside, Real Audio is expensive. Expect to pay anywhere from $4,000-$14,000 to get a Real Audio Server going (the cost often includes a year or two of technical support), whereas you can put an audio file into a Web page using Shockwave for free if you already have the Director Multimedia Studio.
It doesn't take long to see that it appears as if Real Audio really isn't an alternative to Shockwave. This is especially true when one considers that, interactively speaking, Real Audio is limited to synchronizing audio with specific HTML pages. What has more impact? A Director movie with animation, rollovers, and audio tied to user-triggered events or a Web page with background audio or a narrator speaking (that Shockwave can do better)? With Macromedia's new Shockwave Audio Streaming technology, Real Audio is suddenly archaic.
Additionally, it's possible to insert WAV and MIDI files into Web pages, so that a capable browser, such as Internet Explorer (HoTMetaL Pro 3 supports Internet Explorer-specific HTML) will play those files once loaded. Although you won't benefit from streaming technology, entire songs can be downloaded quickly via a MIDI file. All it takes is a little HTML and some imagination.
Earlier, it was mentioned that it's possible to embed audio sources into Internet Explorer. Internet Explorer also supports embedded inline AVIs. This means that you can embed a Video for Windows file into your Web page. For example, you could make an AVI file of the images used in the Animated GIF and Java examples and use it instead inside of Internet Explorer. All this requires is the software to create the AVI (such as Adobe Premier) and the associated HTML needed to embed the file.
Also, thanks to a number of plug-ins, you may also embed Quicktime movies and Mpeg movies as well. For Netscape, follow this link to get a host of third-party plug-ins:
http://www.home.netscape.com/comprod/power_pack_summary.html
Getting plug-ins for Internet Explorer is a little different. Whenever the browser encounters something that you need a plug-in for, it will ask if you want it to get the plug-in and install it for you (this requires a connection to the Internet).
Because these require the user to have the associated plug-ins installed in their Web browser, the native support for AVIs (if you are rendering an animation using some 3-D Animation package, you can render straight to AVI), Animated GIFs, and Java that Netscape and Internet Explorer have makes them better choices if you are looking for different ways to create the examples that you have been going through.
In summary, because more than a single Shockwave movie per page can yield undesirable results, the savvy designer can use an Animated GIF or Java applet or even an AVI for those other elements on a page. Because they load faster than the majority of Shocked movies, using these alternatives as a supplement to a movie can be a plus.
Here is a preview of what's coming up in the following chapters: