


Putting motion and sound on your Web page doesn't have to be for entertainment or for "energy" as many people see it. It may have a functional purpose. Imagine any situation where motion and sound can be used to demonstrate a concept that otherwise might be difficult to convey. This chapter gives you a few ideas and examples of Shockwave for useful purposes.
In any functional situation, you will need to consider whether or not the Shockwave addition is practical. If the purpose can be achieved through a static image, you might decide not to use an animation. Download time should be the main factor in your decision. If your viewers are willing to wait, Shockwave could be a valuable enhancement to your functional Web site.What you'll do in this chapter:
As an art major in college, "form versus function" was a common topic in a ceramics course I took. The idea was to be aware of the balance between the usefulness of an object and its aesthetic appearance. Using the ceramics example, I could create a vase that looks beautiful: graceful shape, flawless construction, creative surface glaze. But perhaps my design incorporated a series of shapes cut from the side of the vase. The vase would lose quite a bit of functionality because it couldn't hold water. Depending on my intentions, this may work or this may be a problem.
Certain objects are best left on the functional side, while other objects have much more freedom to be artistic. For example, a fire extinguisher should remain functional. If it's not recognizable as a fire extinguisher and doesn't work exactly as a fire extinguisher should, it won't render its safety purpose in a dangerous situation. On the other hand, if a bowl were left purely functional, it would be fairly boring. There is much more freedom to be creative because the bowl can be various shapes, sizes, or colors.
How does this relate to Shockwave? Perhaps more generally, it has to do with your Web page design. The challenge is to create an Internet site that is both functional and visually pleasing. Shockwave applications can fit into both situations. Chapter 6 "Liven Up a Page: Animations for Fun," begins with a few simple animations with relatively limited functional purposes. The next two examples lean more heavily on the functional side.
Any school teacher will tell you that different people learn in different ways. Some learn best by reading directions, some learn by watching or listening, and some learn best by doing something. Through multimedia, Shockwave provides more opportunities for different learning methods.
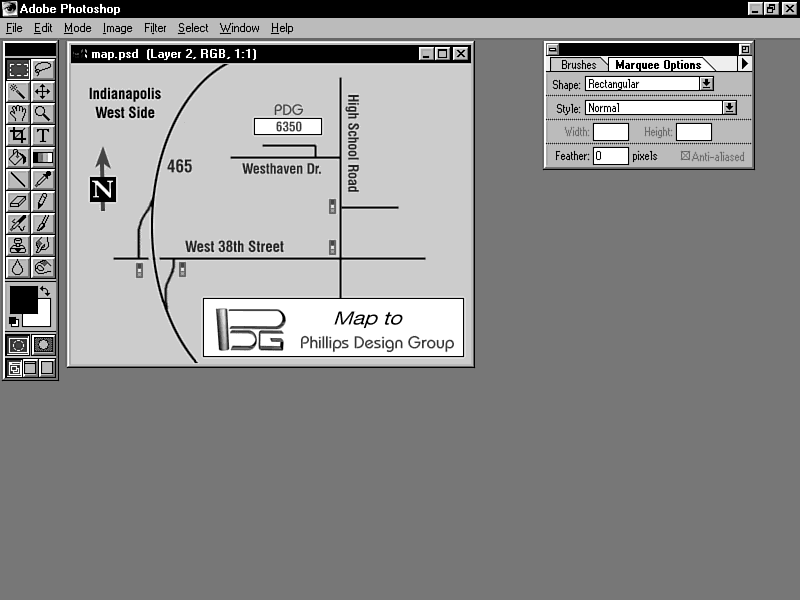
This example is a street map with an animated dot that traces the path to our company. Words describe the steps while the dot moves. People who have difficulty with maps may find this to be valuable because it shows exactly how to get to the destination. The steps of this movie are fairly simple, and no fancy tricks are added because it's meant to be functional. In Internet terms, functional usually means easy to understand quickly and compact for fast downloading time.
Scanning an actual street map and using it for the Shocked map here is a possibility, but this isn't done for a couple of reasons. First, it includes a lot of unnecessary information (side streets and so on) that may cloud the simplicity necessary for this example. Second, the map here uses a plain, solid color background, which compresses very well. For more details about compression, see the following note entitled "Compression." Figure 7.1 shows the map in Photoshop.
Figure 7.1 : The map created in Photoshop.
| Compression |
This chapter doesn't describe the exact process of compression, but here's the concept behind it. There is a lot of repetitive information stored in a normal uncompressed file. The compression process takes that repetitive information and simplifies it. For example, a list of pixels might contain information that defines the first five pixels to be blue. Uncompressed, this would be: pixel one blue, pixel two blue, pixel three blue, pixel four blue, pixel five blue. Compression might reduce this to: pixels one through five blue. You can see, then, why areas of flat color compress much better than dithered areas with various pixel colors-because there is much more repetitive information that can be compressed. So, when working in RGB (Red, Green, Blue), how do you select a color that will become a flat, undithered color when converted to 8-bit? My method is to open an 8-bit file in Photoshop, and then choose Color Table from the Mode menu. Pick a color from the palette that you would like to use and write down the RGB color information for it. The tan color I used in the map was Red-204, Green-204, Blue-153. Then, as you work in RGB mode, you can create a custom color swatch or just type in those numbers from the color picker any time you need the color. |
The animation moves a small red dot along the streets while a short description describes where to turn left and so on. To keep the file size small, use Director's vector tool and text tools so you won't need to create more bit maps.
The red dot is easy to create as a vector graphic using Director's filled circle tool. To animate it along the street was a bit tedious. Straight streets are simple. Put one dot at the beginning of the street and one at the end several frames later, then use the In-Between linear command.
But what about curved streets? Route 465 on this map curves around and has a little exit ramp that the red dot follows. Director offers an In-Between special command that can create curved paths, but it's difficult to be completely accurate with it. The procedure is to put red dots at key locations. You might put a dot every ten frames at a position on the street. Then, select all of the frames with the key positions and choose In-Between Special from the Score menu and select Location. By adjusting the slider in the path box, you can specify how curved the path should be. Good luck. You'll probably have to settle for a path that's close but not exact. Then go frame by frame and adjust the dot's position exactly on the path you want.
As the dot reaches different steps in the directions, I had text appear to describe the event. You just use Director's text tool to create this text so there's no need for bit maps of the text (which would add file size).
The text tool in Director 4 creates aliased-edge text, which is not always pleasant to look at. However, Director 5 has solved this by offering anti-aliased text with its text tool. You should also be aware that Director 4's text tool must use a particular font installed on the system, so you will need to be careful in selecting which font you use. If the viewer's system does not have the same font installed, a different one will be substituted. Director 5's field tool works the same way, but the version 5 text tool does not require font information from the end users system.
This is a relatively large image, but because the background color is flat, it gets crunched to a final size of 13K. Not too bad. One line to your HTML document, and it's ready to go.
<embed src="/shock/map.dcr" height=300 width=400>
Figure 7.2 shows the movie in a Web page. In the preceding example, the map.dcr file was put in a different directory than the HTML file. I could have put in the entire HTTP address if I wanted to, but because it was one directory below my HTML file, I didn't need the whole location. So my two file locations might look like this:
Figure 7.2 : The finished map as seen by the browser.
HTML file:  http://www.pdgroup.com/roadmap.html
.DCR file:  http://www.pdgroup.com/shock/map.dcr
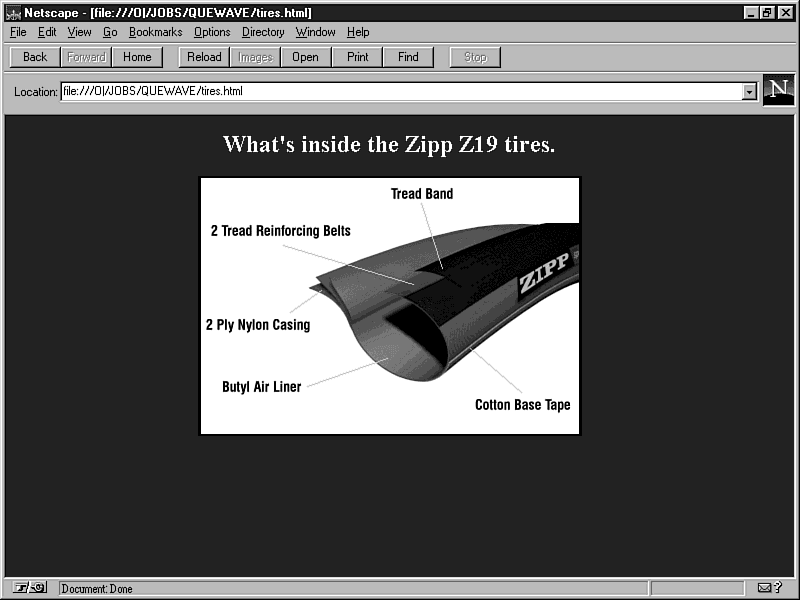
This example shows the layers of a bicycle tire being peeled away with labels for the different materials. For now, the animation just waits for five seconds, then repeats. Chapter 9 "Rollovers and Button Clicks" talks more about using other methods for repeating using interaction.
The tire animation is created in Autodesk 3D Studio. The tire is modeled three-dimensionally, and the layers are animated to peel away. Then 12 frames are exported. Due to the physical size of this particular image, any more than 10 or 12 frames would become too big for a Shockwave movie. Of course, "too big" is relative to each person. You might be willing to download a 500K file, while someone else might be willing to wait for only a 100K file. We could have used a smaller image and rendered more frames, but 12 is enough to show the animation (figure 7.3).
Figure 7.3 : The individual frames exported from 3D Studio.
This example uses a custom palette. An adaptive palette is created in Photoshop, and each frame uses the same palette. It's important that each image uses the exact same palette. If each image had its own unique palette, Director would need to load all 12 palettes and switch between them (which would look awful as an animation, because palette changes usually cause a screen flash). You'll get to see options in the HTML syntax to specify how the browser should handle the custom palette if the user is in 256-color mode.
The techniques of animating in 3D Studio won't be discussed here. Each frame of the animation is exported from 3D Studio as bit-mapped images. The actual process in Director is very simple, then, because each frame was already created.
As you import the 12 images, Director asks if you also would like to import the custom palette. In Director 4, this will happen only if you run Director with your system set in 256 color mode. Director 5 will import the palette while running in any color depth, though the cast members will be 16-bit if you are running in high color and will need to be converted using the "transform bit map" command.
Text labels for the diagram were created and imported as bit-map cast members. The text could have also been created using Director's text tool.
If you align the 12 images in order in the cast window, you can easily move them to the score by selecting all 12 and holding the Alt key down while you drag them to the score window. This will place them in the first 12 frames in identical positions so you won't need to adjust each one to get them lined up exactly.
With only 12 frames in the animation, the tempo is set to 10 frames per second. A simple transition dissolves each of the text images onto the screen. Figure 7.4 shows the various parts in Director.
Figure 7.4 : The tire movie in Director.
After compressing the movie with Afterburner, enter the embed statement with the rest of your HTML document.
<embed src="tires.dcr" height=260 width=384>
Figure 7.5 shows the Shocked Web page with the tire animation.
Figure 7.5 : The Shocked tire animation.
You can also use the palette command in the embed statement to control how the browser handles the custom palette for a system running in 256 color mode. To ignore the custom palette and use the browser's system palette, set the movie palette to "background" as follows:
<embed src="tires.dcr" height=260 width=384 palette=background>
Palette=background is the default mode. If no palette statement is issued, the browser will use its palette to simulate the movie's colors. If you have specific colors that you absolutely want displayed with your own custom palette, you can specify the movie palette to be the active palette, as in the following example:
<embed src="tires.dcr" height=260 width=384 palette=foreground>
You should be aware that setting your custom palette to be the active palette will alter the rest of the screen for someone running in 256-color mode.
A current debate is trying to predict whether Web visitors will soon have to pay for access to certain Web sites, or if advertisers will cover costs for the developer by renting space on the Web page. If advertisement is the answer, this example could be quite common.
Many sites contain banners with advertisements for other Web sites, products, or services. Shockwave could easily be used for this functional purpose. Our example is a simple demonstration of how you could advertise your company or provide a place for other companies to advertise on your Web site.
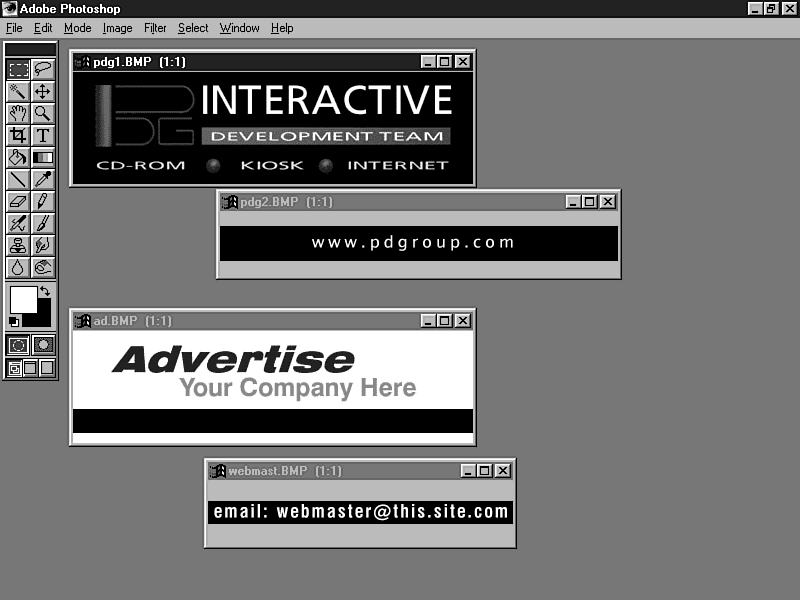
Our example has only two different "scenes" in the advertisement. One is an advertisement for the company PDG, and the other is a blank advertisement to show viewers that they may advertise their company in this space.
The PDG scene displays the logo and some text that was done in two steps that may be animated to draw attention to the banner. The second scene was also done in two parts to animate the advertisement. Figure 7.6 shows the graphics that were created. If you offered this space for other companies to advertise, they would probably supply you with graphics that they would like displayed.
Figure 7.6 : Graphics used in the advertisement banner.
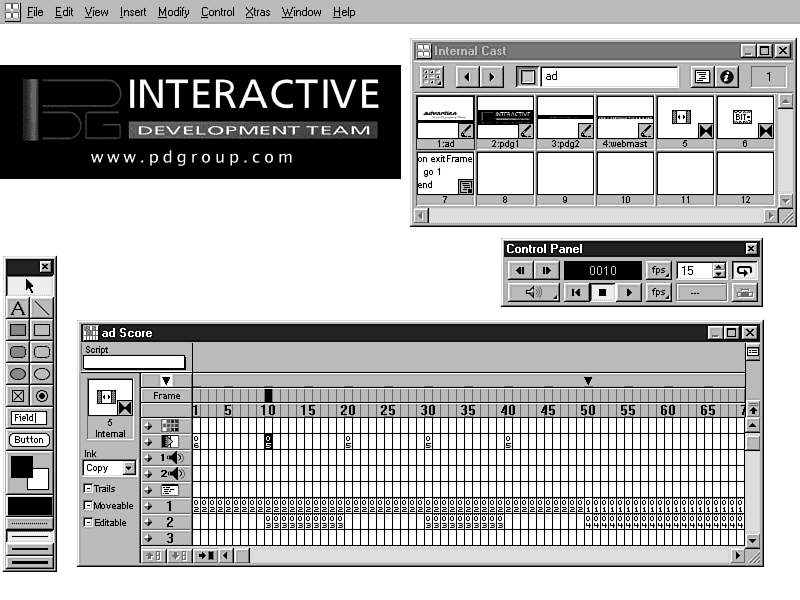
You can be creative in how you animate the banner. In my example, I used a simple transition within the PDG scene to alternate between the Web address and the other text. You can see in the score how I put the Web address graphic on top of the PDG image and alternated on and off every ten frames. I used a horizontal transition at each changing point (see figure 7.7).
Figure 7.7 : Animating the graphics in Director.
The second scene displays the graphic that says, "Advertise your company here." Over that, I animated the email address of the Web master so that it moves in from off the screen using an in-between linear process. These animations are not essential to the banner, but they add almost no file size and are worth using to draw attention to the advertisement.
Figure 7.8 shows the banner as seen on a Web page. The DCR file size for this example is less than 15K, but it only contains graphics for two scenes. You might have ten companies wanting to advertise on your Web page, which could make the Shockwave movie too large. By reducing the physical size of the movie, you might solve this problem.
Figure 7.8 : A Web page using the advertising banner.
The HTML code is as follows:
<embed src="ad.dcr" height=112 width=400>
The compressed tire peel-away movie turned out to be 144K. Pretty big for something that doesn't do very much. The tire example can be understood almost as well by using a static image with the text labels. But you can see the potential for other, more complex diagrams-a technical drawing showing various pieces being put together or taken apart, an animation of an abstract process, and so on. Just about anything that's understood better using motion would be ideal for Shockwave.
These two examples don't use sound; however, you might find a way to use sound to help convey your ideas. A musical group would find sound very functional in demonstrating their songs over the Web. Or, audio may be just another enhancement that combines the educational movie with some fun elements.
So far, you've seen only noninteractive movies. In Part III, "Adding Interactivity" you learn the interactive aspects of Shockwave. The options for enhanced function then increase because the user can make decisions and see results. Chapter 11, "Using Shockwave for Data," takes functionality even further with Shockwave movies that perform advanced calculations and sort information.
You may decide that your Web site should be entirely functional, or you may decide it should be solely for entertainment. Whatever your purpose is, you can adapt all of the examples from this book to meet your needs. What's next? One more chapter in this part will show a few more animation examples, then you can progress to more advanced topics, such as: