


Back in Chapter 7 "Making the Jump to Hyperspace: Adding
Links," I showed you how to use hypertext links to add a
semblance of interactivity to your pages. However, beyond this
basic level of interaction lies a whole genre of Web pages called
forms.
| Where, Oh Where Are This Chapter's Examples? |
Because the book's disk had already shipped to production by the time I wrote this chapter, none of these form examples will be on the disk. However, all is not lost. I'll put all the examples on my Web site and you'll be able to pick them up from there. Here's where to go: |
Most modern programs will toss a dialog box in your face if they need to extract some information from you. For example, selecting a program's "Print" command will most likely result in some kind of "Print" dialog box showing up. The purpose of this dialog box will be to pester you for information such as the number of copies you want, the pages you want to print, and so on.
A form is simply the Web-page equivalent of a dialog box. It's a page populated with text boxes, drop-down lists, and command buttons to get information from the reader. For example, the picture below shows a form from my Web site. This is a "guest book" that people "sign" when they visit my Web abode. Although most new browsers can handle forms, some older browsers may choke on them.
Of course, guest books are only the beginning of what you can do with forms. If you put out a newsletter or magazine, you can use forms to gather information from subscribers; if your Web site includes pages with restricted access, you can use a form to get a person's user name and password for verification; if you have information in a database, you can use a form to have people specify what type of information they want to access.
You create forms using special HTML tags, and it's pretty easy to set up a form. (The problem, however, is getting hold of the information that the reader types into the form. Unfortunately, this requires some programming, so it's well beyond the scope of a humble book such as this. So what's a poor, programming-challenged Web wizard to do? Check out the section titled "Oh Say, Can You CGI?" later on in this chapter.)
To get started, enter the <FORM> and </FORM> tags. These can be inserted anywhere inside the body of the page. You place all the other form-related tags (which I'll show you in the rest of this chapter) between <FORM> and </FORM>.
The <FORM> tag always includes a couple of extra goodies that tell the Web server how to process the form. Here's the general format:
<FORM ACTION="url" METHOD=METHOD>
</FORM>
Here, the ACTION attribute tells the browser where to send the form's data. This will almost always be a program (or script, as they're often called) that processes the data and then performs some kind of action (hence the name). The url part is the URL of the Web page that contains the program.
The METHOD attribute tells the browser how to send the form's data to the URL specified with ACTION. You have two choices here for METHOD: POST and GET. Although both work in most cases, GET tends to cause errors in large forms. Therefore, you should always use the POST method.
Let's bring all this gobbledygook down to earth with a concrete example. You can test your forms by using one of the NCSA's public scripts. There's one for the POST method and one for the GET method. Here's how to use the POST method version:
<FORM ACTION="http://hoohoo.ncsa.uiuc.edu/htbin-post/post-query" METHOD=POST>
Here's how to use the GET method version:
<FORM ACTION="http://hoohoo.ncsa.uiuc.edu/htbin/query" METHOD=GET>
You can try this out once you build yourself a working form. Speaking of which, the next few sections take you through the basic form elements.
Most dialog boxes, as you probably know from hard-won experience, have an OK button. Selecting this button says, in effect, "All right, I've made my choices. Now go put everything into effect." Forms also have command buttons, and they come in two flavors: "submit" buttons and "reset" buttons.
A submit button (I'll talk about the reset button in the next section) is the form equivalent of an OK dialog box button. When the reader clicks on the submit button, the form data is shipped out to the program specified by the <FORM> tag's ACTION attribute. Here's the simplest format for the submit button:
<INPUT TYPE=SUBMIT>
As you'll see, most form elements use some variation on the <INPUT> tag and, as I said before, you place all these tags between <FORM> and </FORM>. In this case, the TYPE=SUBMIT attribute tells the browser to display a command button labeled Submit Query (or, on some browsers, Submit or Send). Note that each form can have just one submit button.
If the standard Submit Query label is a bit too stuffy for your needs, you can make up your own label, as follows:
<INPUT TYPE=SUBMIT VALUE="Label">
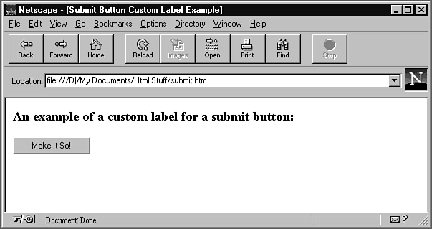
Here, Label is the label that will appear on the button. In the following example (SUBMIT.HTM), I've inserted a submit button with the label "Make It So!", and the following figure shows how it looks in a browser.
<HTML>
<HEAD>
<TITLE>Submit Button Custom Label Example</TITLE>
</HEAD>
<BODY>
<H3>An example of a custom label for a submit button:</H3>
<FORM ACTION="http://hoohoo.ncsa.uiuc.edu/htbin-post/post-query" METHOD=POST>
<INPUT TYPE=SUBMIT VALUE="Make It So!">
</FORM>
</BODY>
</HTML>
A submit button with a custom label.
If you plan on creating fairly large forms, you can do your readers a big favor by including a reset button somewhere on the form. A reset button clears all the data from the form's fields and re-enters any default values that you specified in the fields. (I'll explain how to set up default values for each type of field as we go along.) Here's the tag you use to include a reset button:
<INPUT TYPE=RESET>
This creates a command button labeled "Reset." Yes, you can create a custom label by tossing the VALUE attribute into the <INPUT> tag, as in the following example:
<INPUT TYPE=RESET VALUE="Start From Scratch">
For simple text entries, such as a person's name or address, use text boxes. These are just rectangles within which the reader can type whatever he or she likes. Here's the basic format for a text box:
<INPUT TYPE=TEXT NAME="Field Name">
In this case, Field Name is a name you assign to the field that's unique among the other fields in the form. For example, to create a text box the reader can use to enter their first name (let's call it "First"), you'd enter the following:
<INPUT TYPE=TEXT NAME="First">
For clarity, you'll also want to precede each text box with a label that tells the reader what kind of information to type in. For example, the following line precedes a text box with "First Name:" so the reader knows to type in their first name:
First Name: <INPUT TYPE=TEXT NAME="First">
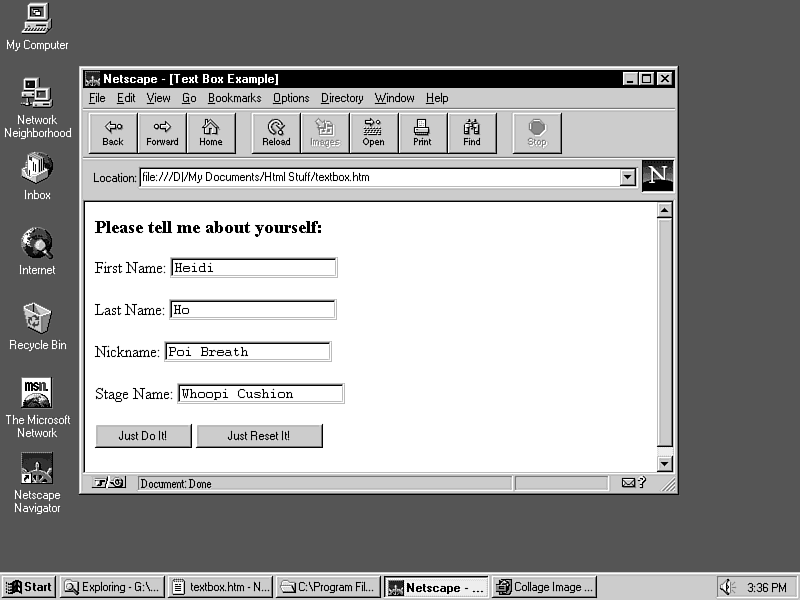
Here's some HTML code (TEXTBOX.HTM) that utilizes a few text boxes to gather some information from the reader:
<HTML>
<HEAD>
<TITLE>Text Box Example</TITLE>
</HEAD>
<BODY>
<H3>Please tell me about yourself:</H3>
<FORM ACTION="http://hoohoo.ncsa.uiuc.edu/htbin-post/post-query" METHOD=POST>
First Name: <INPUT TYPE=TEXT NAME="First">
<P>
Last Name: <INPUT TYPE=TEXT NAME="Last">
<P>
Nickname: <INPUT TYPE=TEXT NAME="Nickname">
<P>
Stage Name: <INPUT TYPE=TEXT NAME="Stage">
<P>
<INPUT TYPE=SUBMIT VALUE="Just Do It!">
<INPUT TYPE=RESET VALUE="Just Reset It!">
</FORM>
</BODY>
</HTML>
The following figure shows how it looks in Netscape:
If you run this form (that is, if you select the Just Do It! button), the data is sent to the NCSA's public server. Why? Because I included the following line:
<FORM ACTION="http://hoohoo.ncsa.uiuc.edu/htbin-post/post-query" METHOD=POST>
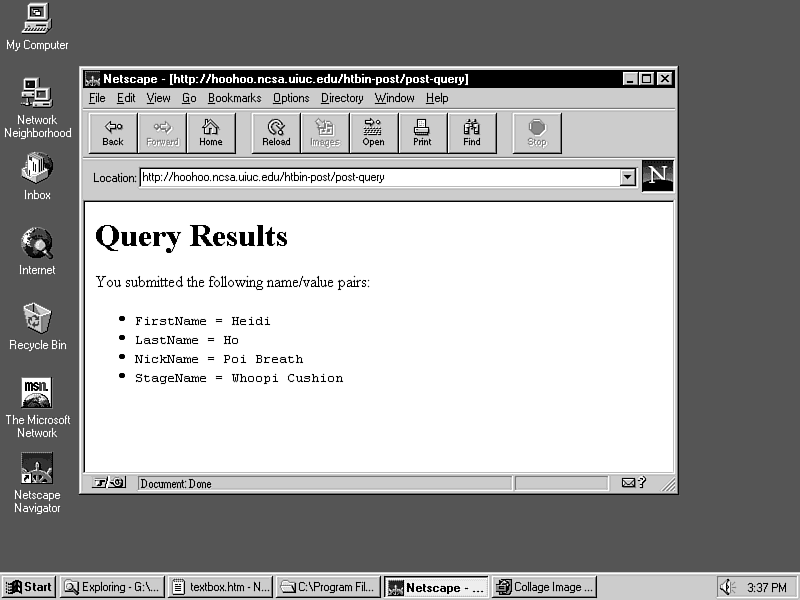
You'd normally replace this ACTION attribute with one that points to a program that will do something to the data. You don't have such a program right now, so it's safe just to use the NCSA's server for testing purposes. Remember that this server doesn't do much of anything except send your data back to you. If everything comes back okay (i.e., there are no error messages), then you know your form is working properly. Just so you know what to expect, the following figure shows the page that gets returned to you. Notice how the page shows the names of the fields followed by the value the user entered.
An example of the page that's returned when you send the form data to the NCSA public server.
Text boxes also come with the following bells and whistles:
Setting the default value If you'd like to put some pre-fab text into the field, include the VALUE attribute in the <INPUT> tag. For example, suppose you want to know the URL of the reader's home page. To include http:// in the field (since most URLs begin with this), you'd use the following tag:
<INPUT TYPE=TEXT NAME="URL" VALUE="http://">
Setting the size of the box To determine the length of the text box, use the SIZE attribute. (Note that this attribute affects only the size of the box, not the length of the entry; for the latter, see the MAXLENGTH attribute, below.) For example, the following tag displays a text box that's 40 characters long:
<INPUT TYPE=TEXT NAME="Address" SIZE=40>
Limiting the length of the text In a standard text box, the reader can type away until their fingers are numb. If you'd prefer to restrict the length of the entry, use the MAXLENGTH attribute. For example, the following text box is used to enter a person's age and restricts the length of the entry to 3 characters:
<INPUT TYPE=TEXT NAME="Age" MAXLENGTH=3>
If you want to give your readers lots of room to type their hearts out, or if you need multi-line entries (such as an address), you're better off using a text area than a text box. A text area is also a rectangle that accepts text input, but text areas can display two or more lines at once. Here's how they work:
<TEXTAREA NAME="Field Name" ROWS=TotalRows COLS=TotalCols WRAP>
</TEXTAREA>
Here, Field Name is a unique name for the field, TotalRows specifies the total number of lines displayed, and TotalCols specifies the total number of columns displayed. The WRAP attribute tells the browser to wrap the text onto the next line whenever the user's typing hits the right edge of the text area. (The WRAP attribute is supported by most browsers, but not all of them.) Note, too, that the <TEXTAREA> tag requires the </TEXTAREA> end tag. (If you want to include default values in the text area, just enter them-on separate lines, if necessary-between <TEXTAREA> and </TEXTAREA>.)
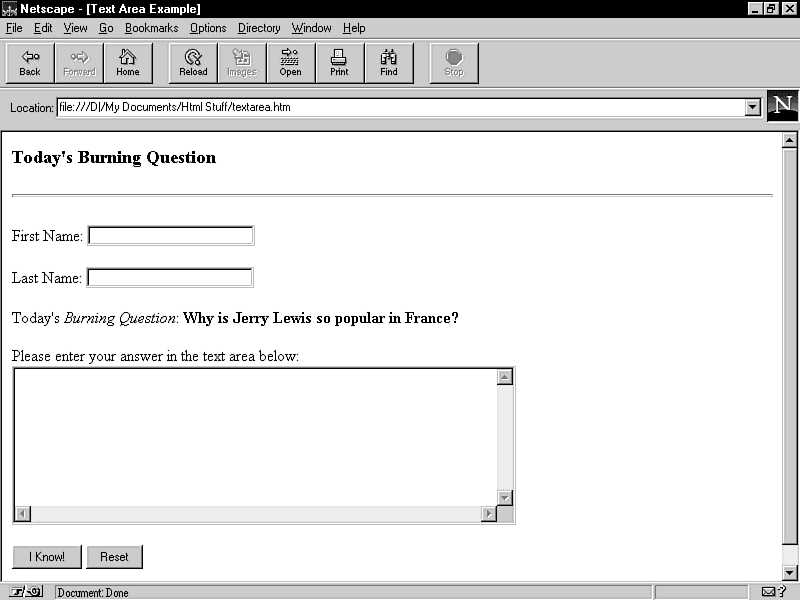
The following HTML tags (TEXTAREA.HTM) show a text area in action, and the following figure shows how it looks in a browser.
<HTML>
<HEAD>
<TITLE>Text Area Example</TITLE>
</HEAD>
<BODY>
<H3>Today's Burning Question</H3>
<HR>
<FORM ACTION="http://hoohoo.ncsa.uiuc.edu/htbin-post/post-query" METHOD=POST>
First Name: <INPUT TYPE=TEXT NAME="First Name">
<P>
Last Name: <INPUT TYPE=TEXT NAME="Last Name">
<P>
Today's <I>Burning Question</I>: <B>Why is Jerry Lewis so popular in France?</B>
<P>
Please enter your answer in the text area below:
<BR>
<TEXTAREA NAME="Answer" ROWS=10 COLS=60 WRAP>
</TEXTAREA>
<P>
<INPUT TYPE=SUBMIT VALUE="I Know!">
<INPUT TYPE=RESET>
</FORM>
</BODY>
</HTML>
If you want to elicit yes/no or true/false information from your readers, check boxes are a lot easier than having the user type in the required data. Here's the general format for an HTML check box:
<INPUT TYPE=CHECKBOX NAME="Field Name">
As usual, Field Name is a unique name for the field. You can also add the attribute CHECKED to the <INPUT> tag, which tells the browser to display the check box "pre-checked." Here's an example:
<INPUT TYPE=CHECKBOX NAME="Species" CHECKED>Human
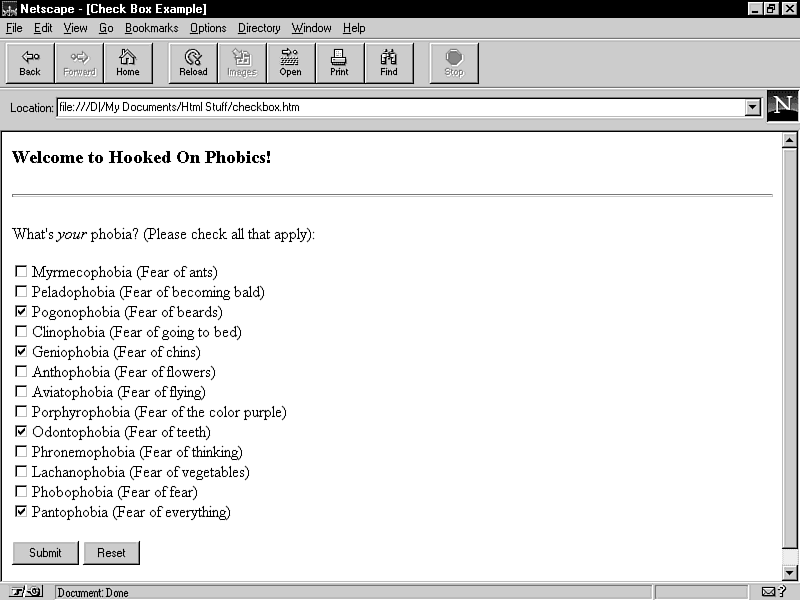
Notice in the above example that I placed some text beside the <INPUT> tag. This text is used as a label that tells the reader what the check box represents. Here's a longer example (CHECKBOX.HTM) that uses a whole mess of check boxes. The following figure shows how it looks (I've checked a few of the boxes so you can see how they appear):
<HTML>
<HEAD>
<TITLE>Check Box Example</TITLE>
</HEAD>
<BODY>
<H3>Welcome to Hooked On Phobics!</H3>
<HR>
<FORM ACTION="http://hoohoo.ncsa.uiuc.edu/htbin-post/post-query" METHOD=POST>
What's <I>your</I> phobia? (Please check all that apply):
<P>
<INPUT TYPE=CHECKBOX NAME="Ants">Myrmecophobia (Fear of ants)<BR>
<INPUT TYPE=CHECKBOX NAME="Bald">Peladophobia (Fear of becoming bald)<BR>
<INPUT TYPE=CHECKBOX NAME="Beards">Pogonophobia (Fear of beards)<BR>
<INPUT TYPE=CHECKBOX NAME="Bed">Clinophobia (Fear of going to bed)<BR>
<INPUT TYPE=CHECKBOX NAME="Chins">Geniophobia (Fear of chins)<BR>
<INPUT TYPE=CHECKBOX NAME="Flowers">Anthophobia (Fear of flowers)<BR>
<INPUT TYPE=CHECKBOX NAME="Flying">Aviatophobia (Fear of flying)<BR>
<INPUT TYPE=CHECKBOX NAME="Purple">Porphyrophobia (Fear of the color purple)<BR>
<INPUT TYPE=CHECKBOX NAME="Teeth">Odontophobia (Fear of teeth)<BR>
<INPUT TYPE=CHECKBOX NAME="Thinking">Phronemophobia (Fear of thinking)<BR>
<INPUT TYPE=CHECKBOX NAME="Vegetables">Lachanophobia (Fear of vegetables)<BR>
<INPUT TYPE=CHECKBOX NAME="Fear">Phobophobia (Fear of fear)<BR>
<INPUT TYPE=CHECKBOX NAME="Everything">Pantophobia (Fear of everything)<BR>
<P>
<INPUT TYPE=SUBMIT VALUE="Submit">
<INPUT TYPE=RESET>
</FORM>
</BODY>
</HTML>
Instead of yes/no choices, you might want your readers to have a choice of three or four options. In this case, radio buttons are your best bet. With radio buttons, the user gets two or more options, but they can pick only one. Here's the general format:
<INPUT TYPE=RADIO NAME="Field Name" VALUE="Value">
Field Name is the usual field name, except in this case you supply the same name to all the radio buttons. That way, the browser knows which buttons are grouped together. Value is a unique text string that specifies the value of the option when it's selected. In addition, you can also add CHECKED to one of the buttons to have the browser activate the option by default. The following HTML document (RADIOBTN.HTM) puts a few radio buttons through their paces, as shown in the following figure.
<HTML>
<HEAD>
<TITLE>Radio Button Example</TITLE>
</HEAD>
<BODY>
<H3>Survey</H3>
<HR>
<FORM ACTION="http://hoohoo.ncsa.uiuc.edu/htbin-post/post-query" METHOD=POST>
Which of the following best describes your current salary level:
<UL>
<INPUT TYPE=RADIO NAME="Salary" VALUE="Salary1" CHECKED>Below the poverty line<BR>
<INPUT TYPE=RADIO NAME="Salary" VALUE="Salary2">Living wage<BR>
<INPUT TYPE=RADIO NAME="Salary" VALUE="Salary2">Comfy<BR>
<INPUT TYPE=RADIO NAME="Salary" VALUE="Salary2">DINK (Double Income, No Kids)<BR>
<INPUT TYPE=RADIO NAME="Salary" VALUE="Salary2">Rockefellerish<BR>
</UL>
Which of the following best describes your political leanings:
<UL>
<INPUT TYPE=RADIO NAME="Politics" VALUE="Politics1" CHECKED>So far left, I'm right<BR>
<INPUT TYPE=RADIO NAME="Politics" VALUE="Politics2">Yellow Dog Democrat<BR>
<INPUT TYPE=RADIO NAME="Politics" VALUE="Politics3">Right down the middle<BR>
<INPUT TYPE=RADIO NAME="Politics" VALUE="Politics4">Country Club Republican<BR>
<INPUT TYPE=RADIO NAME="Politics" VALUE="Politics5">So far right, I'm left<BR>
</UL>
<P>
<INPUT TYPE=SUBMIT VALUE="Submit">
<INPUT TYPE=RESET>
</FORM>
</BODY>
</HTML>
A form that uses radio buttons for multiple-choice input.
Radio buttons are a great way to give your readers multiple choices, but they get unwieldy if you have more than about five or six options. For longer sets of options, you're better off using lists, or selection lists as they're called in the HTML world. Selection lists are a wee bit more complex than the other form tags we've looked at, but not by much. Here's the general format:
<SELECT NAME="Field Name" SIZE=Items>
<OPTION>First item text</OPTION>
<OPTION>Second item text</OPTION>
<OPTION>And so on...</OPTION>
</SELECT>
As I'm sure you've guessed by now, Field Name is the unique name for the list. For the SIZE attribute, Items is the number of items you want the browser to display. If you omit SIZE, the list becomes a drop-down list. If SIZE is 2 or more, the list becomes a rectangle with scroll bars for navigating the choices. Also, you can insert the MULTIPLE attribute into the <SELECT> tag. This tells the browser to allow the user to select multiple items from the list.
Between the <SELECT> and </SELECT> tags are the <OPTION></OPTION> tags; these define the list items. If you add the SELECTED attribute to one of the items, the browser selects that item by default.
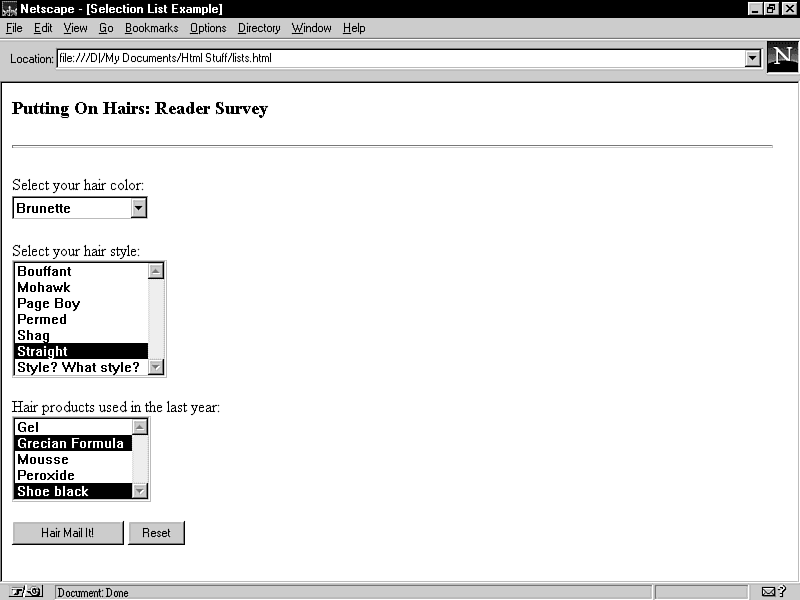
To get some examples on the table, the following document (LISTS.HTM) defines no less than three selection lists. The following figure shows what the Netscape browser does with them.
<HTML>
<HEAD>
<TITLE>Selection List Example</TITLE>
</HEAD>
<BODY>
<H3>Putting On Hairs: Reader Survey</H3>
<HR>
<FORM ACTION="http://hoohoo.ncsa.uiuc.edu/htbin-post/post-query" METHOD=POST>
Select your hair color:<BR>
<SELECT NAME="Color">
<OPTION>Black</OPTION>
<OPTION>Blonde</OPTION>
<OPTION SELECTED>Brunette</OPTION>
<OPTION>Red</OPTION>
<OPTION>Something neon</OPTION>
<OPTION>None</OPTION>
</SELECT>
<P>
Select your hair style:<BR>
<SELECT NAME="Style" SIZE=7>
<OPTION>Bouffant</OPTION>
<OPTION>Mohawk</OPTION>
<OPTION>Page Boy</OPTION>
<OPTION>Permed</OPTION>
<OPTION>Shag</OPTION>
<OPTION SELECTED>Straight</OPTION>
<OPTION>Style? What style?</OPTION>
</SELECT>
<P>
Hair products used in the last year:<BR>
<SELECT NAME="Products" SIZE=5 MULTIPLE>
<OPTION>Gel</OPTION>
<OPTION>Grecian Formula</OPTION>
<OPTION>Mousse</OPTION>
<OPTION>Peroxide</OPTION>
<OPTION>Shoe black</OPTION>
</SELECT>
<P>
<INPUT TYPE=SUBMIT VALUE="Hair Mail It!">
<INPUT TYPE=RESET>
</FORM>
</BODY>
</HTML>
A form with a few selection list examples.
All this form folderol is fine, but what good is a form if it doesn't really do much of anything? That is, why bother building a fancy form if you have no way to get the data? Unfortunately, as I mentioned earlier, grabbing form data and manipulating it is a programmer's job. Specifically, you have to use something called the Common Gateway Interface, or CGI for short. CGI is a method of transferring form data in a manner that makes it relatively easy to incorporate into a program and then massage it all you need. Easy, that is, if you have the requisite nerdskills.
Well, I may not have room to teach you how to program forms, and you may not have the inclination in any case, but that doesn't mean you're totally stuck. The next few sections give you some ideas for getting your forms to do something useful.
Many people want to add simple guest books and feedback mechanisms to their sites, but they don't want to have to bother with the programming aspect. So, in response to their customers' needs, most Web hosting providers make some simple CGI scripts (programs) available to their customers. For example, one common type of script grabs form data, extracts the field names and values, and sends them to an e-mail address you specify. Check with the provider's administrator or webmaster to see if they have any CGI scripts that you can use. And if you haven't settled on a provider yet, you should ask in advance if they have CGI programs available.
A more expensive alternative is to hire the services of a CGI wizard to create a custom program for you. Most Web hosting providers will be only too happy to put together a nice little program tailored to your needs. There's also no shortage of hired guns on the Web who'll create programs to your specifications. As a starting point, check out some of the resources mentioned in the next section.
If your service provider or Web hosting provider
doesn't have ready-to-run CGI programs that you can use, there's
no shortage of sites on the Net that are only too happy to either
teach you CGI or supply you with programs. This section runs through
a list of some of these sites:
| Mind Your CGI Program Ps and Qs |
Bear in mind that if you grab a program or two to use, you'll need to contact your service provider's administrator to get the full lowdown on how to set up the program. In most cases, the administrator will want to examine the program code to make sure it's up to snuff. If it passes muster, they'll put it in a special directory (usually called cgi-bin) and you can then refer to the program in your form. |
LPAGE Internet Services Home Page CGI tutorials, a "CGI school," example programs, and even a guest-book program that you can use simply by adding a couple of links to your page! (You have to register with LPAGE for the latter; it doesn't cost anything, but LPAGE asks that businesses sign on as sponsors for the guest book to help defray the costs.) Here's the URL of the LPAGE home page:
http://lpage.com/cgi/
Matt's Script Archive Matt Wright has written tons of CGI scripts and graciously offers them gratis to the Web community. He has scripts for a guest book, random link generator, animation, and lots more. It's a great site and a must for would-be CGI mavens. Here's the URL:
http://www.worldwidemart.com/scripts/
NCSA - The Common Gateway Interface This is the place on the Web for CGI info. NCSA (the same folks who made the original Mosaic browser) has put together a great collection of tutorials, tips, and sample programs. Here's the locale:
http://hoohoo.ncsa.uiuc.edu/cgi/
Usenet A great spot for CGI tips and tricks, or just to hang around with fellow Web programmers, is the following Usenet newsgroup:
comp.infosystems.www.authoring.cgi.
Windows CGI 1.1 Description Some Web servers run on Windows machines, so you can use Visual Basic to program CGI. This site was put together by Robert Denny, the fellow who invented Windows CGI. It describes Windows CGI, has example programs, and more. Here's where to find it:
http://www.city.net/win-httpd/httpddoc/wincgi.htm
Yahoo's CGI Index A long list of CGI-related resources. Many of the links have either CGI how-to info or actual programs you can use. Here's where to go:
http://www.yahoo.com/Computers_and_Internet/Internet/ World_Wide_Web/CGI_Common_Gateway_Interface/
This chapter introduced you to the fabulous world of forms. Here's a fond look back at what great fun we had (!):