![]()
![]()
![]()
In the first section of this book, you learned the basics about Index Server, Internet Information Server, document indexing, queries, and result sets. In Chapter 3, "System Requirements," and Chapter 4, "Site Design Considerations," you learned the system requirements for installing and running Index Server as well as some site-design issues to consider when installing Index Server. Now you're ready to download and install the latest release of Index Server.
Microsoft maintains a Web page dedicated to Index Server where you can download the latest release of Index Server as well as find additional information (such as Index Server's latest features, system requirements, documentation, and downloading instructions). For developers, there are links for downloading the latest Index Server Software Developers Kit (SDK) and Index Server Filter development tools.
RESOURCE
The Microsoft Index Server Web page is located at http://www.microsoft.com/ntserver/search/.
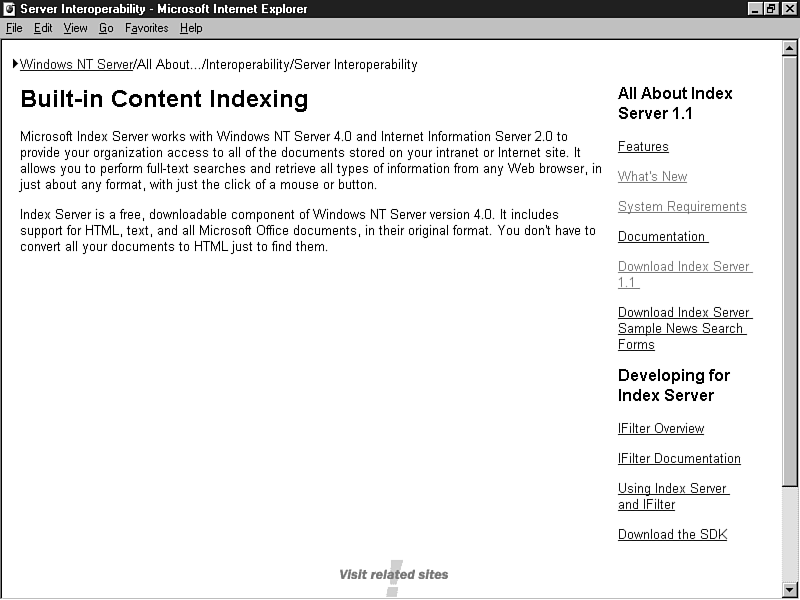
Using your favorite Web browser, enter the URL mentioned previously to access the Microsoft Index Server Web page. Microsoft is constantly changed its Web site to include the latest releases of all of its software products, so check back often for the latest release information about Index Server. Figure 5.1 displays the current Index Server Web page.
Figure 5.1. The Microsoft Index Server Web page.
As of the writing of this book, the only available release of Index Server is version 1.1. However, Microsoft periodically updates the Index Server Web page and provides access to beta versions to developers as the new releases are available.
With the Index Server Web page as the active document in your Web browser, select the hypertext link Download Index Server 1.1 to begin the download process.
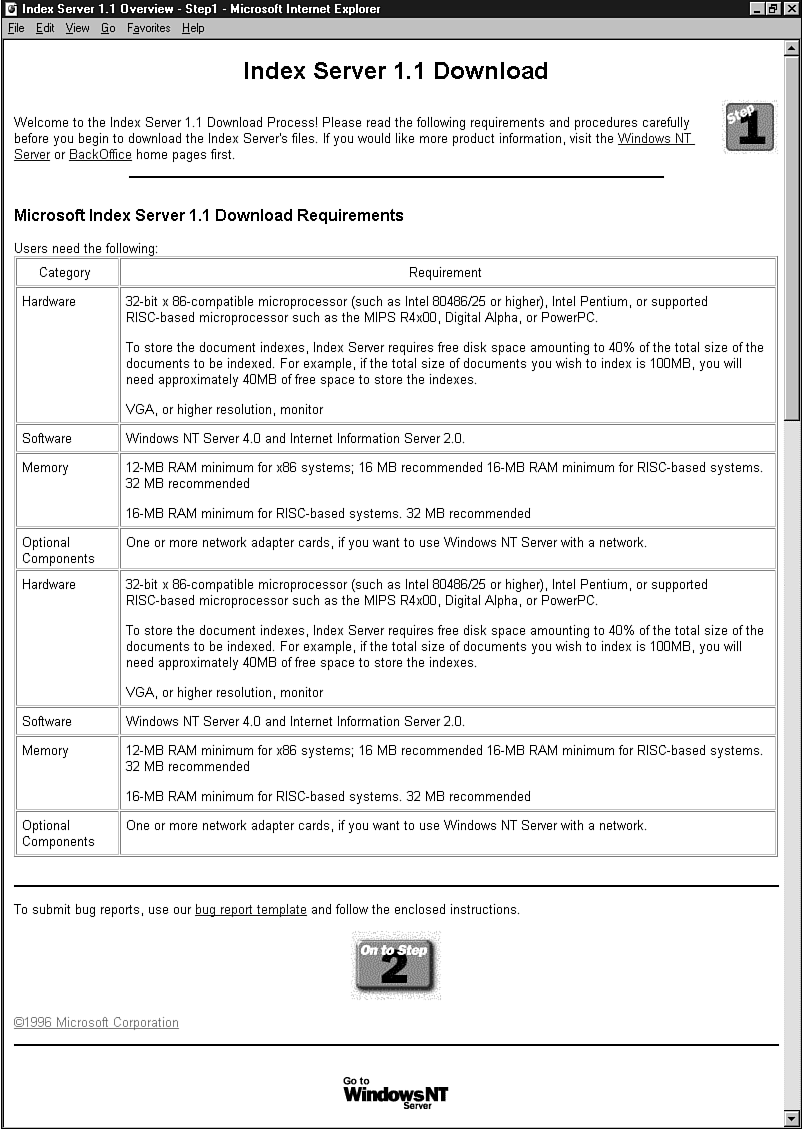
After you select the Download Index Server 1.1 button, the document for the first step of the download process is loaded. Figure 5.2 displays the Index Server 1.1 Download window, which is the first step of the Index Server download process.
Figure 5.2. The Index Server 1.1 Download window is the first step of the Index Server download process.
After reviewing the Microsoft Index Server 1.1 Download Requirements, select the On to Step 2 button at the bottom of the window to proceed with the download process.
The second step of the download process displays the end-user license agreement, which you should fully read before you accept its terms. The document is quite lengthy and contains the standard agreement information for downloading freeware products. If you accept the terms of the agreement, select the I Accept These Terms button at the bottom of the document.
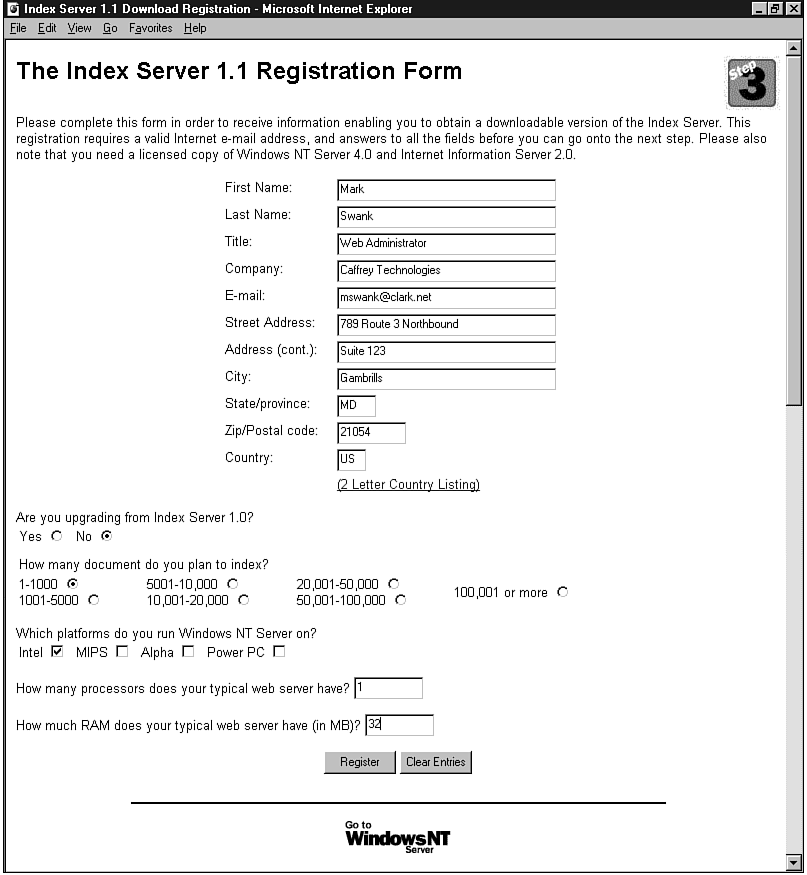
After you accept the terms of the agreement in step two, the Index Server 1.1 registration form is displayed as the third step of the download process. You must fill out this registration form to continue with the download process. You are required to fill in most, but not all, of the fields. If a required field is left blank, an error will be returned when the document is submitted. In this case, simply correct the missing field and resubmit the document for processing. Figure 5.3 shows a sample registration form.
Figure 5.3. A sample Index Server 1.1 registration form.
After you fill in the registration form, select the Register button to proceed to the fourth step of the download process.
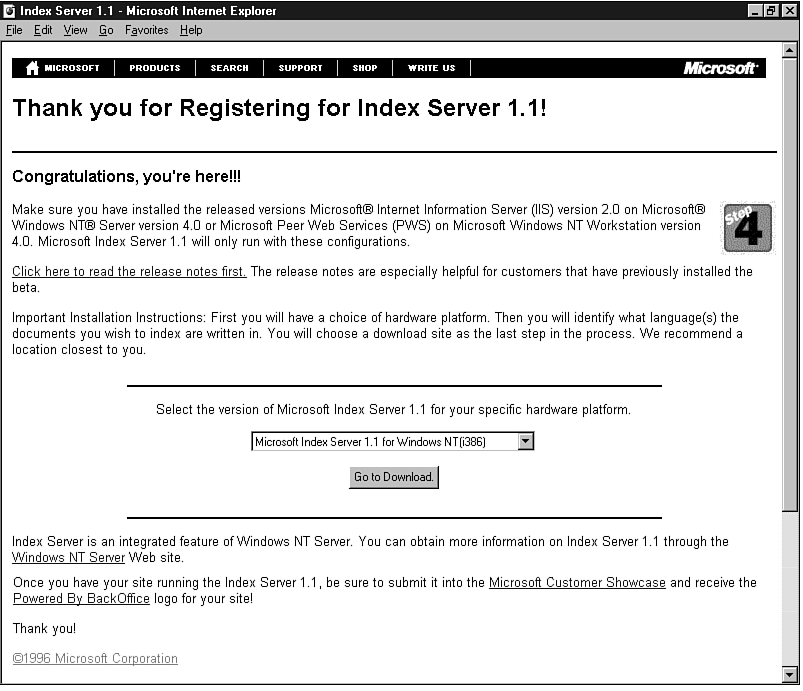
Step four prompts the user to select the version of Microsoft Index Server 1.1 for his specific hardware platform.
If you are unsure about the platform onto which you will be installing Index Server, check with your hardware manufacturer. The self-extracting executables are hardware-platform specific and will not work on the wrong hardware platform.
Figure 5.4 displays the window for step four of the download process.
Figure 5.4. The Thank you for Registering for Index Server 1.1 window is the fourth step of the Index Server download process.
Having selected the proper hardware platform, select the Next button to proceed to the fifth step of the download process.
In step five, you will select which language-specific version of Index Server you want to download. Index Server currently supports eight languages. You can select any one individually, or the default of all eight combined. In this example, you will download just the US-English version. Figure 5.5 displays the window for step five of the download process.
Figure 5.5. The Select a Language window is the fifth step of the Index Server download process.
After you select which language version(s) you want to download, click the Next button at the bottom of the window to proceed to step six, the final step of the download process.
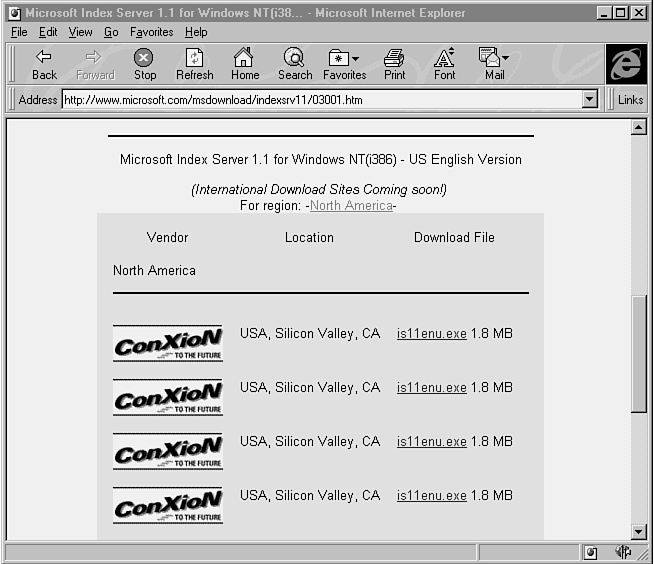
Step six provides information about installing Index Server as well as a complete listing of mirrored sites (sites that maintain a copy of Index Server for downloading) from which you can select. Choose the mirror site nearest to your location and select the hypertext link for the version of Index Server you have identified for downloading in the previous steps. Figure 5.6 displays the window for step six of the download process.
Figure 5.6. This page provides hypertext links for the version of Index Server you specified in the five previous steps.
Your window may differ from the one in Figure 5.6 depending on what version of Index Server you selected for download.
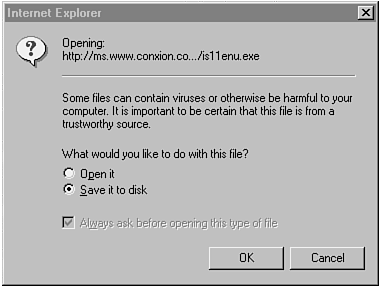
After you select the hypertext link of the site nearest your site, the download process begins. After the Web browser has contacted the Web server servicing the document, you may be prompted with a pop-up window to save the file to disk or to run the downloaded file. If you are using Internet Explorer, your pop-up window will look like the one shown in Figure 5.7.
Figure 5.7. The Index Server download pop-up window.
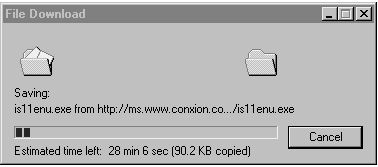
Select the Save it to disk radio button and select the OK button. If you choose to run the executable, select the Open it radio button. If you choose to save the executable, another pop-up dialog box appears prompting you for a location on your hard drive to store the file. Select a location on your system and select OK. The file will immediately begin to download. The status of the download process can be monitored with the File Download pop-up window (as shown in Figure 5.8).
Figure 5.8. The Index Server file download pop-up window.
The size of the self-extracting executable depends on what language and hardware platform you selected. After the file download is completed, the File Download pop-up window disappears. Congratulations! You now have a copy of Index Server from which you can install or re-install Index Server at any time.
During the installation process, you will be prompted for information pertaining to where you want to place installation-specific documents and executable scripts. Additionally, you should know where you want to install indexes created by Index Server. Using the information presented in Chapter 4, you may want to store installation-specific documents and indexes on separate disk drives to reduce disk contention and input/output processing.
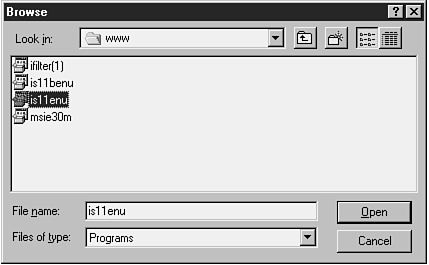
The installation of Index Server is started by selecting the self-extracting executable from NT Explorer, by following the My Computer icon links to the file, or by selecting the Start button on your NT desktop and choosing Run. From the Run pop-up window, choose Browse to search your hard drives (or your network drives if the document was stored on a network-accessible drive) for the executable. Figure 5.9 displays the Browse pop-up window with the downloaded Index Server self-extracting executable selected.
Figure 5.9. The Index Server browse pop-up window.
With the self-extracting executable file selected, click the Open button in the Browse window, then the OK button in the Run window to continue with the installation process.
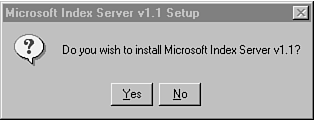
The first window to pop up is a dialog box, which verifies the installation of Index Server v1.1. Figure 5.10 displays this pop-up dialog box.
Figure 5.10. The installation pop-up dialog box.
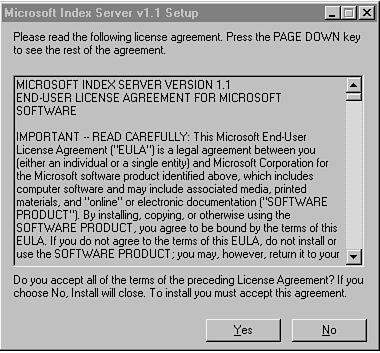
Select Yes to display a pop-up dialog box containing the end-user license agreement.
The end-user license agreement may appear differently (or not at all) if you are installing production (non-beta) software.
Figure 5.11 displays the end-user license agreement pop-up dialog box. If you accept the terms of the agreement, select Yes to continue with the installation process.
Figure 5.11. End-user license agreement pop-up dialog box.
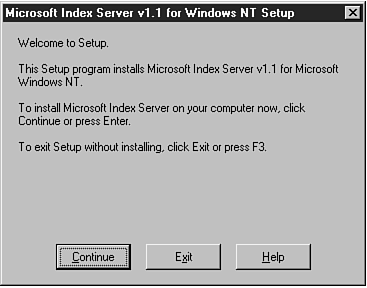
After you accept the terms of the agreement, the Microsoft Index Server v1.1 for Windows NT Setup dialog box is displayed. From this dialog box, you can continue with the installation or exit without installing Index Server. Figure 5.12 displays the Setup dialog box.
Figure 5.12. The Index Server setup dialog box.
Select the Continue button to continue the installation process.
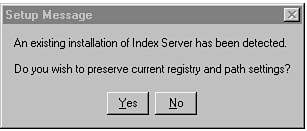
If you are re-installing Index Server or if you have a prior version of Index Server already installed on your machine, you will be prompted with a setup message dialog box that allows you to either overwrite or preserve existing registry and path settings. Figure 5.13 displays the Setup Message dialog box.
Figure 5.13. The Index Server setup message dialog box.
Select Yes to preserve your registry and path entries or No to overwrite them with installation default values.
The next window in the installation process permits you to enter the full physical path to the IIS scripts directory. By default, Index Server inputs the default scripts directory that is installed with IIS. However, you can install the Index Server scripts on a new path if you want.
To install the scripts in a new directory, you must create a virtual root that maps to the new directory. This virtual root is created within the IIS Server Manager program and must be configured as executable.
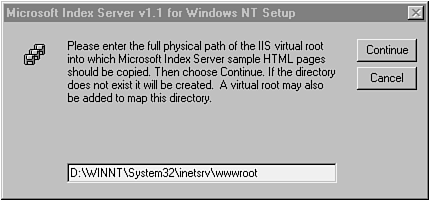
After you select a new path or use the default scripts path, select the Continue button to proceed with the installation. Index Server continues the installation process by prompting you for the location of the IIS virtual root directory. Index Server creates a new directory within the IIS virtual root directory to hold the sample Index Server documents. Figure 5.14 displays the virtual root selection window.
Figure 5.14. The IIS virtual root selection window.
By default, Index Server uses the IIS registry setting to determine the default location for storing the files. In most cases, the default is the correct location for the sample Index Server document.
To install the files in a different directory, you might need to create a virtual root directory in IIS that maps to the new directory.
Enter a new directory location or choose the default by selecting the Continue button.
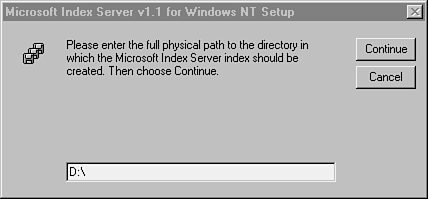
The installation program then asks where you want to store your document indexes; you must provide the full path location.
Using the information in Chapter 4, you might want to store indexes on a completely separate disk drive from that of the operating system or IIS and Index Server script files and documents.
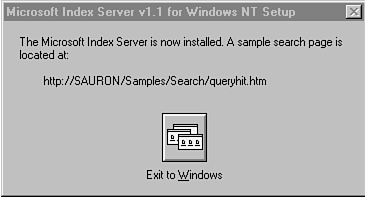
Figure 5.15 displays the Setup dialog box for choosing your index storage location. Choose a location for the index files and select the Continue button. The installation program stops IIS, copies the sample files and scripts to the specified destination directories, updates the system's registry entries, and restarts IIS. After completing these tasks, the final pop-up dialog box is displayed, which shows where the default sample query form is located. Figure 5.16 displays the final pop-up dialog box, which signifies that the installation is complete.
Figure 5.15. Index Server index location selection window.
Figure 5.16. The installation completed dialog box.
When you select the Exit to Windows button, your installation is complete. Congratulations! You have just installed Index Server on your machine. A new program group has been created titled Microsoft Index Server, which includes a link to a sample query form, online documentation, Index Server Administration, and Release Notes.
Because Microsoft Index Server is a freeware product, there is no support contract. However, there are e-mail lists for filing bug reports and receiving responses. The installation documentation provides information on using the buglist e-mail address.
Additionally, Microsoft maintains a newsgroup service that includes newsgroups for most Microsoft products, including Index Server. To access newsgroups, you need a news reader program.
RESOURCE
Microsoft provides a news and mail reader program that you can download free of charge at http://www.microsoft.com/ie/download/ieadd.htm.
When you have a news reader program installed, you can use the Index Server-specific newsgroup for corresponding with Microsoft Index Server support personnel as well as with other Index Server users on the Internet.
RESOURCE
Anybody can access the Microsoft newsgroups with a news reader program using the server name msnews.microsoft.com. The Index Server newsgroup is located at microsoft.public.inetserver.iis.tripoli.
During the course of this chapter, you learned how to access the Microsoft Index Server Web page for the latest information relating to Index Server. New information and releases of Index Server are posted on the Web pages continually. You also learned how to install Index Server. Finally, you learned how to get online support for questions pertaining to production or beta releases of Index Server. Armed with this information, you'll be launching index queries and getting online help from users around the world in no time.
![]()
![]()
![]()
![]()