


by Mark Wutka
Java applets frequently need to display images. Sometimes, these images are GIF and JPEG files downloaded from a Web server. Other times, they are images that are created internally by the applet. You can also create classes that load Java images in formats other than GIF and JPEG.
Once you create a Java image, you can either display it using the AWT Graphics class, or you can apply different filters to change the appearance of the image. When you display an image, you can either draw it as is, or resize it.
Java's image filtering mechanism is very powerful. It allows you to create classes that change the appearance of an image. Because the filters are implemented as classes, once you create a filter that performs a specific visual effect, you can use the filter in any number of applets and applications.
Since images tend to take a while to download, Java allows your applet to run while the images are still downloading. It provides ways to track images so you can tell when they finish downloading, or when there is an error in downloading. Although it isn't always a good idea, you can even wait for all the images to finish downloading before starting your applet.
The basic mechanism for displaying images within an applet is the drawImage method in the Graphics class. It displays instances of the Image class. The getImage method in the Applet class fetches a GIF or JPEG image from a URL and creates an instance of Image. Listing 4.1 shows an applet that loads an image and displays it.
Listing 4.1 Source Code for DrawImage.java
import java.applet.Applet;
import java.awt.Graphics;
import java.awt.Image;

// This is a simple example applet that loads an image and
// displays it.

public class DrawImage extends Applet
{
     Image image;

     public void init()
     {
          image = getImage(getDocumentBase(), "samantha.gif");
     }

     public void paint(Graphics g)
     {
          g.drawImage(image, 10, 10, this);
     }
}
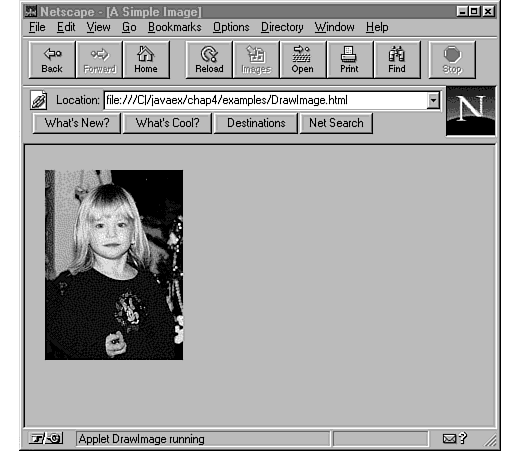
Figure 4.1 shows the image displayed by this program.
Figure 4.1 : Java can display any GIF or JPEG file.
Like the <IMG> tag in many Web browsers, the Java image display mechanism has the ability to shrink or stretch images to fit a particular size. Normally, when you display an image, you only specify the x-and-y coordinates for the upper left corner of the image. You can, however, specify an alternate width and height for the image. Java automatically scales the image to fit the new width and height. Listing 4.2 shows an applet that stretches and shrinks an image.
Listing 4.2 Source Code for ShrinkStretch.java
import java.applet.Applet;
import java.awt.Graphics;
import java.awt.Image;
import java.awt.MediaTracker;

// This applet takes an image and displays it stretched and shrunk.

public class ShrinkStretch extends Applet
{
      Image image;

      public void init()
      {
// Get the image
            image = getImage(getDocumentBase(), "samantha.gif");

// Create a media tracker to wait for the image
            MediaTracker tracker = new MediaTracker(this);

// Tell the media tracker to watch the image
            tracker.addImage(image, 0);

// Wait for the image to be loaded
            try {
                  tracker.waitForAll();
            } catch (Exception ignore) {
            }
      }

      public void paint(Graphics g)
      {
// Get the width of the image
            int width = image.getWidth(this);

// Get the height of the image
            int height = image.getHeight(this);

// Draw the image in its normal size
            g.drawImage(image, 10, 10, width, height, this);

// Draw the image at half-size.
            g.drawImage(image, width+20, 10, width / 2,
                  height / 2, this);

// Draw the image at twice its size. Notice that the x coordinate
// for this image is width * 3 / 2 + 30. The 30 represents a 10-pixel
// padding between each image, for 3 images. The 3/2 represents the
// total image size of the previous two images. One full image, plus
// one half the original size.

            g.drawImage(image, width * 3 / 2 + 30, 10,
                  width * 2, height * 2, this);
      }
}
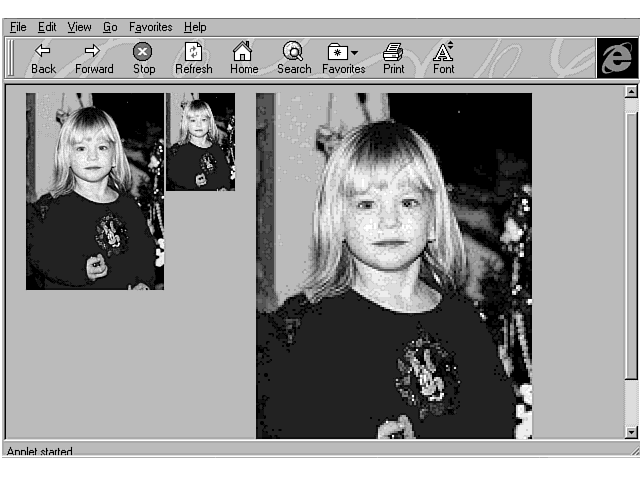
Figure 4.2 shows the output from this applet. The image on the left is the untouched image. The middle image is half the size of the original, and the image on the right is twice the size of the original.
Figure 4.2 : Java automatically shrinks and stretches images.
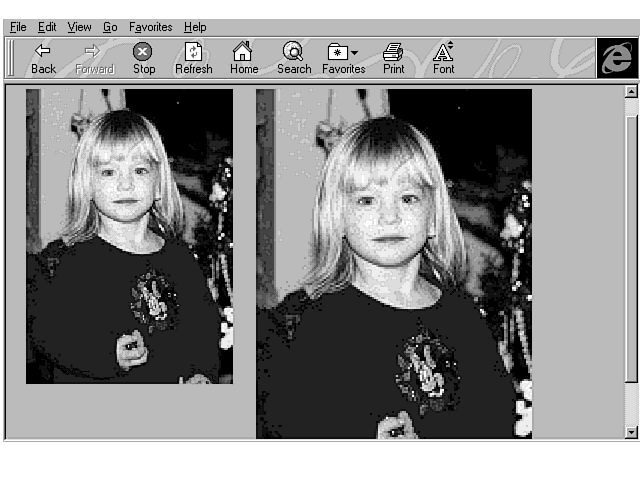
Generally, images stretch better than they shrink. When you shrink an image, you are losing some part of the picture because there are fewer pixels. When you stretch an image, on the other hand, you don't lose any pixels. In addition, the stretching works best when the new size is a multiple of the original size. In other words, it is better to double or triple the size of an image rather than increasing it by only 50 percent. Figure 4.3 shows an image that has been stretched by 50 percent next to an image whose size has been doubled. Notice how the image on the left shows "stretch marks" where some areas are stretched a little more than others.
Figure 4.3 : Images scale better in whole multiples.
In addition to displaying GIF and JPEG images, you can also create images from an in-memory array. This enables you to create your own images on-the-fly. Usually a browser has native code to display GIF and JPEG files; however, the in-memory images go through some additional Java code before they are displayed. This means that the in-memory images usually take much longer to display than GIF or JPEG files. To create your own in-memory image, you first create a MemoryImageSource object, and then use the createImage method to create an Image instance. Listing 4.3 shows an applet that creates a memory image source and displays it.
Listing 4.3 Source Code for MemoryImage.java
import java.applet.*;
import java.awt.*;
import java.awt.image.*;

// This applet creates an image from an array of color values
// and displays it.

public class MemoryImage extends Applet
{
// Create some shortcut constants for yellow, black, and white

     protected static final int y = Color.yellow.getRGB();
     protected static final int b = Color.black.getRGB();
     protected static final int w = Color.white.getRGB();

// Define an array of pixel values. The pixels will be converted
// into a 16¥16 image.

     protected static final int imageData[] = {
          w, w, w, w, y, y, y, y, y, y, y, y, w, w, w, w,
          w, w, w, y, y, y, y, y, y, y, y, y, y, w, w, w,
          w, w, y, y, y, y, y, y, y, y, y, y, y, y, w, w,
          w, y, y, y, b, b, y, y, y, y, b, b, y, y, y, w,
          y, y, y, y, b, b, y, y, y, y, b, b, y, y, y, y,
          y, y, y, y, y, y, y, y, y, y, y, y, y, y, y, y,
          y, y, y, y, y, y, y, y, y, y, y, y, y, y, y, y,
          y, y, y, y, y, y, y, y, y, y, y, y, y, y, y, y,
          y, y, y, y, y, y, y, y, y, y, y, y, y, y, y, y,
          y, y, y, b, y, y, y, y, y, y, y, y, b, y, y, y,
          y, y, y, y, b, y, y, y, y, y, y, b, y, y, y, y,
          y, y, y, y, y, b, b, y, y, b, b, y, y, y, y, y,
          w, y, y, y, y, y, y, b, b, y, y, y, y, y, y, w,
          w, w, y, y, y, y, y, y, y, y, y, y, y, y, w, w,
          w, w, w, y, y, y, y, y, y, y, y, y, y, w, w, w,
          w, w, w, w, y, y, y, y, y, y, y, y, w, w, w, w
     };

     Image smiley;

     public void init()
     {
// Create an image from the array of pixels
          smiley = createImage(
               new MemoryImageSource(16, 16, imageData, 0, 16));
     }

     public void paint(Graphics g)
     {
// Display the image, stretched considerably from its original 16¥16
// to a size of 128¥128.
          g.drawImage(smiley, 10, 10, 128, 128, this);
     }
}
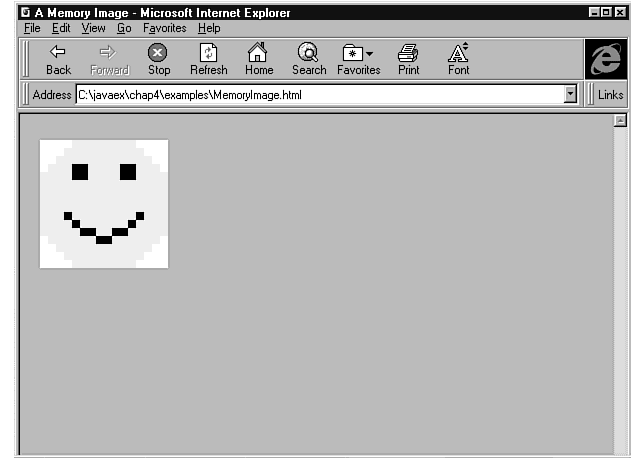
Figure 4.4 shows the output from this applet.
Figure 4.4 : You can define your own image from an array of pixels.
You may want to display images that aren't in either GIF or JPEG
format. You can use the MemoryImageSource,
along with a little programming finesse and knowledge of image
formats, to display any image format you want. Most image formats
contain similar information that is stored in different ways.
You can usually find the dimensions of the image, the number of
bits per pixel, an optional color map, and the pixel values. Your
task is to take those pixel values and turn them into an array
of RGB values that can be passed to the MemoryImageSource
class. The hardest part of getting the pixel values is almost
always the image decompression. Most popular image file formats
have a compression algorithm to shrink the image before storing
it. Some of these compression algorithms, like LZW, are not very
easy to code. The Windows Bitmap (.BMP) format, on the other hand,
uses a very simple compression method called run-length encoding
(RLE) that is easy to write. Run-length encoding simply replaces
a number of consecutive pixels of the same color with a count
and the pixel color. In other words, if there were 97 blue pixels
in a row, it would replace them with 97 blue. There's a little
more to it, but that's the basic scheme.
| Tip |
Whenever you create a class that understands a particular image format, make sure that it can use an InputStream object. This allows you to read in images from either a file or an URL. |
Windows bitmaps are all over the place. Under the various Microsoft operating systems, you use bitmaps as icons, cursors, wallpaper, and other visual components. Windows bitmaps are not very popular on the Web, however. Since most windows bitmaps are not compressed, they tend to be larger than they would be if they were in GIF or JPEG format.
A Windows bitmap file consists of four parts: the bitmap file
header, the bitmap info header, the color table, and the bits
that make up the image.
| Note |
All numbers in a bitmap file are stored in Intel byte order, also known as little-endian. This means that the first byte in the file represents the little end of the number. For instance, if you wrote the hex number 0x1234 in little-endian format, you would write out 0x34, followed by 0x12. Java, on the other hand, uses big-endian format (sometimes known as network byte order, since it is employed by the TCP/IP suite). When you write out 0x1234 in big-endian format, you write out 0x12 followed by 0x34. |
Table 4.1 shows the contents of the bitmap file header.
| Type | Description | |
| Character | File type (should be the characters 'B' and 'M') | |
| 32-bit Int | Total size of the file in bytes | |
| 16-bit Int | Reserved | |
| 16-bit Int | Reserved | |
| 32-bit Int | Byte-offset in file where the actual bitmap bits begin |
The file type in the bitmap file header allows a program to make
sure that this is a bitmap file before proceeding. If it doesn't
start with "BM," it isn't a bitmap file. The byte offset
for the bitmap bits is important, because there may be some padding
between the headers and the actual bits. You need to know how
much padding to skip over.
| Note |
The technique of putting a special value at the beginning of a file (like 'BM') is very common. This value is often referred to as a magic number. Unix uses this same technique to identify the type of a file. |
Table 4.2 shows the contents of the bitmap info header.
| Type | Description | |
| 32-bit Int | Size (in bytes) of the info header | |
| 32-bit Int | Width of bitmap (in pixels) | |
| 32-bit Int | Height of bitmap (in pixels) | |
| 16-bit Int | Number of bitplanes (should be 1) | |
| 16-bit Int | Number of bits per pixel (should be 1, 4, 8, or 24) | |
| 32-bit Int | Type of compression used | |
| 32-bit Int | Actual number of bytes in bitmap (only necessary if compression is used) | |
| 32-bit Int | Number of horizontal pixels per meter (used for scaling) | |
| 32-bit Int | Number of vertical pixels per meter (used for scaling) | |
| 32-bit Int | Number of colors actually used | |
| 32-bit Int | Number of colors that are really important (helps when reducing the number of colors) |
After the bitmap info header is a table of colors. The colors
are stored in a format called RGBQUAD, which consists of 4 bytes.
An RGBQUAD value contains an 8-bit blue intensity value, an 8-bit
green intensity, an 8-bit red intensity, and 8-bits of 0. This
may look backwards to you when you are used to thinking of colors
in the order red-green-blue, but remember that this is actually
just a 32-bit number stored in little-endian format. If you were
to read in an RGBQUAD and perform the necessary byte-order adjustments,
you end up with a normal RGB color value. For example, suppose
an RGBQUAD contained the bytes 0x56, 0x34, 0x12, and 0. If you
read this value in and converted it from a little-endian number
to a Java big-endian number, you would have an RGB color value
of 0x123456. The number of colors in the color table is given
in the bitmap info header as the number of colors actually used.
| Note |
If a bitmap contains pixels using 24-bit color, there is no color table because the actual color values are stored in the pixel bits. |
If the compression type in the bitmap info header is 0, then no compression is used. If the compression type is 1, the bitmap uses RLE8 compression. A compression type of 2 indicates that the bitmap uses RLE4 compression.
RLE4 and RLE8 compression are both simple run-length encoding schemes. The only difference is that RLE4 is used when you have 4-bit pixels, and RLE8 is used when you have 8-bit pixels. Basically, these two encoding schemes consist of a number of 2-byte codes and pixel values. A 2-byte code can contain a repeat count and a pixel value. The count indicates how many times in a row the pixel value is repeated. If the first byte of the code is 0, the second byte can indicate a number of things. It might indicate that you should skip to the next line, or you should skip to a certain x,y position, or that there are a certain number of unencoded bytes following this 2-byte code. You could completely ignore the run-length encoding and still support most of the Windows bitmaps you find. Very few of them actually use the run-length encoding.
The most peculiar thing about windows bitmaps is that they are stored upside-down. The last line in the bitmap is stored first, and the first line is stored last.
Listing 4.4 shows the BMPReader class that reads a Windows Bitmap from an input stream and creates an image.
Listing 4.4 Source Code for BMPReader.java
import java.awt.*;
import java.awt.image.*;
import java.io.*;

// This class provides a public static method that takes an InputStream
// to a Windows .BMP file and converts it into an ImageProducer via
// a MemoryImageSource.
// You can fetch a .BMP through a URL with the following code:
// URL url = new URL( <wherever your URL is> )
// Image img = createImage(BMPReader.getBMPImage(url.openStream()));

public class BMPReader extends Object
{
// Constants indicating how the data is stored
    public static final int BI_RGB = 0;
    public static final int BI_RLE8 = 1;
    public static final int BI_RLE4 = 2;

    public static ImageProducer getBMPImage(InputStream stream)
    throws IOException
    {
// The DataInputStream allows you to read in 16 and 32 bit numbers
        DataInputStream in = new DataInputStream(stream);

// Verify that the header starts with 'BM'

        if (in.read() != 'B') {
            throw new IOException("Not a .BMP file");
        }
        if (in.read() != 'M') {
            throw new IOException("Not a .BMP file");
        }

// Get the total file size
        int fileSize = intelInt(in.readInt());

// Skip the 2 16-bit reserved words
        in.readUnsignedShort();
        in.readUnsignedShort();

        int bitmapOffset = intelInt(in.readInt());

        int bitmapInfoSize = intelInt(in.readInt());

        int width = intelInt(in.readInt());
        int height = intelInt(in.readInt());

// Skip the 16-bit bitplane size
        in.readUnsignedShort();

        int bitCount = intelShort(in.readUnsignedShort());

        int compressionType = intelInt(in.readInt());

        int imageSize = intelInt(in.readInt());

// Skip pixels per meter
        in.readInt();
        in.readInt();

        int colorsUsed = intelInt(in.readInt());
        int colorsImportant = intelInt(in.readInt());
        if (colorsUsed == 0) colorsUsed = 1 << bitCount;

        int colorTable[] = new int[colorsUsed];

// Read the bitmap's color table
        for (int i=0; i < colorsUsed; i++) {
            colorTable[i] = (intelInt(in.readInt()) & 0xffffff) + 0xff000000;
        }

// Create space for the pixels
        int pixels[] = new int[width * height];

// Read the pixels from the stream based on the compression type
        if (compressionType == BI_RGB) {
            if (bitCount == 24) {
                readRGB24(width, height, pixels, in);
            } else {
                readRGB(width, height, colorTable, bitCount,
                    pixels, in);
            }
        } else if (compressionType == BI_RLE8) {
            readRLE(width, height, colorTable, bitCount,
                pixels, in, imageSize, 8);
        } else if (compressionType == BI_RLE4) {
            readRLE(width, height, colorTable, bitCount,
                pixels, in, imageSize, 4);
        }

// Create a memory image source from the pixels
        return new MemoryImageSource(width, height, pixels, 0,
            width);
    }

// Reads in pixels in 24-bit format. There is no color table, and the
// pixels are stored in 3-byte pairs. Oddly, all windows bitmaps are
// stored upside-down - the bottom line is stored first.

    protected static void readRGB24(int width, int height, int pixels[],
        DataInputStream in)
    throws IOException
    {

// Start storing at the bottom of the array
        for (int h = height-1; h >= 0; h--) {
         int pos = h * width;
            for (int w = 0; w < width; w++) {

// Read in the red, green, and blue components
          int red = in.read();
          int green = in.read();
          int blue = in.read();

// Turn the red, green, and blue values into an RGB color with
// an alpha value of 255 (fully opaque)
                pixels[pos++] = 0xff000000 + (red << 16) +
               (green << 8) + blue;
            }
        }
    }
The readRGB method is a good example of how to extract bits that have been packed into a byte. It computes the number of pixels stored in a byte by dividing 8 by the number of bits per pixel. When you extract bits from a byte, you have to shift the byte to the right and mask out everything but the bits you are interested in. For example, if you want the leftmost 2 bits in a byte, you shift the byte 6 bits to the right, then AND the byte with 3 (3 is the bit mask for 2 bits). The general formula for an n-bit bit mask is (1 << n) - 1. For instance, for a 2-bit mask, it's (1 << 2) - 1, which is 4-1, or 3. The readRGB method computes an array of shift values indicating how many bits to shift for each pixel stored in the byte. For instance, if you are storing 4 pixels per byte (i.e., 2-bit pixels), you will have 4 shift values which are 6, 4, 2, and 0. That is, for the first pixel value, you shift the byte 6 bits to the right. For the second pixel, you shift 4 bits to the right. Note that these shifts are not cumulative. You are always starting with the original byte.
Listing 4.4 Source Code for BMPReader.java (continued)
// readRGB reads in pixels values that are stored uncompressed.
// The bits represent indices into the color table.

    protected static void readRGB(int width, int height, int colorTable[],
        int bitCount, int pixels[], DataInputStream in)
    throws IOException
    {

// How many pixels can be stored in a byte?
        int pixelsPerByte = 8 / bitCount;

// A bit mask containing the number of bits in a pixel
        int bitMask = (1 << bitCount) - 1;

// The shift values that will move each pixel to the far right
        int bitShifts[] = new int[pixelsPerByte];

        for (int i=0; i < pixelsPerByte; i++) {
            bitShifts[i] = 8 - ((i+1) * bitCount);
        }

        int whichBit = 0;

// Read in the first byte
        int currByte = in.read();

// Start at the bottom of the pixel array and work up
        for (int h=height-1; h >= 0; h--) {
            int pos = h * width;
            for (int w=0; w < width; w++) {

// Get the next pixel from the current byte
                pixels[pos] = colorTable[
                    (currByte >> bitShifts[whichBit]) &
                    bitMask];
          pos++;
                whichBit++;

// If the current bit position is past the number of pixels in
// a byte, we advance to the next byte
                if (whichBit >= pixelsPerByte) {
                    whichBit = 0;
                    currByte = in.read();
                }
            }
        }
    }


// readRLE reads run-length encoded data in either RLE4 or RLE8 format.

    protected static void readRLE(int width, int height, int colorTable[],
        int bitCount, int pixels[], DataInputStream in,
        int imageSize, int pixelSize)
    throws IOException
    {
        int x = 0;
        int y = height-1;

// You already know how many bytes are in the image, so only go
// through that many.

        for (int i=0; i < imageSize; i++) {

// RLE encoding is defined by two bytes
            int byte1 = in.read();
            int byte2 = in.read();
            i += 2;

// If byte 0 == 0, this is an escape code
            if (byte1 == 0) {

// If escaped, byte 2 == 0 means you are at end of line
                if (byte2 == 0) {
                    x = 0;
                    y--;

// If escaped, byte 2 == 1 means end of bitmap
                } else if (byte2 == 1) {
                    return;

// if escaped, byte 2 == 2 adjusts the current x and y by
// an offset stored in the next two words
                } else if (byte2 == 2) {
                    int xoff = (char) intelShort(
                        in.readUnsignedShort());
                    i+= 2;
                    int yoff = (char) intelShort(
                        in.readUnsignedShort());
                    i+= 2;
                    x += xoff;
                    y -= yoff;

// If escaped, any other value for byte 2 is the number of bytes
// that you should read as pixel values (these pixels are not
// run-length encoded)
                } else {
                    int whichBit = 0;

// Read in the next byte
                    int currByte = in.read();

                    i++;
                    for (int j=0; j < byte2; j++) {

                        if (pixelSize == 4) {
// The pixels are 4-bits, so half the time you shift the current byte
// to the right as the pixel value
                            if (whichBit == 0) {
                                pixels[y*width+x] = colorTable[(currByte >> 4)
                                    & 0xf];
                            } else {

// The rest of the time, you mask out the upper 4 bits, save the pixel
// value, then read in the next byte

                                pixels[y*width+x] = colorTable[currByte & 0xf];
                                currByte = in.read();
                                i++;
                            }
                        } else {
                            pixels[y*width+x] = colorTable[currByte];
                            currByte = in.read();
                            i++;
                        }
                        x++;
                        if (x >= width) {
                            x = 0;
                            y--;
                        }
                    }
// The pixels must be word-aligned, so if you read an uneven number of
// bytes, read and ignore a byte to get aligned again.
                    if ((byte2 & 1) == 1) {
                        in.read();
                        i++;
                    }
                }


// If the first byte was not 0, it is the number of pixels that
// are encoded by byte 2
            } else {
                for (int j=0; j < byte1; j++) {

                   if (pixelSize == 4) {
// If j is odd, use the upper 4 bits
                       if ((j & 1) == 0) {
                           pixels[y*width+x] = colorTable[(byte2 >> 4) & 0xf];
                       } else {
                           pixels[y*width+x+1] = colorTable[byte2 & 0xf];
                       }
                   } else {
                       pixels[y*width+x+1] = colorTable[byte2];
                   }
                   x++;
                   if (x >= width) {
                       x = 0;
                       y--;
                   }
                }
            }
        }
    }
// intelShort converts a 16-bit number stored in intel byte order into
// the local host format

    protected static int intelShort(int i)
    {
        return ((i >> 8) & 0xff) + ((i << 8) & 0xff00);
    }

// intelInt converts a 32-bit number stored in intel byte order into
// the local host format

    protected static int intelInt(int i)
    {
        return ((i & 0xff) << 24) + ((i & 0xff00) << 8) +
            ((i & 0xff0000) >> 8) + ((i >> 24) & 0xff);
    }
}
The intelShort and intelInt methods in Listing 4.4 are extremely handy methods that really belong in their own class. They convert numbers from little-endian to big-endian byte order. You can actually use these methods to convert both ways. If you use intelInt on a big-endian number, it returns a little-endian number. The same holds true for intelShort.
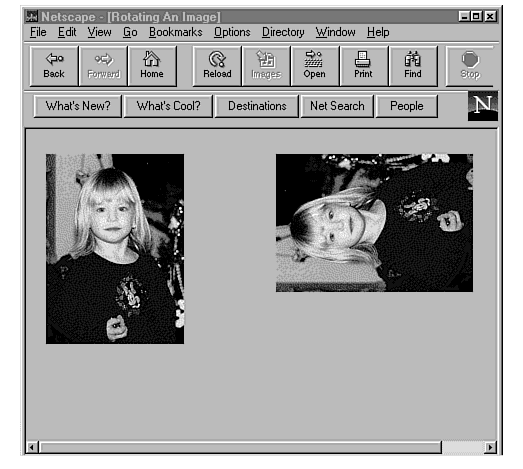
Java's producer-consumer model makes it simple to create filters that provide many interesting image effects. Just to refresh your memory, an image producer provides the data for an image. An image consumer takes the image data and displays it. When you create an image from an URL, the data read from that URL serves as the image producer. When you create an image from an in-memory array, the MemoryImageSource is the image producer. To display an image, you connect an image producer to an image consumer and the image consumer displays the image. An image filter works like both a producer and a consumer. It acts like a consumer when it receives pixel data from the producer; then it acts like a producer when it sends the pixel data on to the consumer. Depending on the image effect you are creating, you may have to create a complete in-memory copy of the image before passing it on to the consumer. Other times, you may be able to take the array of pixels passed to you, manipulate it, and pass it on to the consumer. For example, if you want to rotate an image 90 degrees, you do not have to create an in-memory image. You only need to recompute the position of the pixels you receive. Listing 4.5 shows a filter that performs a 90-degree rotation of an image.
Listing 4.5 Source Code for Rotate Filter.java
import java.awt.image.*;

// This filter rotates an image 90 degrees by reversing the horizontal
// coordinates and then exchanging the x and y coordinates of each
// pixel.

public class RotateFilter extends ImageFilter
{
     public RotateFilter()
     {
     }

// Since you flip the image, if the image is delivered in either
// complete scan lines or top-down, left-right order, you won't be
// passing the data to the consumer that way, so filter out those
// flags from the hints.

     public void setHints(int hints)
     {
          consumer.setHints(hints & ~(ImageConsumer.COMPLETESCANLINES +
               ImageConsumer.TOPDOWNLEFTRIGHT));
     }

// Because you exchange x and y coordinates, width is now height and
// height is now width.
     public void setDimensions(int width, int height)
     {
          consumer.setDimensions(height, width);
     }

// To rotate the pixels, create a new array and copy over the
// pixels, reversing the horizontal pixels and then swapping
// x and y.

     public void setPixels(int x, int y, int width, int height,
          ColorModel model, byte[] pixels, int offset, int scansize)
     {
// Create a new array for the pixels

          byte[] rotatePixels = new byte[pixels.length];

          for (int ry=0; ry < height; ry++) {
               for (int rx=0; rx < width; rx++) {

// copy in the pixels with reversed x and y
                    rotatePixels[rx*height + ry] =
                         pixels[(ry+1)*scansize-rx-1+offset];
               }
          }
          consumer.setPixels(y, x, height, width, model, rotatePixels,
               0, height);
     }

// To rotate the pixels, create a new array and copy over the
// pixels, reversing the horizontal pixels and then swapping
// x and y.

     public void setPixels(int x, int y, int width, int height,
          ColorModel model, int[] pixels, int offset, int scansize)
     {
// Create a new array for the pixels

          int[] rotatePixels = new int[pixels.length];

          for (int ry=0; ry < height; ry++) {
               for (int rx=0; rx < width; rx++) {

// copy in the pixels with reversed x and y
                    rotatePixels[rx*height + ry] =
                         pixels[(ry+1)*scansize-rx-1+offset];
               }
          }
          consumer.setPixels(y, x, height, width, model, rotatePixels,
               0, height);
     }
}
Listing 4.6 shows an applet that uses this filter to display an image and a rotated version of the image.
Listing 4.6 Source Code for RotateApplet.java
import java.applet.Applet;
import java.awt.Graphics;
import java.awt.Image;
import java.awt.MediaTracker;
import java.awt.image.*;

// This applet displays an image rotated 90 degrees using the
// RotateFilter image filter.

public class RotateApplet extends Applet
{
     Image image;
     Image origImage;

     public void init()
     {

          String imageName = getParameter("image");
          if (imageName == null) imageName = "samantha.gif";

// Get the original image
          origImage = getImage(getDocumentBase(), imageName);

// Need to wait on the image for this one. The image filters
// get upset if you try to filter an image that hasn't been
// loaded yet. You should really display alternate information
// rather than just waiting for the image, though.

          MediaTracker mt = new MediaTracker(this);
          mt.addImage(origImage, 0);
          try {
               mt.waitForAll();
          } catch (Exception e) {
          }
// Now filter the image
          image = createImage(new FilteredImageSource(
               origImage.getSource(), new RotateFilter()));
     }

     public void paint(Graphics g)
     {
          g.drawImage(origImage, 10, 10, this);
          g.drawImage(image, 240, 10, this);
     }
}
Figure 4.5 shows a plain image and an image rotated 90 degrees by this filter.
Figure 4.5 : Image filters enable you to perform effects such as rotation.
Sometimes the changes you need to make to an image require that you have a complete copy of the image first. You can set up a filter to do this by saving all the pixels you receive in the setPixels call. Unlike the other image filters, your setPixels method will not invoke the setPixels method in the consumer. When the imageComplete method is called, you know that you have all the pixels and can process your pixel data. Once you have performed your image processing, you can invoke the setPixels method in the consumer and pass it your modified pixels, then call imageComplete in the consumer. When you are building your own copy of the image, keep in mind that the pixels in the setPixels call are not necessarily RGB values. You should use the image's color model to convertthem to RGB first. When you call setPixels in the consumer, you can use ColorModel. getRGBdefault() as the color model because you will have converted all your pixel values to RGB.
Listing 4.7 shows an abstract image effects class. It implements the Image Observer interface and gets all the pixels in the image. Once all the pixels have been delivered, it calls the performEffect method to manipulate the image. After the effect has been performed, it calls deliverPixels to send the pixels to its consumers.
Listing 4.7 Source Code for EffectFilter.java
import java.awt.image.*;

/**
 * Abstract class for implementing image effects on the
 * whole image. This class loads in an image and then calls
 * the performEffect method to perform the image effect, then
 * it delivers the pixels to the consumer.
 * @author Mark Wutka
 */

// This class is an example of a filter that requires all the
// pixels to be present before it can operate.

public abstract class EffectFilter extends ImageFilter
{
// Storage area for image info
	int width;
	int height;
	int pixels[];

	public EffectFilter()
	{
	}

// Filter the COMPLETESCANLINES hint out of the hints. You know you won't be
// presenting complete scan lines.

	public void setHints(int hints)
	{
		consumer.setHints(hints & ~ImageConsumer.COMPLETESCANLINES);
	}

// When you find out the dimensions of the image, you can create the holding
// area for the pixels.

	public void setDimensions(int width, int height)
	{
		this.width = width;
		this.height = height;
		this.pixels = new int[width*height];

		consumer.setDimensions(width, height);
	}

// An image filter has two different versions of setPixels. This one
// takes an array of bytes as the pixel values. This implies that the
// color model is an indexed color model. Because this filter needs pixels
// in RGB format, you just get the RGB value from the color model and put
// it into our array of pixels.

	public void setPixels(int x, int y, int width, int height,
		ColorModel model, byte[] pixels, int offset, int scansize)
	{

// Process every row in the source array
		for (int i=0; i < height; i++) {

// Shortcuts to save some computation time
			int destLineOffset = (y+i)*width;
			int srcLineOffset = i*scansize+offset;

// Process every pixel in the row
			for (int j=0; j < width; j++) {

// Get the pixel value, make sure it is unsigned (the &0xff does this)
				int pixel = pixels[srcLineOffset+j]&0xff;

// Get the RGB value
				this.pixels[destLineOffset+x+j] =
					model.getRGB(pixel);
			}
		}
	}

// You don't actually know if the color model here is the RGB color
// model or not, so just treat it like it might be an indexed model.

	public void setPixels(int x, int y, int width, int height,
		ColorModel model, int[] pixels, int offset, int scansize)
	{
// Process every row in the source array
		for (int i=0; i < height; i++) {

// Shortcuts to save some computation time
			int destLineOffset = (y+i)*width;
			int srcLineOffset = i*scansize+offset;

// Process every pixel in the row
		    for (int j=0; j < width; j++) {

// Get the pixel value, make sure it is unsigned (the &0xff does this)
				int pixel = pixels[srcLineOffset+j];

// Get the RGB value
				this.pixels[destLineOffset+x+j] =
					model.getRGB(pixel);
			}
		}
	}

// When the image producer is finished sending us pixels it calls
// imageComplete. You take this opportunity to perform the effect
// and then send all the pixels to our consumer before passing on
// the imageComplete call to the consumer. Up to this point the consumer
// doesn't know anything about our pixels. It's about to learn!

	public void imageComplete(int status)
	{
// Do the effect
		performEffect();

// Send the pixels to the consumer
	      deliverPixels();

// You're done now!
	      super.imageComplete(status);
	}

	public abstract void performEffect();

// deliverPixels sends the whole array of pixels to the consumer in one shot

	protected void deliverPixels()
	{
		consumer.setPixels(0, 0, this.width, this.height,
			ColorModel.getRGBdefault(),
			this.pixels, 0, this.width);
	}
}
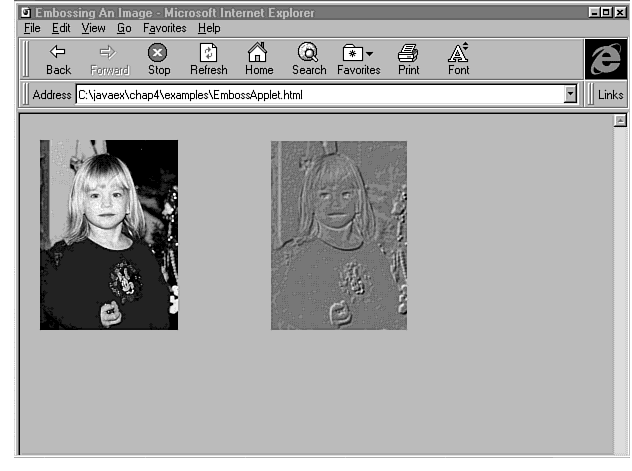
Listing 4.8 shows an image effect that performs an imaging algorithm called an emboss. The emboss filter looks rather confusing, but it is actually fairly simple. It assumes that you are shining a light from the upper-left corner of the image, and that a light pixel is typically higher (closer to the front) than a dark pixel. Given these two conditions, it looks at each pixel and examines the 8 surrounding pixels. The emboss algorithm applies a weighting matrix to the surrounding pixels. The upper left pixel is given a weight of -2, the top and left pixels are given a weight of -1. The lower right pixel is given a weight of 2, and the bottom and right pixels are given a weight of 1. You multiply the color values of these pixels by their weights, add the values together, and divide by 8. This creates a weighted average. What this really does is compute a slope. If you were walking from the upper left pixel to the lower right pixel, it would decide whether you were going uphill or downhill. If the weighted average is negative, you would be walking downhill, because the upper and left pixels would be lighter (they have higher pixel values) than the lower- right pixels.
This slope is then used to either lighten or darken the current pixel. If it is an uphill slope, it would catch more light, so the pixel is lightened. If it is a downhill slope, it would catch less light, so it is darkened. Rather than lightening and darkening the existing pixel, the algorithm starts with a uniform gray value for each pixel. This essentially transfers the slopes of the original image onto a plain gray image without transferring the colors themselves. The end result is an interesting emboss effect that gives the image a 3-D look.
Listing 4.8 Source Code for EmbossFilter.java
public class EmbossFilter extends EffectFilter
{
	public EmbossFilter()
	{
	}

// This is where the actual emboss effect is performed. It uses an
// edge-detection matrix and maps the edge value onto a field of
// all gray. When it does this, it is essentially "bending" the gray
// by adding shadows where all the edges are. This creates a neat
// embossing effect.

	public void performEffect()
	{
// newPixels holds the new embossed image
		int newPixels[] = new int[width*height];

// For each pixel, compute the embossing values. You start one pixel down
// and in because the edge-detection needs to look one pixel in every
// direction and this keeps us from running off the edge.

		for (int y=1; y < height-1; y++) {
		int lineOffset = y * width;
		for (int x = 1; x < width-1; x++) {
				   int pointOffset = lineOffset+x;
				   int redSum = 0;
				   int greenSum = 0;
				   int blueSum = 0;

// Perform the edge detection - the matrix used is:
// -2 -1 0
// -1  0 1
//  0  1 2
// These values are applied individually to the red, green and blue
// components, then the values are normalized and added to the plain
// gray image to "bend" or "crinkle" it.

	redSum -= 2*((pixels[pointOffset-width-1]
		>> 16)&0xff);
	greenSum -= 2*((pixels[pointOffset-width-1]
		>> 8)&0xff);
	blueSum -= 2*(pixels[pointOffset-width-1]
		&0xff);

	redSum -= ((pixels[pointOffset-width]
		>> 16)&0xff);
	greenSum -= ((pixels[pointOffset-width]
		>> 8)&0xff);
	blueSum -= (pixels[pointOffset-width]
		&0xff);

	redSum -= ((pixels[pointOffset-1]
		>> 16)&0xff);
	greenSum -= ((pixels[pointOffset-1]
		>> 8)&0xff);
	blueSum -= (pixels[pointOffset-1]
		&0xff);

	redSum += 2*((pixels[pointOffset+width+1]
		>> 16)&0xff);
	greenSum += 2*((pixels[pointOffset+width+1]
		>> 8)&0xff);
	blueSum += 2*(pixels[pointOffset+width+1]
		&0xff);

	redSum += ((pixels[pointOffset+width]
		>> 16)&0xff);
	greenSum += ((pixels[pointOffset+width]
		>> 8)&0xff);
	blueSum += (pixels[pointOffset+width]
		&0xff);

	redSum += ((pixels[pointOffset+1]
		>> 16)&0xff);
	greenSum += ((pixels[pointOffset+1]
		>> 8)&0xff);
	blueSum += (pixels[pointOffset+1]
		&0xff);

// Normalize the values
	redSum >>= 3;
	greenSum >>= 3;
	blueSum >>= 3;

// Add these sums to medium-gray
	redSum += 0x7f;
	greenSum += 0x7f;
	blueSum += 0x7f;

// Make sure the values are within the 0-255 range

			if (redSum < 0) redSum = 0;
			if (redSum > 255) redSum = 255;
			if (greenSum < 0) greenSum = 0;
			if (greenSum > 255) greenSum = 255;
			if (blueSum < 0) blueSum = 0;
			if (blueSum > 255) blueSum = 255;

// Compute the final gray value as the maximum of red, green, and blue
			int gray = Math.max(greenSum,
				Math.max(redSum, blueSum));
// Store the new value in the array (since you want the gray value for
// red, green and blue, multiplying by 0x010101 will fill all 3 components
// with the gray value.
			newPixels[pointOffset] = 0xff000000 +
				0x010101 * gray;
		}
	}
	this.pixels = newPixels;
	}
}
Figure 4.6 shows an example of image embossing.
Figure 4.6 : Image embossing is one of the many imaging algorithms you can perform.
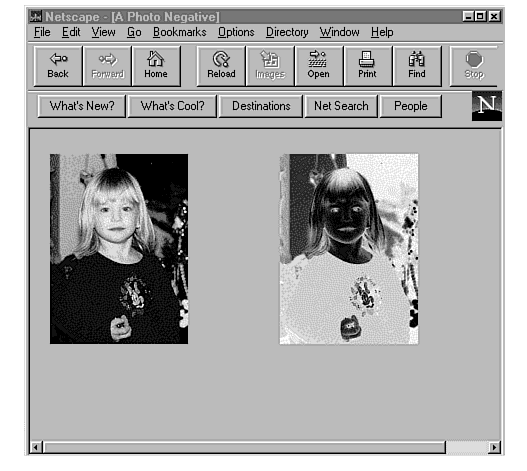
Many image effects involve the simple changing of colors. Rather than filtering the individual image pixels, you can filter the pixel colors instead. If the pixel's x and y coordinates do not have any effect on a pixel's filtered color, you should set the canFilterIndexColorModel variable to true. This greatly speeds up the filtering process if the image uses an index color model, because you filter only the index and not the entire image. Listing 4.9 shows an image filter that creates a photo negative of an image by XOR-ing the red, green, and blue components with 255.
Listing 4.9 Source Code for NegativeFilter.java
import java.awt.image.*;

// This class is a simple RGB filter that inverts
// colors by XORing the color components with
// 0xff, which makes black become white and vice versa.

public class NegativeFilter extends RGBImageFilter
{
     public NegativeFilter()
     {
          canFilterIndexColorModel = true;
     }

     public int filterRGB(int x, int y, int rgb)
     {
          return
               (rgb & 0xff000000) +     // preserve transparency
               (rgb & 0xffffff) ^ 0xffffff; // xor the components
     }
}
Figure 4.7 shows an image along with its negative counterpart.
Figure 4.7 : The RGBImageFilter modifies the colors of an image.
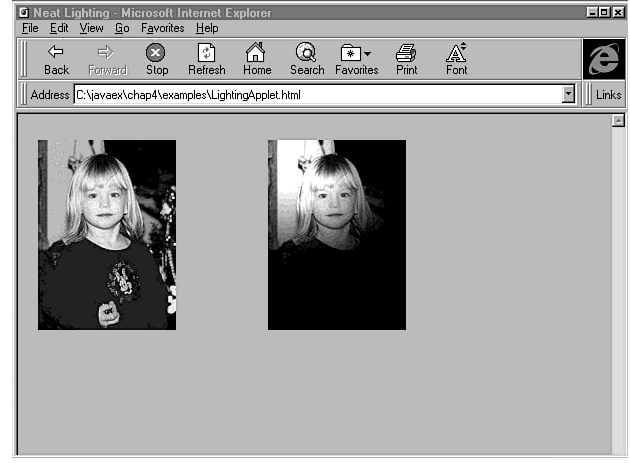
Some image filters require you to know the x and y components of the pixel to determine its coloring. For example, if you want to perform a lighting effect in which the pixels farther from the light are darker, you need to compute the distance of the pixel from the light source. The distance calculation uses the old standard square root of the x distance squared plus the y distance squared. In other words, given two points x1,y1 and x2,y2, the distance between them is sqrt((x1-x2)¥(x1-x2)+(y1-y2)¥(y1-y2)). Listing 4.10 shows an image filter that performs a lighting effect using the pixel's position.
Listing 4.10 Source Code for LightingFilter.java
import java.awt.image.*;

/**
 * Simulates the presence of a white light source shining
 * down on an image. When you create the filter, you supply
 * the X,Y coordinates for the center of the light, the radius
 * of the light, the intensity of the light, and a fading factor
 * for the light. An intensity of 1.0 gives you at most the same
 * brightness as the original image, higher than 1.0 causes white
 * washout near the light (really bright light), and less than 1 means
 * it's pretty dark. The fade factor indicates how much the light fades
 * as you get farther from it. A fade of 0.0 means it doesn't fade at all.
 * The formula for the intensity of light is the distance from the circle
 * of light * the fade. If the intensity is 1 and the fade is 0.01, any point
 * that is 100 pixels or more away from the light will be black (since by
 * the intensity formula, the intensity is 1.0 - (100 * 0.01), or 0).
 *
 * @author Mark Wutka
*/

public class LightingFilter extends RGBImageFilter
{

/** the center x coordinate of the circle of light */
     public int centerX;

/** the center y coordinate of the circle of light */
     public int centerY;

/** the radius of the circle of light */
     public int radius;

/** the intensity of the light */
     public double intensity;

/** How quickly the intensity fades as you go away from the light */
     public double fade;

/**
 * Creates an instance of a lighting filter which shines a circle
 * of light on an image.
 *
 * @param centerX the X coordinate of the center of the light circle
 * @param centerY the Y coordinate of the center of the light circle
 * @param radius the radius of the light circle
 * @param intensity the intensity of the light, > 1.0 whitens the colors
 *          within the circle (it's brighter).
 * @param fade how quickly the light fades as you leave the circle. If fade
 *           is >= 1.0, it is pitch black outside the circle.
 */
     public LightingFilter(int centerX, int centerY, int radius,
          double intensity, double fade)
     {
          this.centerX = centerX;
          this.centerY = centerY;
          this.radius = radius;
          this.intensity = intensity;

// Can't have an intensity less than 0, an intensity of 0 is total darkness
// How much blacker could it be? The answer is "none more black". - N. Tufnel
          if (intensity < 0.0) intensity = 0.0;

          this.fade = fade;

// Because the lighting is position dependent, this filter
// cannot filter an index color model;
          canFilterIndexColorModel = false;
     }

     public int filterRGB(int x, int y, int rgb)
     {
// Save the pixel's transparency value
          int trans = rgb & 0xff000000;

// Compute the distance from the edge of the circle (distance from center
// - radius).
          double dist = Math.sqrt((x-centerX)*(x-centerX) +
               (y-centerY)*(y-centerY)) - radius;
          if (dist < 0.0) dist = 0.0;

// Compute the intensity based on distance and fade
          double intense = intensity - dist * fade;

// Again, none more black than 0.0
          if (intense < 0.0) intense = 0.0;

// Adjust the colors based on the new intensity
          int red = (int)(((rgb >> 16) & 0xff) * intense);
// Max color value for each component is 255
          if (red > 255) red = 255;

          int green = (int)(((rgb >> 8) & 0xff) * intense);
          if (green > 255) green = 255;

          int blue = (int)((rgb & 0xff) * intense);
          if (blue > 255) blue = 255;

// Return the new color
          return trans + (red << 16) + (green << 8) + blue;
     }
}
Figure 4.8 shows the output from the lighting filter.
Figure 4.8 : Filters based on pixel position can create neat effects.
When your applet starts up and begins downloading its images, you shouldn't wait for all the images to be loaded before your applet really starts. The MediaTracker class is nice for this, but you must be careful when using it. The media tracker allows you to wait for your images to be downloaded. Many times, this is acceptable to you. If you are creating an applet for a commercial Web page, however, you should avoid any possible delay. One option you have with the media tracker is to spawn a thread that waits for images and calls repaint when all the images have been loaded. Of course, that requires you to set up a special thread, which you also may not want to do.
If your applet is not already runnable, you can create a run method and use the media tracker in the run method. If your applet already has a run method, you must set up another class that is responsible for running the media tracker. By the time you create another runnable class that uses the media tracker, you might as well just use the ImageObserver interface.
The Component class, of which Applet is a subclass, contains everything you need to start downloading images and check on their progress. Your applet can implement the ImageObserver interface so it can be notified as your images are downloaded successfully. When you use the ImageObserver interface, you implement the imageUpdate method, which is called whenever there is more information available about the image. Your imageUpdate method should check the flags parameter to see when the ImageObserver.ALLBITS flag is set. When this flag is set, the image has finished loading. You can then repaint the screen using the full image. Listing 4.11 shows an applet that implements the ImageObserver interface to see when all its images have finished downloading.
Listing 4.11 Source Code for DownloadApplet.java
import java.awt.*;
import java.awt.image.*;
import java.applet.*;

// This applet acts as an image observer to watch for images
// to be ready. While applets are being loaded, it displays
// a message where the applet will be drawn. Once the image is
// loaded, it displays the image. If there is an error loading
// an image, it prints an error message in place of the image.

public class DownloadApplet extends Applet implements ImageObserver
{
// The three images we are loading

     protected Image moe;
     protected Image larry;
     protected Image curly;

     public DownloadApplet()
     {
     }

     public void init()
     {

// get the images, this doesn't necessarily start download them, however
          moe = getImage(getDocumentBase(), "moe2.gif");
          larry = getImage(getDocumentBase(), "larry2.gif");
          curly = getImage(getDocumentBase(), "curly2.gif");

// start downloading the images
          prepareImage(moe, this);
          prepareImage(larry, this);
          prepareImage(curly, this);
     }

// Show image checks the flags associated with an image. If the image
// is still loading, it displays the loadingMessage string. If the image
// had an error loading, it displays the errorMessageString. Otherwise,
// it displays the fully-loaded image.

     protected void showImage(Graphics g, int x, int y, Image image,
          String loadingMessage, String errorMessage)
     {
// Get the status of the image
          int flags = checkImage(image, this);

// If the image aborted or had an error, print the error message
          if ((flags & (ImageObserver.ABORT+ImageObserver.ERROR)) != 0)
          {
               g.drawString(errorMessage, x, y+30);
               return;

// If the image has been loaded fully, display it
          } else if ((flags & ImageObserver.ALLBITS) != 0) {
               g.drawImage(image, x, y, this);

// If the image is still loading, display the loading message
          } else {
               g.drawString(loadingMessage, x, y+30);
               return;
          }
     }

     public void paint(Graphics g)
     {
          showImage(g, 10, 10, moe, "Moe's coming!",
               "Moe can't make it.");
          showImage(g, 200, 10, larry, "Larry's coming!",
               "Larry can't make it.");
          showImage(g, 390, 10, curly, "Curly's coming!",
               "Curly can't make it.");
     }

     public boolean imageUpdate(Image img, int flags, int x, int y,
          int width, int height)
     {
// Whenever an image's status changes, imageUpdate gets called. If the
// image aborts, has an error, or is complete, we call repaint to redraw
// the image with the updated information.

          if ((flags & ImageObserver.ALLBITS+ImageObserver.ABORT+
               ImageObserver.ERROR) != 0)
          {
               repaint();
          }
// Otherwise, if we just got more pixels or something else, there's
// no need to repaint, we don't need to change the current message.

          return true;
     }
}
Figure 4.9 shows the output of the applet while it is waiting for the image to be downloaded.
Figure 4.9 : You should display alternate information while waiting for an image to download.