Day 9
Creating a Common Look and Feel
by Paul Mahar
CONTENTS
Today's chapter guides you through the design of a custom form
class that will set the look and feel for the application. You
will use the custom form class to create the store's first JavaScript
form. Along with setting a standard color and heading for each
form, the custom form class will contain a toolbar with buttons
to take the shopper to each major area of the Web bookstore application
you started on Day 8. The JavaScript form is the Help form referenced
by the index HTML file from Day 8. The following are the major
tasks for the day:
- Finding common links that you can use for toolbar buttons.
- Designing a custom form class with a standard banner.
- Adding toolbar buttons to the custom form class.
- Writing a JavaScript method for each toolbar button.
- Designing the Help form.
- Creating a user key value to track users.
- Creating a JavaScript preprocessor file to link all the form
source files together.
You will learn how to write methods for both the Help form and
the toolbar custom form class. Most of the methods are simple
functions that open other forms. The most advanced method in this
chapter tells the shopper how many books are in the shopping cart.
You'll also get a brief introduction to the JavaScript preprocessor.
For the bookstore application, Boingo (the boss) insists all forms
include a banner with the store name and a common set of navigation
buttons. Here are several basic approaches to giving Boingo what
he wants:
- Add standard buttons and methods to each form. You could use
the Form Designer's Clipboard support to copy buttons from one
form to another. This would make the task a little less tedious,
but still not a delight.
- Create custom components for each button. This lets you add
the common buttons directly from the component palette. You have
to write the methods only once. Using custom components does take
advantage of reusable objects but you still have to add and position
five or six components for each form. There must be an easier
way.
- Use a custom form class complete with the banner, buttons,
and events. Controls from a custom form class require no repositioning
and make it easy to add multiple components to multiple forms.
One of the most powerful benefits of object orientation is the
ability to create reusable classes. A custom form class lets you
create a standard template for a set of JavaScript forms. Custom
form classes can add properties, components, and methods to standard
JavaScript forms.
A custom form class also streamlines application maintenance.
If you decide you want to add a new button to the toolbar for
all forms or change the way one of the buttons works, you need
to change only the custom form class. All derived forms will inherit
your changes automatically.
Not all forms can be common links. From the dissecting done on
Day 8, you determined that your application requires eight forms.
The shopper needs the ability to jump to some of the forms at
any point. Other forms can open only at certain points. To make
a sensible toolbar with common links, start by taking a closer
look at each form.
As shoppers move around from form to form, the application needs
to keep track of them. This can be done by creating a user key
value when the user first enters the application. Each form can
then pass the key value along to the next form. As long as the
shopper stays within the application, it can keep track of the
shopping cart contents.
- The Cart form shows the shopper what is in the shopping cart.
This form requires a user identification key so that it can filter
out rows from the Cart table that belong to other shoppers.
- The Checkout form enables the user to enter billing information
and commit an order. Like the Cart form, the Checkout form requires
a user identification key so that it can locate the correct rows
in the Cart table.
- The Detail form shows information for a single book.
Shoppers can add books to the shopping cart from this form. The
user key is required to add books to the cart. The Detail form
requires query and row positioning information from the Results
form. The Detail form is not a common link because it can open
only from the Results form.
- The Help form displays information about each of the common
links. This is the only form that does not require a user key
to open. If the Help form opens without a user value, it generates
a new user key. This is the only form that a shopper can open
through a URL. All the other forms open in response to a request
to an IntraBuilder server.
- The Keyword form performs a complex search for books in the
Titles table. It requires only the user key to pass on to other
forms. The Keyword form can open the Results form.
- The Message form opens when no rows are available for another
form. It requires the user key to pass on to other forms. The
toolbar does not need a common link to this form.
- The Quick form has simple search capabilities. Like the Keyword
form, it opens the Results form and passes on query information
and the user key. It requires only the user key to open.
- The Results form presents a list of rows matching either a
keyword or quick search. It requires query information from a
search form and is not a common link.
The only forms that work as common links are the Cart form, the
Checkout form, the Help form, the Keyword form, and the Quick
form. All the others require more information than the user key.
So far this application is only an idea. You have yet to develop
any forms, but that won't stop you from charging ahead and creating
a set of toolbar buttons that can link the applications forms
together. This section describes how to create a custom form class
with five buttons, each linked to an event that can open another
form. The custom form class will also contain a banner and a ruler.
Here are the steps for creating the Toolbar custom form class:
- Open the IntraBuilder Explorer with the Look In box set to
the Store folder.
- Select the Forms tab and double-click the (untitled) Custom
Form Class icon. This is the second icon in the group. It contains
less detail than the standard Form icon. If you are prompted for
an Expert, you'll know you clicked on the wrong icon.
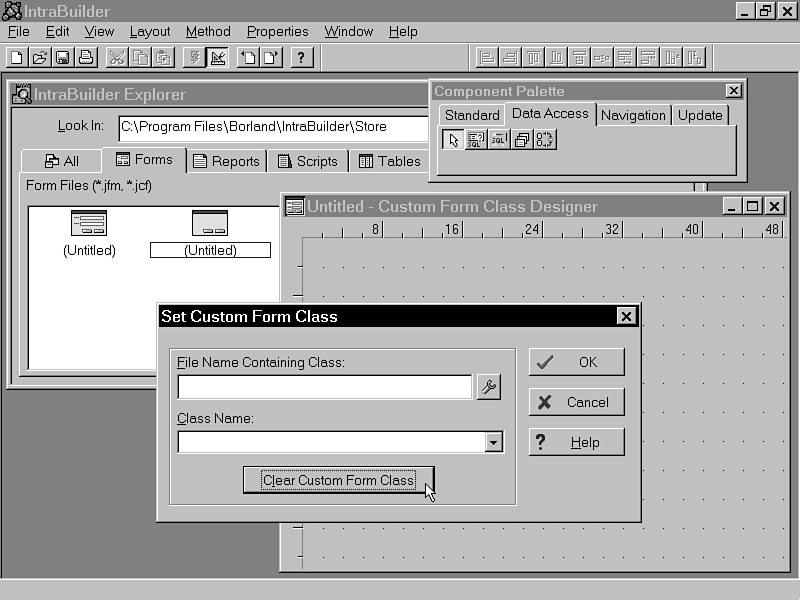
- Clear any current custom form class by selecting File|Set
Custom Form Class. Use the Clear Custom Form Class button to force
the designer to derive your new class from the base Form class
(refer to Figure 9.1).
Figure 9.1 : Creating a new custom form class from the base class of Form.
- Drop an HTML component on the form to use as a banner. Place
the component near the top of the form and make it large enough
to hold "Boingo's Books" in a large font.
- Open the Inspector and change the HTML component's name property
to htmlBanner. The name property is one of the identification
properties.
 |
All component names must be unique to a form. Be sure to change the default name property of each component you place in a custom form class. Leaving the default names increases the likelihood of conflicts with components on forms derived from a custom
form class.
|
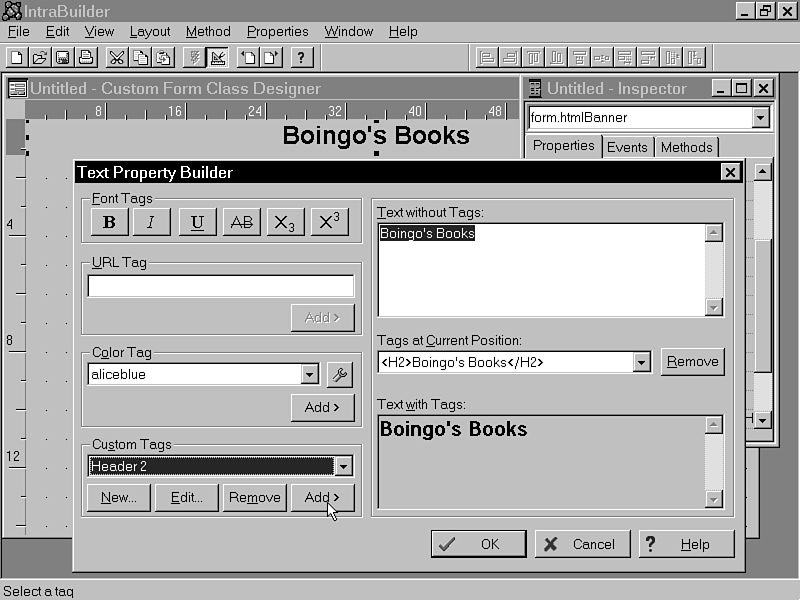
- Locate the text property and open the Text Property
Builder by clicking on the tool (also known as the wrench,
or spanner) button.
- Enter Boingo's Books into the Text without Tags box.
Select the text and apply the Header 2 tag. You can select the
Header 2 tag from the Custom Tags drop-down list. Click Add to
place HTML tags around the selected text as shown in Figure 9.2.
Figure 9.2 : Adding HTML header tags with the Text Property Builder.
| TIP |
Use standard HTML tags to control the emphasis of text items. Although IntraBuilder does support selecting specific fonts, not all browsers support font name tags. All Web browsers support HTML tags for header levels.
|
- The last property to change for htmlBanner is alignHorizontal.
Set this to 1 - Center.
- Add five buttons and set the names and text properties as
shown in Table 9.1.
For all buttons, set the top to 1.6 and the width to
12.
Table 9.1. The toolbar button properties.
| Name | Text |
Left |
| buttonQuick | Quick
| 1 |
| buttonKeyword | Keyword
| 15 |
| buttonCart | View Cart
| 29 |
| buttonCheckout | Checkout
| 43 |
| buttonHelp | Help |
57 |
| TIP |
Many position values given throughout the text do not conform to the default grid. If you have not already done so, uncheck the Snap to Grid option. You can set this and other Form Designer properties by selecting Properties|Form Designer
Properties.
|
- The last property to alter before saving this custom form
class is the form's color property. Use the Color Property Builder
or enter white into the Inspector for form.color.
Your custom form class should now appear similar to the one in
Fig-ure 9.3.
- Save your form and close the Custom Form Class Designer. From
the menu, select File|Close and save the file as Toolbar.JCF.
The custom form class file is actually a library that can hold
many different custom form classes. When you save a custom form
class to a new file, the first class is given the name of the
file plus CForm. This makes the new toolbar class ToolbarCForm.
If you save additional forms to this file as custom form classes,
you are prompted for a class name.
Figure 9.3 : Setting the form color.
Currently, the buttons in the custom form class do nothing at
all. They do not even show up in any forms that you run. To remedy
this situation, this section works through the development of
a simple Help form. The Help form, like all the other forms in
the application, derives the toolbar buttons from the custom form
class.
The first rendition of the Help form will contain only some HTML
text in addition to the components inherited from the custom form
class. The new HTML text is a list with brief instructions on
what each of the common link buttons do. After creating the Help
form, you can try opening it through the index.htm file.
After the Help form is up and running through a browser, JavaScript
methods need to be added to both the custom form class and the
Help form to make them actually do something dynamic. After all,
dynamic forms are what IntraBuilder is all about! These steps
show how to make the initial static Help form.
- Open the Form Designer. Double-click the standard (untitled)
forms icon to create a new form. When prompted, click Designer
to avoid the way of wizards, warlocks, and experts.
- Set the custom form class to the Toolbar class. From the menu,
select File|Set Custom Form Class. Use the tool button to open
the Toolbar.jcf file. This file has only one class, so
you can leave the class name set to ToolbarCForm.
When you click OK to close the Set Custom Form Class dialog, the
Form Designer shows what appears to be your custom form class.
If you select one of the buttons, you'll notice a difference in
the nibs.
 |
Nibs are the dots that appear on a component to indicate selection. The nibs for components that exist within a class appear black. Nibs on inherited components, such as the toolbar buttons, appear white.
|
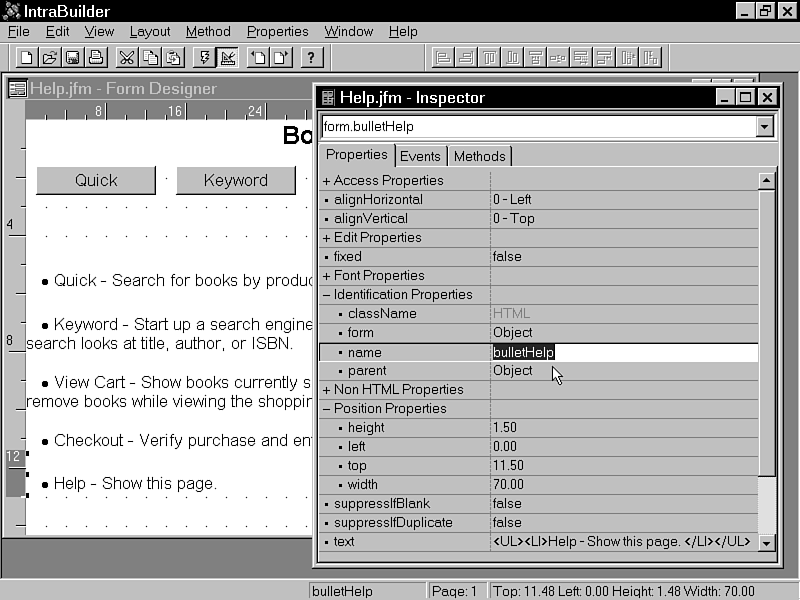
- Add five HTML controls and set their respective name and text
properties as shown in Table 9.2. It is easier to enter long text
properties from within the Text Property Builder.
To make each item appear as an HTML bullet, start each text with
<UL><LI> and place </LI></UL>
at the end. The LI tag specifies that the text is part
of a list. The default list type is a numbered list. The UL
tag makes a list item into an unnumbered list item.
Table 9.2. The HTML bullet properties for the Help
form.
| Name | Text |
| bulletQuick | <UL><LI>Quick - Search for books by product covered.</LI></UL>
|
| bulletKeyword | <UL><LI>Keyword - Start up a search engine to help find the book you want directly. A keyword search looks at title, author, or ISBN. </LI></UL>
|
| bulletCart | <UL><LI>View Cart - Show books currently selected for purchase. You can edit quantities and remove books while viewing the shopping cart. </LI></UL>
|
| bulletCheckout | <UL><LI>Checkout - Verify purchase and enter name, address and billing information. </LI></UL>
|
| bulletHelp | <UL><LI>Help - Show this page. </LI></UL>
|
- Position the bullets in a vertical list and leave enough space
between the toolbar buttons and the first bullet to add a rule
and another line of text. Position the bullets with a left property
of 0.
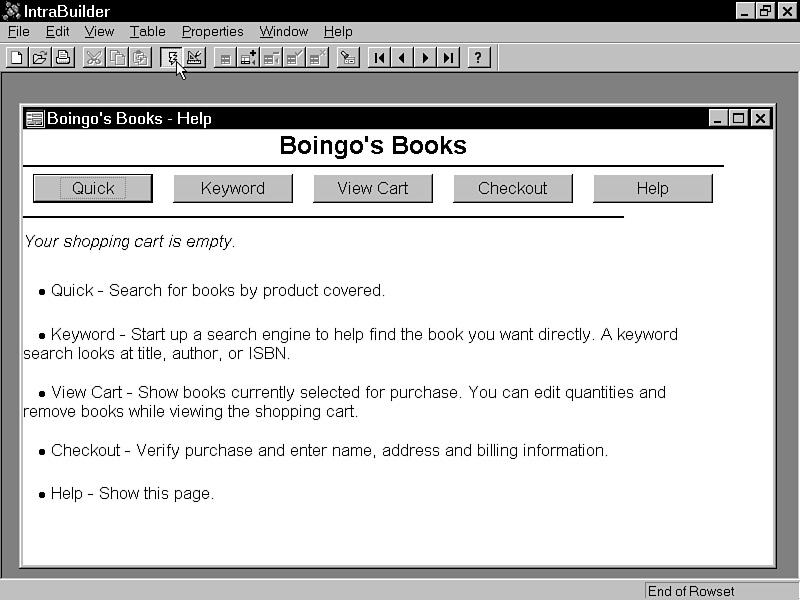
- When you have the form looking like Figure 9.4, press f2 to
save and run it as help.jfm.
Figure 9.4 : Laying out a bulleted list.
After you design a form in IntraBuilder, it is a good idea to
view it through Navigator and Internet Explorer. What looks okay
in the IntraBuilder Designer and Navigator might look surprisingly
bad in Internet Explorer. The opposite can be true, too. So, now
is a good time to try out that link in index.htm.
Close the IntraBuilder Designer and start a Web server and an
IntraBuilder Server. When your server environment is running,
open the index.htm file created on Day 8. If you're running
the Borland Web Server on the same machine that your browser runs
on, the URL will be http:\\localhost\store\index.htm.
Other servers will let you get away with http:\\localhost\store.
|
Close the IntraBuilder Designer before starting an IntraBuilder Server. The IntraBuilder Server uses some of the same underlying data structures and can conflict with Designer sessions.
|
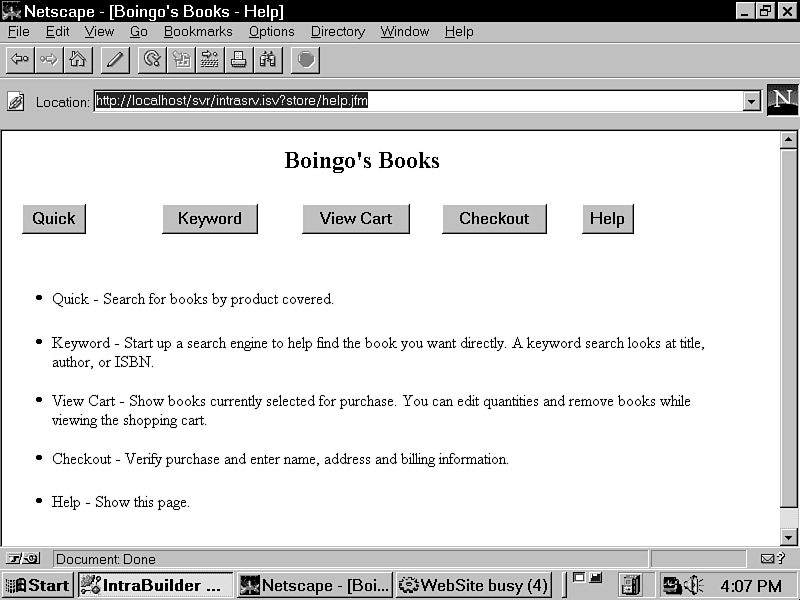
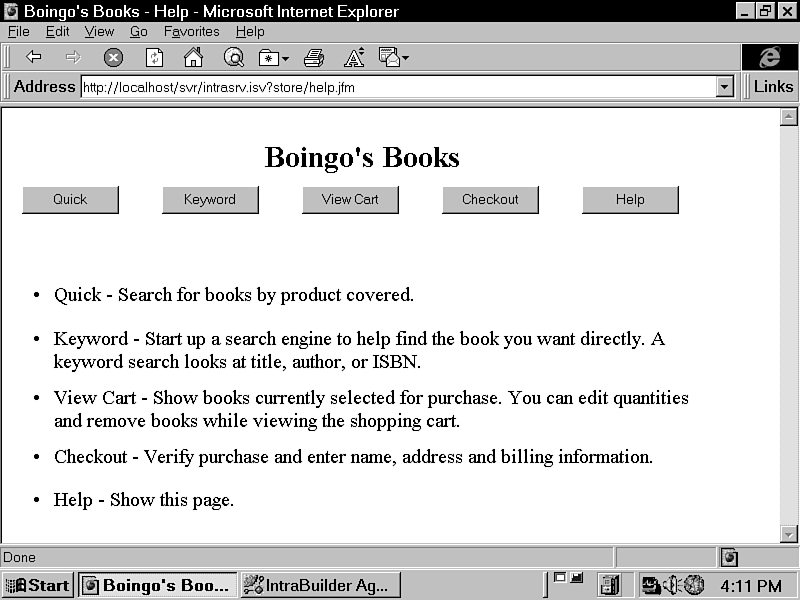
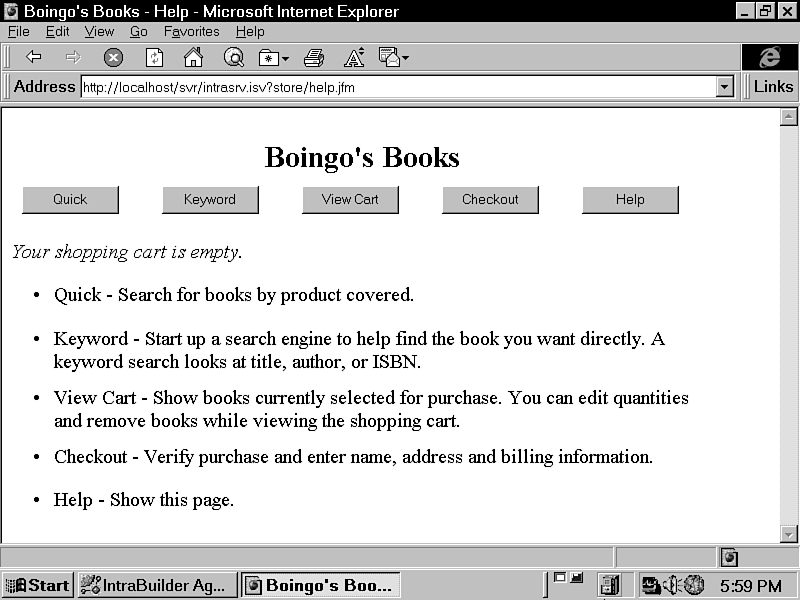
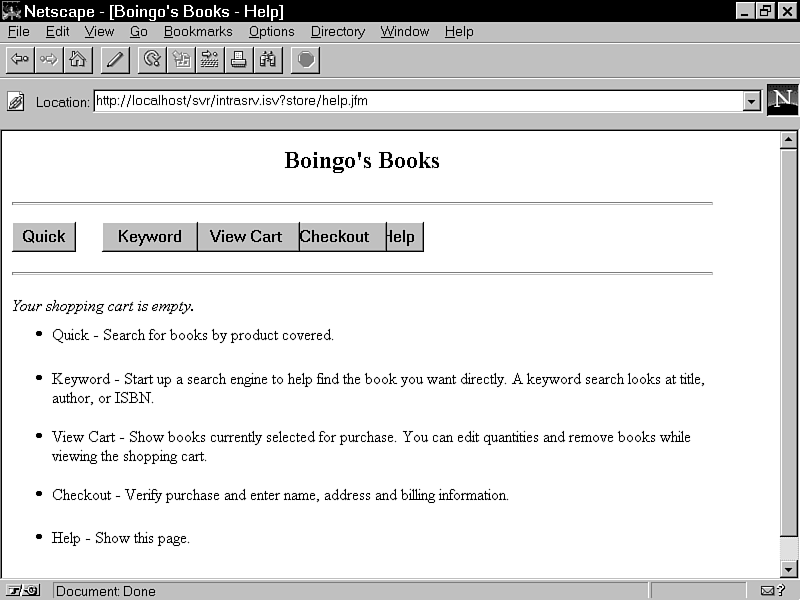
Try loading the Help form with both the text and image links on
the index page. You can also start the Help form directly with
a URL of http://localhost/svr/intrasrv.isv?store/help.jfm.
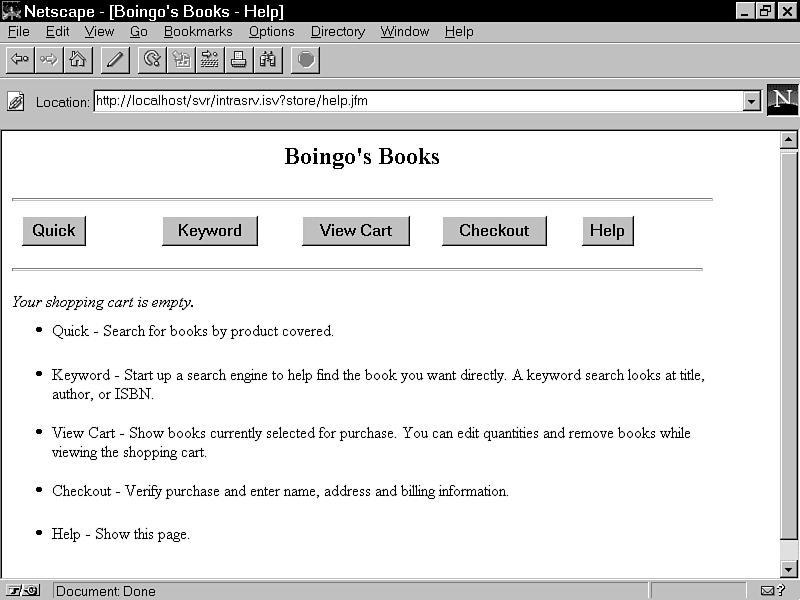
Figure 9.5 shows the form as it looks in Navigator. It looks pretty
good.
Figure 9.5 : Running the Help form through Netscape Navigator.
If you run the same form in Internet Explorer, things look even
better. From Figure 9.6, you can see that toolbar buttons maintain
a consistent width. In Navigator the button width is determined
by the text within the button.
Figure 9.6 : Running the Help form through Microsoft Internet Explorer.
If you view the source HTML, you will see that IntraBuilder uses
HTML tables to control positioning. IntraBuilder 1.0 uses HTML
tables to create a grid where components are placed in relative
positions. Version 1.01 goes beyond relative positioning to enable
pixel level placement of controls. The pixel positioning is accurate
for the top and left properties. The width and height can be altered
by other factors. For instance, the width of a select control
is determined by the widest option value.
|
When positioning buttons and select controls, leave ample room so that the controls will not overlap in Navigator. If you place a row of buttons too close together, Navigator keeps the top and left positions while expanding the width. Internet Explorer
prevents overlapping controls by repositioning controls as needed.
|
One of the objectives of the original HTML specification was to
avoid any type of true formatting. As a document language, not
an application language, the emphasis was on describing how ideas
interrelated. As a result, you have things such as <H2>
for a heading. With HTML, you can identify text by content. Instead
of specifying that an HTML object appears in an Arial bold font
with a point size of 20, you make it a heading, and let the browser
pick the font. As the browser vendors engage in feature wars,
they continue to extend HTML with more positioning and physical
appearance tags. This does defeat the total platform-independent
nature of the original Web creators, but it also gives us application
developers the control we so desire.
Now that you have verified that you can run your new JavaScript
form successfully, it's time to complete it and add some dynamic
HTML. To complete the Help form, you will add two methods. The
first generates a unique value for the user key. The second method
shows how many items are currently in the shopper's cart. Because
there really isn't any way to add items to the cart, this number
should come up as zero. This first set of steps shows you how
to add the user property and provides a glimpse at the
exception handler.
|
An exception is a runtime error that you can trap within a JavaScript function. Exception is also the class name of the standard error information object.
|
Before you start, close down the IntraBuilder Server by closing
the Web server and all the IntraBuilder Agents. Then follow the
next steps to start some real JavaScripting.
| TIP |
If you're running Windows NT 3.51, the quickest way to shut down the IntraBuilder Agents is through the Windows task list.
|
- Open the Help form in the Form Designer. A quick way to do
this is to double-click the Help.jfm file in the IntraBuilder
Explorer.
- Open the Inspector and locate the onServerLoad event
for the form. This is a server-side event that fires when the
form opens.
The client-side equivalent is onLoad. The onLoad
event runs within the browser and requires a JavaScript-compatible
browser. All client-side events are ignored if a browser user
sets the option to disable ActiveScript or JavaScript.
- Click the tool button for the onServerLoad event
to create an empty method, open the method editor, and link the
new method to the onServerLoad event.
A method is a function that resides inside a class. Methods and
functions can optionally receive and return values. The method
you're about to write does neither.
- Enter the method from Listing 9.1 and then try to run your
form.

Listing 9.1. Using an exception to see whether the
user property
exists.
 1: function Form_onServerLoad()

 2: {

 3:    // first pass

 4:    try

 5:    {

 6:       var x = this.user ;  // Is user key undefined?

 7:    }

 8:    catch (Exception error)

 9:    {

10:       var errorLog = new File() ;

11:       if (errorLog.exists("errorlog.txt"))

12:       {

13:          errorLog.open("errorlog.txt","RW") ;

14:       }

15:       else

16:       {

17:          errorLog.create("errorlog.txt") ;

18:       }

19:       errorLog.puts("") ;

20:       errorLog.puts("Unexpected exception in Help.jfm");

21:       errorLog.puts("Date:    " + (new Date())) ;

22:       errorLog.puts("Code:    " + error.code) ;

23:       errorLog.puts("Message: " + error.message) ;

24:       errorLog.close() ;

25:    }

26: }
 Shoppers can open Help from the store front (index.htm) or from any other JavaScript form in the application. This means that during the onServerLoad, the user property may
or may not exist. The Form_onServerLoad method uses exception handling to see if the user property is already defined.
Shoppers can open Help from the store front (index.htm) or from any other JavaScript form in the application. This means that during the onServerLoad, the user property may
or may not exist. The Form_onServerLoad method uses exception handling to see if the user property is already defined.
Exception handling works with try and catch
blocks. A try block contains the code that you want to
try to run. If anything goes wrong when trying to run the try
block, the error is caught by the catch block. The catch
block can determine what went wrong and decide what to do next.
The try block in the Form_onServerLoad contains
only the statement on line 6. It tries to assign form.user
to a new variable. This works-as long as the user property
exists. If it does, the catch block is ignored and the
function ends. If the user property does not exist, the
catch block writes out the error to a log file.
When an error is caught on line 8, the method creates an Exception
object. This object contains a text message and a numeric code
to indicate what went wrong. The catch routine takes this code
and writes it to a file using two other objects. The File
class contains methods to work directly with files. The errorLog
is an instance of the File class that is used to check
whether a log already exists. If the log file exists, it is opened,
and the new error is written out. Otherwise, the catch
block creates a new error log before writing out the error information.
If you run the form now, it creates an errorlog.txt file.
You can open the text file from the Custom tab on the IntraBuilder
Explorer. To see the newly created files in the IntraBuilder Explorer,
use View|Refresh. The file will contain something like this:

Unexpected exception in Help.jfm

Date:    09/13/96 01:30:19 AM

Code:    167

Message: Error:  Variable is not defined:  user
From this file, you can see that the code for an undefined variable
is 167. You can update the Form_onServerLoad
method to generate a new user property in the catch
block if a code of 167 is caught. If an existing shopper
runs the form, the user property will already exist,
and the method does not need to do anything else. To complete
the event, open the form in the Script Editor, locate the Form_onServerLoad
method, and modify it to match Listing 9.2.
Listing 9.2. The complete Form_onServerLoad
method for the Help form.
 1: function Form_onServerLoad()

 2: {

 3:    // complete

 4:    try

 5:    {

 6:       var x = this.user ;  // Is user key undefined?

 7:    }

 8:    catch (Exception error)

 9:    {

10:       if (error.code == 167) //  not defined

11:       {

12:          if ( (new NetInfo()).sessionID == -1 )

13:          {

14:             var cUser = new StringEx("" + Math.int(Math.random(-1)

15:                       * Math.pow(10,20))) ;

16:             this.user = cUser.left(20) ;

17:          }

18:          else

19:          {

20:             this.user = "" + (new NetInfo()).sessionID

21:          }

22:       }

23:       else

24:       {

25:          var errorLog = new File() ;

26:          if (errorLog.exists("errorlog.txt"))

27:          {

28:             errorLog.open("errorlog.txt","RW") ;

29:          }

30:          else

31:          {

32:             errorLog.create("errorlog.txt") ;

33:          }

34:          errorLog.puts("") ;

35:          errorLog.puts("Unexpected exception in Help.jfm");

36:          errorLog.puts("Date:    " + (new Date())) ;

37:          errorLog.puts("Code:    " + error.code) ;

38:          errorLog.puts("Message: " + error.message) ;

39:          errorLog.close() ;

40:       }

41:    }

42: }
The complete version of the Help form's Form_onServerLoad adds two more sets of if and else blocks. If the error code that is caught is 167, then a new user key is
generated. Otherwise, the error is written to the error log file.
When the form is run through a browser, the IntraBuilder Server
creates a unique identifier for the session. The session ID is
a property of the NetInfo class. When run in the Designer,
the session ID is always -1. Line 12 checks whether the
session ID can be used as the user key. To let the application
also run correctly in the Designer, an alternate key can be generated
using a random string.
| NOTE |
The NetInfo class is not available in version 1.0. If you encounter a class not loaded error when trying to use NetInfo, check what version you are running. A free patch from 1.0 to 1.01 is available from the IntraBuilder Web
site.
|
Two new classes are used to create the alternate user key on lines
18 through 20. The first is the Math class. It has many
methods to help out in complex calculations. The Math
class is one of the few classes that enables static use. To create
a random number, you could use something like this:
m = new Math()

x = m.random( -1 )
It works just as well to use this:
x = Math.random( -1 )
|
Static use refers to using methods of the class without creating an instance of it. For example, you can use methods of the Math and Date classes without creating a new object.
|
The random() method returns a value between 0
and 1. To make this number a little more unique as a
whole number, it is multiplied by 10 to the power of 20. You end
up with a 20-digit random value. The random() method
does not return a truly random number. It actually returns a fixed
set of numbers in a fixed order. You can pass it a parameter to
mix up the order. Passing a negative value to the random()
method bases the return value on the system clock. This ensures
more uniqueness than the system time itself.
The function converts the 20-digit number to a string. Strings
are completely accurate in query operations, while numbers lose
precision after 16 digits. Making a simple string in JavaScript
is easy. Just add quotation marks ("") to the
start of a number, and it becomes a string. All strings are string
objects with a small set of methods for string manipulation. More
advanced string manipulation methods are available with the StringEx
class.
To create a more perfect user key, line 20 removes trailing decimal
points from the string. There isn't an easy way to do this through
the standard String class. StringEx contains
a left() method that will do the trick. Passing a string
to StringEx creates a string of the same value with additional
methods. The left() method returns the leftmost digits
of a string. Passing 20 to the left() method truncates
anything past the 20th position. This removes the decimal points
and completes the user key.
Now that the Help form has a user key, let's make use of it. In
the next series of steps, you'll create an HTML object that defines
its own message with another onServerLoad event. This
also involves the application's first query.
- Open the Help form in the Designer and add another HTML component
directly above the bullets.
- Change the name to htmlCount. You can leave the text
property as is.
|
Always press Enter to commit changes when editing property values in the Inspector. If you do not press Enter, shifting focus to another window can cause the property to revert to the previous value.
|
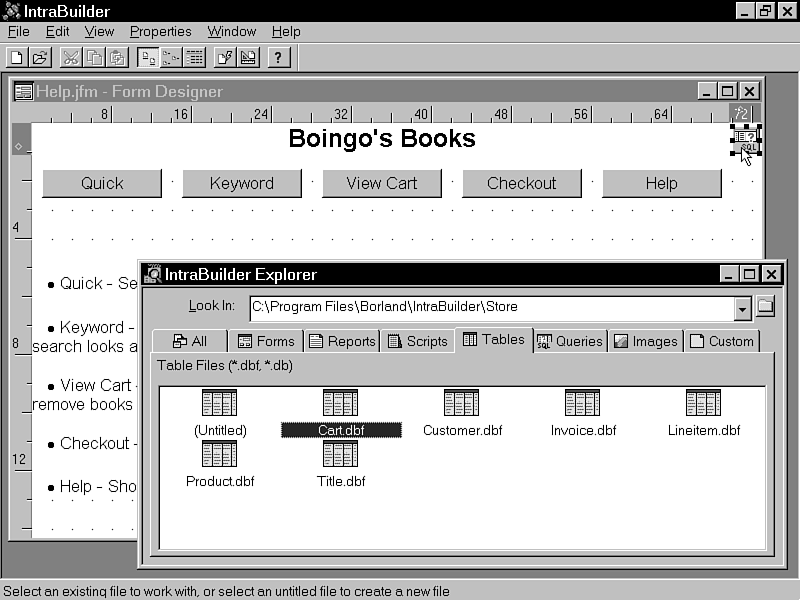
- Add a Query object for the Cart table. The easiest
way to do this is to open the IntraBuilder Explorer, select the
Tables tab and drag the Cart table to the Form Designer as shown
in Figure 9.7. When you drop the table on the form, it creates
a query with a reference of cart1.
Figure 9.7 : Using drag-and-drop to add the Cart table to the Help form.
| NOTE |
Unlike standard controls, the data access components do not have a name property. To change the reference name for a query, you must edit the JavaScript source code. When you use drag-and-drop to add a query, the Form Designer creates a name
based on the query. Adding a query from the component palettes leaves the less desirable name of query1. This naming convention starts to get confusing when you have more than one query.
|
- Whenever you add a table from the current folder, you should
edit the sql property to remove the full path. Select
the query, open the Inspector, and locate the sql property.
The default statement will be
SELECT * FROM "C:\Program Files\Borland\IntraBuilder\Store\cart.DBF"
Change this to the following:
SELECT * FROM "cart.DBF"
Now you can deploy the application to another drive or folder
without any problems. If you need to work with tables in a directory
other than where the JavaScript forms are located, consider using
a BDE alias. When you work with a BDE alias, the folder name is
defined in a BDE configuration file rather than in the application's
source files.
- Inspect the htmlCount object and create a new method
linked to the htmlCount onServerLoad event.
The onServerLoad event for a component fires after the
onServerLoad event of the form.
- Enter the method in Listing 9.3. When you're done, run the
form to see the message saying that you have no items in your
shopping cart.
Listing 9.3. The htmlCount_onServerLoad()
method.
 1: function htmlCount_onServerLoad()

 2: {

 3:    var nCount = 0 ;

 4:    this.form.cart1.rowset.filter =

 5:         "CARTUSER = '" + this.form.user + "'" ;

 6:    this.form.cart1.rowset.first() ;

 7:    while ( ! this.form.cart1.rowset.endOfSet )

 8:    {

 9:       nCount+=this.form.cart1.rowset.fields["QTY"].value ;

10:       this.form.cart1.rowset.next() ;

11:    }

12:    nCount = Math.int(nCount) ;

13:    if ( nCount == 0 )

14:    {

15:       this.text = "Your shopping cart is empty." ;

16:    }

17:    else

18:    {

19:       this.text = "Your shopping cart contains " + nCount +

20:          ( (nCount==1) ? " item." : " items." ) ;

21:    }

22: }
This function introduces many new concepts, so let's go through it in detail. The basic idea is to filter the query to just those rows that belong to the current user. The QTY field is summed up. If
the total is zero, the message says the cart is empty; otherwise, it displays the total.
function htmlCount_onServerLoad()
The function statement on line 1 names the function and sets the
parameter list. In this case, there are no parameters. If there
were, the parameters would be listed between the parentheses after
the function name.
var nCount = 0 ;
The var statement on line 3 creates a local variable.
If you leave off the var, the variable becomes public
and has a higher chance of conflicting with other functions. Here,
a local variable is assigned and initialized to zero:
this.form.cart1.rowset.filter =

     "CARTUSER = '" + this.form.user + "'" ;

this.form.cart1.rowset.first() ;
Lines 4 and 5 set a filter property on a query. Notice
that the query is referenced through the form. Each standard control
has a form property that points to the container form.
The form property of a control is equal to its parent
property.
The filter is a property of the rowset class.
All query objects contain a rowset object. When you use
a simple SQL select statement that queries a single table,
the query refers to the table as a whole, while the rowset
refers to individual records. The filter property determines
what records you can navigate to. You can set the filter
property to a SQL expression.
The SQL expression is much more limited than a JavaScript expression.
For example, the SQL expression cannot include references to objects.
The expression is a string that IntraBuilder passes to the Borland
Database Engine. If the user property is equal to 100,
the resulting filter would become "CARTUSER = '100'".
Notice that the filter property requires nested quotes
to work with literal strings. Although this.form.user
does not start as a literal string, its value transforms into
one before being passed to BDE.
The first() method simply moves the row pointer to the
first row that matches the filter. If no rows match, the rowset
is at endOfSet.
while ( ! this.form.cart1.rowset.endOfSet )

{

   nCount+=this.form.cart1.rowset.fields["QTY"].value ;

   this.form.cart1.rowset.next() ;

}
The while loop starting at line 7 moves through all rows
that match the filter. The loop uses nCount to sum up
values from the QTY field. The += operator is used as
shorthand. The summation line could also be written as
nCount = nCount + this.form.cart1.rowset.fields["QTY"].value ;
The next() method moves the row pointer ahead one row.
It optionally takes a parameter to specify direction and how many
rows to move. Passing next a negative value moves the
pointer backward. In other words, a negative next is
a previous.
nCount = Math.int(nCount) ;
Line 12 removes the decimal places and makes the nCount
variable an integer. This is done to make the sum display as a
whole number.
if ( nCount == 0 )

{

   this.text = "Your shopping cart is empty." ;

}
Here the text property of the htmlCount object is set
to "Your shopping cart is empty", if the nCount
is equal to zero. Notice that the JavaScript equality operator
is a double equal sign; however, the equality operator used in
the filter is a single equal sign. In the assignment, this
refers to the object that owns the current event. The function
is linked to the onServerLoad event of htmlCount.
That makes this equal to htmlCount. The same
statement also could be written as
this.form.htmlCount.text = "Your shopping cart is empty."
One benefit of using a this reference is that you can
change the name of the control, and the function still works.
An explicit reference is more difficult to maintain.
else

{

   this.text = "Your shopping cart contains " + nCount +

      ( (nCount==1) ? " item." : " items." ) ;

}
The else on line 17 takes effect when the if
fails. This block actually contains a second set of if
and else conditions on lines 19 and 20. The question
mark is a shorthand way to use a condition. The same block could
also be written as follows:
else

{

   if (nCount==1)

   {

      this.text = "Your shopping cart contains " + nCount +" item." ;

   }

   else

   {

      this.text = "Your shopping cart contains " + nCount +" items." ;

   }

}
To finish up the Help form, you need to fix the bullets so they
show up better in Internet Explorer and provide a way to locate
code for other forms. The first part can be done with a few mouse
clicks. The second requires a new file and some imagination. To
begin, you'll need to create a header file that is really more
of a footer file.
Open the Script Editor to create a new file. Double-click the
(untitled) icon on the Script tab of the IntraBuilder Explorer.
Enter the preprocessor statements from Listing 9.4. Save the file
as store.h. If you refresh the IntraBuilder Explorer
window, the header file will appear on the Custom tab.
Listing 9.4. The shell for the store.h
file.
 1: #define DEBUG  // for development only

 2: #ifndef STORE

 3:    #define STORE

 4:    #ifdef DEBUG

 5:       // Load scripts

 6:       // _sys.script.load statements go here.

 7:    #elseif

 8:       // Include scripts

 9:       return null

10:       // #include statements go here

11:    #endif

12: #endif
The header file actually gets included at the bottom of the Help form's source code. The header gives you a central location to specify additional source files for the store application. This is the
only file, outside of index.htm, that will reference physical JavaScript source filenames.
The header file is primarily composed of JavaScript preprocessor
statements. These statements follow the same conventions found
in the C++ Builder and Visual dBASE preprocessors.
To avoid duplicate definitions from accidental multiple inclusions,
the file checks to see if the constant STORE exists in
line 2. If it does, nothing else happens. If it does not already
exist, STORE gets defined.
|
A constant is a value defined within the preprocessor that cannot be altered through a JavaScript assignment. The value of a constant is set prior to compilation. One of the most common uses of constants is to create more meaningful names for API
parameter values. Programmers usually separate constant definitions from other source files by placing them in a header file. IntraBuilder comes with several header files that contain constants for working with the Windows API. You will find these files in
the IntraBuilder include folder.
|
The second condition checks to see whether the constant DEBUG
exists. If so, additional scripts are loaded through _sys.scripts.load().
This method requires slightly more overhead than direct inclusion,
but it makes debugging much easier. If a file has a runtime error
during development, the IntraBuilder error dialog can take you
directly to the line where the error occurred. This is a great
debugging feature that you don't want to be without until final
deployment. The first line of the header creates the DEBUG
constant.
When the application is done, you can use #include statements
to consolidate all the source code into one compiled object file.
This reduces the system's use of file handles. When you include
JavaScript form files at the end of other JavaScript form files,
you must be sure to add an extra return statement on
line 9. Without the return null, the first included JavaScript
form would open in addition to the Help form.
Therefore, if you can imagine having other JavaScript forms to
include, then you can imagine this header being useful. For now
it is just a placeholder that lets you finish work on the Help
form.
With the store.h include file in place, you
are set for the last modifications to the Help form. To complete
the form, you can give it a proper title and make sure controls
have proper spacing. The following steps show you how:
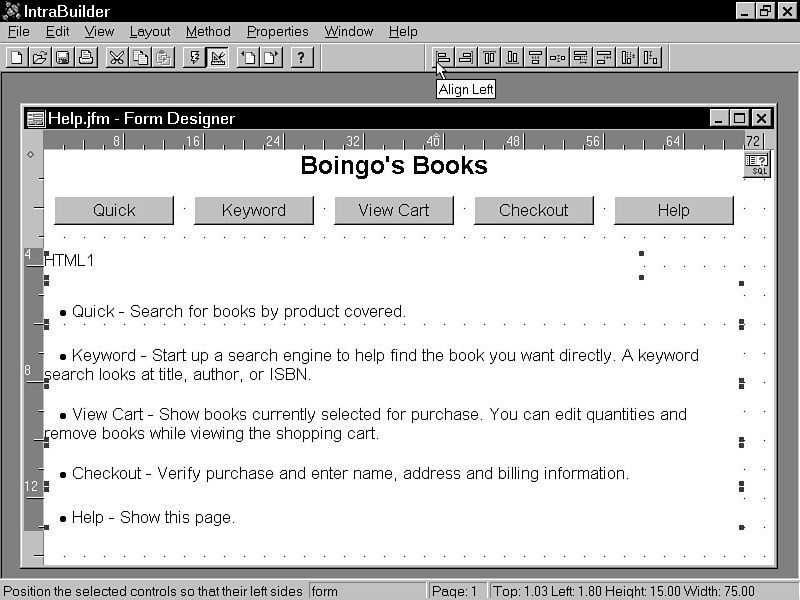
- Open the Help form in the Form Designer.
- Click the htmlCount object and Shift-click all the
bullets to select them.
- From the menu, choose Layout|Spacing|Make Equal Vertical Spacing.
You can also left align the controls as shown in Figure 9.8.
Figure 9.8 : Left aligning the bullets and the htmlCount control.
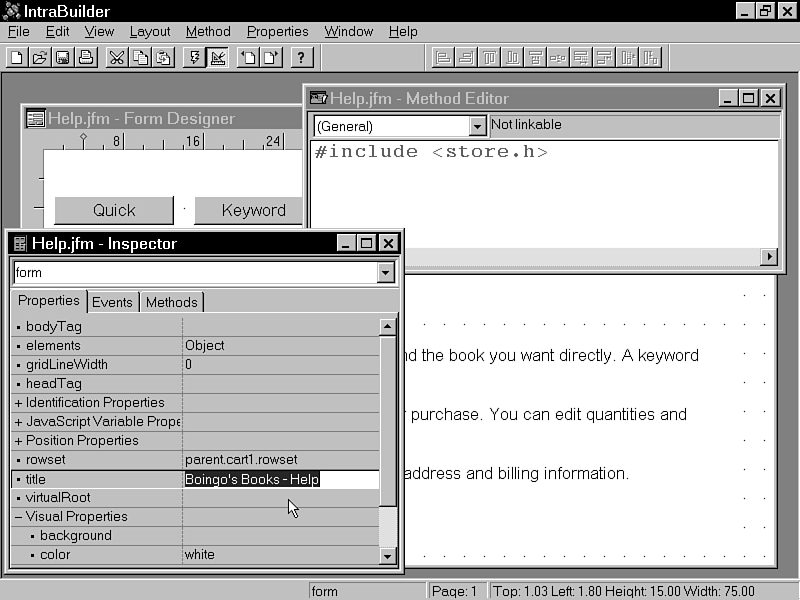
- Open the Method Editor. From the menu, select View|Method
Editor. It will open showing the Form_onServerLoad method.
- Switch to the general section of the source file. From the
drop-down list, select (general). This is the footer of the JavaScript
form file. Here you can create functions that reside outside the
class definition.
- Enter the following line as shown in Figure 9.9:
#include <store.h>
Figure 9.9 : Placing the #include outside the class definition.
- Change the title of the form to Boingo's Books - Help.
The title appears in the title bar of the browser. That's it-you're
done with the Help form. Save your changes and close the Designer.
As when you make any modifications to a form, it is a good idea
to run it through a browser to see if the changes look okay. From
Figure 9.10, you can see the new form title in Internet Explorer's
title bar.
Figure 9.10 : The revised Help form in Internet Explorer.
If you need to make any more minor position adjustments, you might
want to do so with the Script Editor. Sometimes, it can be quicker
to change a top property through source code than through
the Designer. This is especially true of shorter forms. If you
open the Help form as JavaScript, it should resemble Listing 9.5.
Listing 9.5. The complete source code for the Help form.
  1: // {End Header} Do not remove this comment//

  2: // Generated on 11/02/96

  3: //

  4: var f = new helpForm();

  5: f.open();

  6: class helpForm extends ToolbarCForm from "TOOLBAR.JCF" {

  7:    with (this) {

  8:       height = 15;

  9:       left   = 0;

 10:       top    = 0;

 11:       width  = 75;

 12:       title  = "Boingo's Books - Help";

 13:       onServerLoad = class::Form_onServerLoad;

 14:    }

 15:

 16:    with (this.cart1 = new Query()){

 17:       left   = 72;

 18:       top    =  0;

 19:       sql    = 'SELECT * FROM "cart.DBF"';

 20:       active = true;

 21:    }

 22:

 23:    with (this.cart1.rowset) {

 24:    }

 25:

 26:    with (this.htmlCount = new HTML(this)){

 27:       height = 1;

 28:       top    = 3.5;

 29:       width  = 70;

 30:       color  = "black";

 31:       text   = "HTML1";

 32:       onServerLoad = class::htmlCount_onServerLoad;

 33:    }

 34:

 35:    with (this.bulletQuick = new HTML(this)){

 36:       height = 1.5;

 37:       top    = 4.5;

 38:       width  = 70;

 39:       color  = "black";

 40:       text   = "<UL><LI>Quick - Search for books by product " +

 41:                "covered.</LI></UL>";

 42:    }

 43:

 44:    with (this.bulletKeyword = new HTML(this)){

 45:       height = 2;

 46:       top    = 6;

 47:       width  = 70;

 48:       color  = "black";

 49:       text   = "<UL><LI>Keyword - Start up a search " +

 50:                "engine to help find the book you want " +

 51:                "directly. A keyword search looks at title, " +

 52:                "author, or ISBN. </LI></UL>";

 53:    }

 54:

 55:    with (this.bulletCart = new HTML(this)){

 56:       height = 2;

 57:       top    = 8;

 58:       width  = 70;

 59:       color  = "black";

 60:       text = "<UL><LI>View Cart - Show books currently " +

 61:              "selected for purchase. You can edit " +

 62:              "quantities and remove books while viewing " +

 63:              "the shopping cart. </LI></UL>";

 64:    }

 65:

 66:    with (this.bulletCheckout = new HTML(this)){

 67:       height = 1.5;

 68:       top    = 10;

 69:       width  = 70;

 70:       color  = "black";

 71:       text   = "<UL><LI>Checkout - Verify purchase and enter " +

 72:                "name, address and billing information. </LI></UL>";

 73:    }

 74:

 75:    with (this.bulletHelp = new HTML(this)){

 76:       height = 1.5;

 77:       top    = 11.5;

 78:       width  = 70;

 79:       color  = "black";

 80:       text = "<UL><LI>Help - Show this page. </LI></UL>";

 81:    }

 82:

 83:    this.rowset = this.cart1.rowset;

 84:

 85:    function Form_onServerLoad()

 86:    {

 87:       // complete

 88:       try

 89:       {

 90:          var x = this.user ;  // Is user key undefined?

 91:       }

 92:       catch (Exception error)

 93:       {

 94:          if (error.code == 167) //  not defined

 95:          {

 96:              if ( (new NetInfo()).sessionID == -1 )

 97:             {

 98:                var cUser = new StringEx("" + Math.int(Math.random(-1)

 99:                          * Math.pow(10,20))) ;

100:                this.user = cUser.left(20) ;

101:             }

102:             else

103:             {

104:                this.user = "" + (new NetInfo()).sessionID

105:             }

106:          }

107:          else

108:          {

109:             var errorLog = new File() ;

110:             if (errorLog.exists("errorlog.txt"))

111:             {

112:                errorLog.open("errorlog.txt","RW") ;

113:             }

114:             else

115:             {

116:                errorLog.create("errorlog.txt") ;

117:             }

118:             errorLog.puts("") ;

119:             errorLog.puts("Unexpected exception in Help.jfm");

120:             errorLog.puts("Date:    " + (new Date())) ;

121:             errorLog.puts("Code:    " + error.code) ;

122:             errorLog.puts("Message: " + error.message) ;

123:             errorLog.close() ;

124:          }

125:       }

126:    }

127:

128:    function htmlCount_onServerLoad()

129:    {

130:       var nCount = 0 ;

131:       this.form.cart1.rowset.filter =

132:            "CARTUSER = '" + this.form.user + "'" ;

133:       this.form.cart1.rowset.first() ;

134:       while ( ! this.form.cart1.rowset.endOfSet )

135:       {

136:          nCount+=this.form.cart1.rowset.fields["QTY"].value ;

137:          this.form.cart1.rowset.next() ;

138:       }

139:       nCount = Math.int(nCount) ;

140:       if ( nCount == 0 )

141:       {

142:          this.text = "Your shopping cart is empty." ;

143:       }

144:       else

145:       {

146:          this.text = "Your shopping cart contains " + nCount +

147:             ( (nCount==1) ? " item." : " items." ) ;

148:       }

149:    }

150:

151: }

152: #include <store.h>
You've seen the fuctions before, so let's look at some of the
other code. The code starts out with some functional comments.
Although most comments do nothing, others contain special identifiers
such as {Export} and {End Header}. IntraBuilder
uses these comments to identify sections of code. The {End
Header} comment in line 1 separates any header code you enter
from the standard form open code that the Form Designer adds to
every form.
// {End Header} Do not remove this comment//

// Generated on 11/02/96

//

var f = new helpForm();

f.open();
Line 4 contains a var statement, which creates a new
instance of the helpForm. The form then opens. For the
Help form, the application relies on these lines to open the form.
All the other forms in the application use custom opening code
rather than what is included at the top of the JavaScript form
file.
class helpForm extends ToolbarCForm from "TOOLBAR.JCF" {
The class statement starts the class definition on line
6. This class is named helpForm and is derived from a
class called ToolbarCForm. If you're not using a custom
form class, forms are derived from the standard Form
class. The last part of the class statement tells IntraBuilder
where to find the source code for the ToolbarCForm. The
TOOLBAR.JFM file opens without the need for an explicit
_sys.scripts.load().
with (this) {

   height = 15;

   left   = 0;

   top    = 0;

   width  = 75;

   title  = "Boingo's Books - Help";

   onServerLoad = class::Form_onServerLoad;

}
The with statement makes it easier to set a group of
properties for a single object. The same code could also be written
like this:
this.height = 15;

this.left   = 0;

this.top    = 0;

this.width  = 75;

this.title  = "Boingo's Books - Help";

this.onServerLoad = class::Form_onServerLoad;
Anywhere in the class constructor, this refers to the
form. So the height of the form is set to 15. The position
properties for the form are relevant only when running within
the Designer. When run through a browser, the form sizes to the
current browser window or active frame. The onServerLoad
assignment links a method in the current class to the form's onServerLoad
event. Although the default name of the method matches the event
and object, it is arbitrary. You could link the onServerLoad
event to a method called bob with the following line:
this.onServerLoad = class::bob;
The class:: specifies that the method belongs to the
current class using the scope resolution operator. The class specifies
the scope or location to use. You can also give a specific class
name, including the class name of the current class. In that case,
the same assignment could be written as
this.onServerLoad = helpForm::Form_onServerLoad;
|
The scope resolution operator is the double colon that you place between a class name and a method name. Use this operator instead of the dot operator when working with a class definition rather than a specific instance of a class.
|
Specifying a different class name is rarely done. A more common
option is to call methods from a parent or superclass. Because
this form is derived from ToolbarCForm, it can call any
methods defined within ToolbarCForm using the super::
operator. This is handy when the current class overrides a method
defined in its parent class. For example, both the ToolbarCForm
and helpForm classes could contain a Form_onServerLoad
event. The following code will call a method in the parent class
called Form_onServerLoad as the first line of the current
class's Form_onServerLoad method. This makes it easy
to extend the behavior of a method.
Function Form_onServerLoad;

{

   super::Form_onServerLoad;

   var nCount = 0 ;

   // do some other stuff.

}
The rest of the code simply creates each component and sets values
for each property. Notice that the last line is the #include
statement that was added to the general section of the form.
Well, you sure have a nice Help form, but it still doesn't do
anything. If you click any of the buttons, the browser refreshes
with the same form. In this section, you make the buttons do something
different. Instead of doing nothing, they will cause an error.
Is an error really better than nothing? In this case, yes, because
the errors will go away as other forms are created and added to
store.h.
Each button needs its own onServerClick method to open
the next form and release the current form. The code for each
method is essentially the same. The only difference is the class
name of the next form. The Help button can also be optimized not
to reopen the Help form if the current form is already the Help
form. Other buttons do not need this optimization because they
will be disabled when inappropriate.
The custom form class could also use some rule lines for beautification.
To continue, open Toolbar.jfm in the Custom Form Class
Designer and follow these steps:
- Make sure you are in the Custom Form Class Designer rather
than the regular Form Designer. You can tell from the form's title
bar. The run toolbar button is also disabled when in the Custom
Form Class Designer.
- Select the Quick button, open the Inspector, and locate the
Quick button's onServerClick event. Use the tool button
to open the Method Editor and link to the current event.
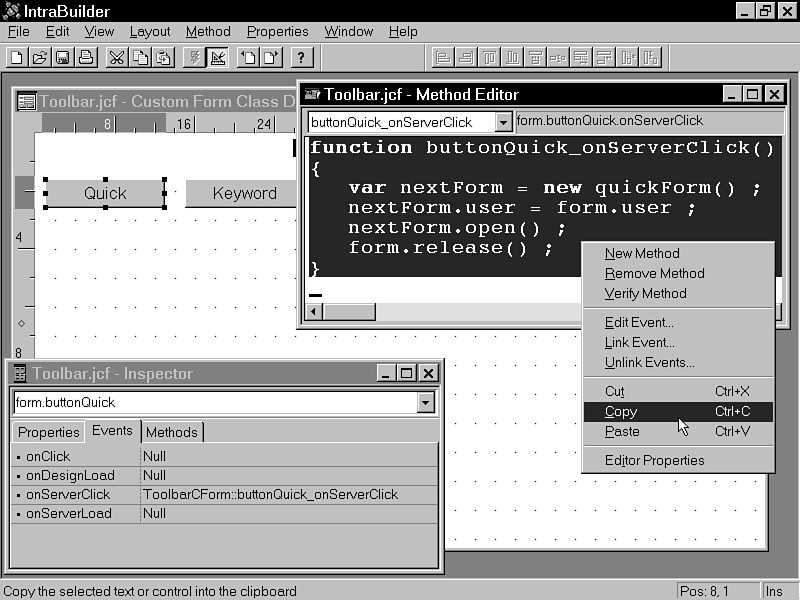
- Enter the following code as shown in Figure 9.11. Select the
code and copy it to the Clipboard.
Figure 9.11 : Copying a new method to the Clipboard.
function buttonQuick_onServerClick()
{
var nextForm = new quickForm() ;
nextForm.user = form.user ;
nextForm.open() ;
form.release() ;
}
- From the Method Editor's right-click shortcut menu select
New Method.
- Paste the method in the Clipboard over the default method
template that the editor provides. Edit the method name and the
new form line to match the following:
function buttonKeyword_onServerClick()
{
var nextForm = new keywordForm() ;
nextForm.user = form.user ;
nextForm.open() ;
form.release() ;
}
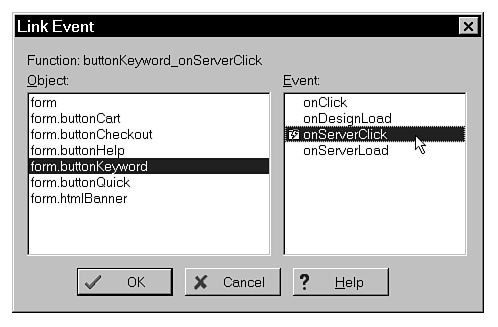
- Link the new buttonKeyword_onServerClick() method
to the buttonKeyword component's onServerClick
event. From the shortcut menu, select Link Event.
In the Link Event dialog, select form.buttonKeyword from
the Object list and onServerClick from the event list.
Click OK to confirm the link as shown in Figure 9.12.
Figure 9.12 : Linking methods through the Link Event dialog.
- Repeat this process to create a new buttonCart_onServerClick()
and link it to the buttonCart component. The only differences
in the function definitions are the name and variable assignment
lines. They should look like this:
function buttonCart_onServerClick()
{
var nextForm = new cartForm() ;
nextForm.user = form.user ;
nextForm.open() ;
form.release() ;
}
- Three down, two to go. Repeat the process again for the
onServerClick event of buttonCheckout. Again, the only differences
are the function name and the assignment statements.
function buttonCheckout_onServerClick()
{
var nextForm = new checkoutForm() ;
nextForm.user = form.user ;
nextForm.open() ;
form.release() ;
}
- You might have become used to a pattern here, but it is about
to change in a subtle way for the Help button. Here, you need
to enclose the new form code within a conditional block. The method
needs to open the Help form only if the current form is not the
Help form. The last method looks like this:
function buttonHelp_onServerClick()
{
if (this.form.title.indexOf("Help") == -1)
{
var nextForm = new helpForm() ;
nextForm.user = form.user ;
nextForm.open() ;
form.release() ;
}
}
- The methods are done; the last change to make is purely cosmetic.
Add rules over and under the toolbar buttons. This keeps the first
item on the derived form from squishing up against the toolbar
buttons. When you're done, save and run the form within the Designer.
As you add more and more controls to a form, the difference between
the way the form appears in the Designer and the way it appears
in the browser increases. Keep in mind that the way the
form runs in the Designer is of secondary importance. Figure 9.13
shows that I did not make the second rule line wide enough for
the Help button. I set the right property to 60
instead of 70.
Figure 9.14 : Running the Help form with the short rule line through Netscape Navigator.
Although the finished product looks sloppy in the Designer, it
looks better in both Netscape and Internet Explorer. When running
through a browser, the rules are closer to the same length, as
shown in Figure 9.14. To get a perfect match, both rule lines
should have the right property set to 70. Rule
lines also have more vertical space around them when running in
a browser. The more rule lines a form has, the more it stretches
out when streamed to HTML.
Figure 9.13 : Running the Help form with a short rule line in the IntraBuilder Designer.
You might find another surprise lurking for you when you view
your form through a browser. If your buttons are too close together,
the buttons can overlap in Navigator. Figure 9.15 shows the Help
form with each button set to a width of 9 and no space
left between the buttons. The same form looks all right in the
designer and in Internet Explorer.
Figure 9.15 : Overlapping buttons in Netscape Navi-gator.
The complete source for the toolbar custom form class with the
good looking rules is in Listing 9.6. You will use this toolbar
custom form class for all the forms in the shopping cart application.
Listing 9.6. The complete code for the toolbar custom form
class.
  1: class ToolbarCForm extends Form custom {

  2:    with (this) {

  3:       color = "white";

  4:       height = 15;

  5:       left = 0;

  6:       top = 0;

  7:       width = 75;

  8:       title = "";

  9:    }

 10:

 11:    with (this.rule1 = new Rule(this)){

 12:       top = 1.25;

 13:       size = 2;

 14:       right = 70;

 15:    }

 16:

 17:    with (this.rule2 = new Rule(this)){

 18:       top = 3;

 19:       size = 2;

 20:       right = 70;

 21:    }

 22:

 23:    with (this.htmlBanner = new HTML(this)){

 24:       height = 1.2;

 25:       width = 70;

 26:       color = "black";

 27:       alignHorizontal = 1;

 28:       text = "<H2>Boingo's Books</H2>";

 29:    }

 30:

 31:    with (this.buttonQuick = new Button(this)){

 32:       left = 1;

 33:       top = 1.6;

 34:       width = 12;

 35:       text = "Quick";

 36:       onServerClick = class::buttonQuick_onServerClick;

 37:    }

 38:

 39:    with (this.buttonKeyword = new Button(this)){

 40:       left = 15;

 46:       top = 1.6;

 42:       width = 12;

 43:       text = "Keyword";

 44:       onServerClick = class::buttonKeyword_onServerClick;

 45:    }

 46:

 47:    with (this.buttonCart = new Button(this)){

 48:       left = 29;

 49:       top = 1.6;

 50:       width = 12;

 51:       text = "View Cart";

 52:       onServerClick = class::buttonCart_onServerClick;

 53:    }

 54:

 55:    with (this.buttonCheckout = new Button(this)){

 56:       left = 43;

 57:       top = 1.6;

 58:       width = 12;

 59:       text = "Checkout";

 60:       onServerClick = class::buttonCheckout_onServerClick;

 61:    }

 62:

 63:    with (this.buttonHelp = new Button(this)){

 64:       left = 57;

 65:       top = 1.6;

 66:       width = 12;

 67:       text = "Help";

 68:       onServerClick = class::buttonHelp_onServerClick;

 69:    }

 70:

 71:    function buttonQuick_onServerClick()

 72:    {

 73:       var nextForm = new quickForm() ;

 74:       nextForm.user = form.user ;

 75:       nextForm.open() ;

 76:       form.release() ;

 77:    }

 78:

 79:    function buttonKeyword_onServerClick()

 80:    {

 81:          var nextForm = new keywordForm() ;

 82:          nextForm.user = form.user ;

 83:          nextForm.open() ;

 84:          form.release() ;

 85:    }

 86:

 87:    function buttonCart_onServerClick()

 88:    {

 89:       var nextForm = new cartForm() ;

 90:       nextForm.user = form.user ;

 91:       nextForm.open() ;

 92:       form.release() ;

 93:    }

 94:

 95:    function buttonCheckout_onServerClick()

 96:    {

 97:          var nextForm = new checkoutForm() ;

 98:          nextForm.user = form.user ;

 99:          nextForm.open() ;

100:          form.release() ;

101:    }

102:

103:    function buttonHelp_onServerClick()

104:    {

105:       if (this.form.title.indexOf("Help") == -1)

106:       {

107:          var nextForm = new helpForm() ;

108:          nextForm.user = form.user ;

109:          nextForm.open() ;

110:          form.release() ;

111:       }

112:    }

113:

114: }
The source code for a custom form class looks a lot like the source code for a standard form class. Let's look at the differences. First, there is no code to create an instance of the class at the top.
This is why you cannot run a custom form class file.
Line 1 of the class definition ends with the custom option.
You can inherit from any class; there is no need to have the custom
option if you are writing your own JavaScript outside of the designers.
The Form Designer uses the custom option when writing
JavaScript out to a JFM file. Properties that are inherited from
a class that has the custom option do not stream into a JFM.
If you remove the custom option and resave the Help form, the
banner, buttons, and rules will save into the Help form. That
sort of defeats the purpose of inheritance to always leave the
custom option on your custom form classes.
So now the buttons do something: they cause runtime errors. Runtime
errors are one of three major categories of errors. The other
two are compile-time errors and logic errors.
Compile-time errors occur when you try to run a JavaScript file
after making a change. Whenever you make a change to a source
file, IntraBuilder compiles the source into a new object file.
Syntax errors are the primary cause of compile-time errors. These
happen when you leave out a closing brace or misplace some other
symbol.
Runtime errors occur in files that compile successfully. Trying
to open a file that does not exist or referencing an undefined
variable will generate a runtime error. When you're running in
the Designer, IntraBuilder prompts you to fix the errors as they
occur.
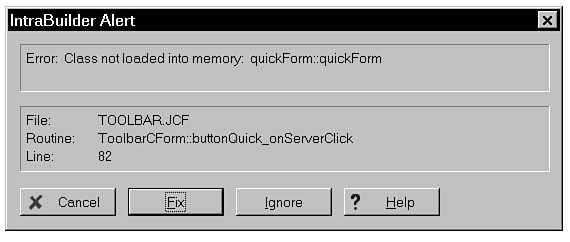
If you run the Help form and click the Quick button, the method
tries to create an instance of the quickForm class. Figure
9.16 shows the error dialog that appears in the Designer. The
three choices you get are to Cancel, Fix, or Ignore. The best
thing to do here is to cancel, which stops executing the method,
but keeps the form running. If you select Fix, the Script Editor
opens at the line of the error. This is handy if you are fixing
a misspelling, but doesn't do you much good in this case. To really
fix the problem, you need to design the Quick form, and you don't
have time to do that today. If you select Ignore, IntraBuilder
skips the line of the error and tries to execute the next line.
However, the line that follows requires that the current line
must work. If you select the Ignore option, you will encounter
another runtime error.
Figure 9.16 : Encountering a runtime error in the Designer.
| NOTE |
IntraBuilder cannot locate the line or an error if it comes from a file compiled through an #include statement. When an error occurs within source code from an included file, the Fix option simply takes you to the #include statement.
|
The error trapping system is much simpler when running through
a browser. There are no choices-the browser just gets back a message
about the error. No links are provided. Figure 9.17 shows the
same error message it appears in Navigator.
Figure 9.17 : Encountering a runtime error through Navigator.
IntraBuilder cannot detect a logic error. This type of error happens
when the JavaScript compiles okay and runs without any problems
except that it does not do what you really wanted it to do. A
logic error would occur if you forgot to link one of the toolbar
button methods to an event. The code would compile, and the button
would not cause any errors. The only problem would be that the
button would not do anything.
Today you created a set of toolbar buttons in a custom form class.
You will reuse the toolbar as you design new forms during the
next few days. The toolbar provides a common look and feel for
all the shopping cart application forms. The toolbar is also a
set of common links between some of the application's main forms.
The other big activity of the day was the creating of the Help
form. This is the first JavaScript form shoppers will see when
entering the Web store. The Help form serves three major functions.
First, it has a bulleted list that explains what each toolbar
button does. Second, it tells the user how many items are currently
in the shopping cart. Last, it creates a user key to track the
current shopper. The generation of the user key is transparent
to the shopper.
Day 10 adds two new forms to the application and provides in-depth
information on creating queries with different table types. The
new forms, the Quick form and the Results form, provide a framework
for shoppers to search for books. You will also find a benchmark
that you can modify for your own data sources to determine the
fastest data access methods.
| Q: | Wouldn't it have been easier to define the toolbar buttons within the Help form?
|
| A: | It would have made things easier today, when there was only one form that used the toolbar, but it would make things much more difficult in the days to come as you create many more forms that use the toolbar
custom form class.
|
| Q: | Can I use images to create a toolbar?
|
| A: | Yes, you will even find applicable GIF files in the following folder:
C:\Program Files\Borland\IntraBuilder\Clipart\Business
In the folder you can find a shopping cart image (shopca11.gif), a checkout image (cashrg21.gif), and a search image (search42.gif).
|
| Q: | Why are all the methods used so far linked to server-side events?
|
| A: | Everything done so far requires a class or file that is not available to the client browser. For example, the method that counts how many items are in the cart uses a Query class to open the Cart
table. Client-side JavaScript does not contain any database classes or the ability to open tables located on a Web server.
|
| Q: | My screen gets very cluttered when I design forms. What is the best way to arrange windows in the Designer?
|
| A: | The best thing is to have a 21-inch monitor. The second best thing is to use the Window|Arrange Designer Windows menu option to close all unrelated windows. You will also have more room if you drag the
component palette off the main toolbar and use it as a floating palette. This way, you can close the palette when you don't need it and get more vertical design space.
|
The Workshop section provides questions and exercises to help
you get a better feel for the material you learned today. Try
to answer the questions and at least think about the exercises
before moving on to tomorrow's lesson. You'll find the answers
to the questions in Appendix A, "Answers to Quiz Questions."
- What is the HTML tag for a list item?
- How do you rename a query object?
- What should you do after dropping a table onto a form?
- Filter is a property of what class?
- What is the difference between an object and a class?
- What symbol makes up the scope resolution operator?
- The query on the Help form is used only to count values. There
is no need to have the ability to update the table. Locate the
property that determines whether a query requests a rowset that
you can update. Set that property to false. Hint: If
you can update the rowset, the query is said to be live.
- If the Cart table is empty, you cannot verify that the filter
on the query is actually working. Try adding a few records to
the Cart table and running the Help form. It should still say
that there are no items in the cart.


