This chapter marks your first foray into practical bean development, which is the focus of this part of the book. Throughout this chapter you learn to develop a bean that is somewhat similar in function to the standard AWT button provided in Java 1.1, but a little fancier. You develop this bean entirely from scratch, while observing the design suggestions covered in Chapter 9, "Bean Construction Basics," along the way. The bean you create in this chapter serves as a great starting point for developing other beans because it tackles many of the common issues related to building practical beans. By the end of the chapter, you will have both the know-how and source code necessary to start building beans of your own.
Along with developing the code for a custom bean in this chapter, you will see how to test the bean in the BeanBox test container, which is a vital part of the development process. You'll find that the BeanBox is a fun way to try out your beans as you develop them. You finish the chapter by brainstorming some areas in which you can improve and extend the bean on your own.
You learn the following major topics in this chapter:
As you learned in Chapter 9, the first step in building any bean is to come up with a preliminary design. This design should be carried out to some degree of detail before embarking on the actual coding of the bean. The bean you develop in this chapter is a fancy button bean, meaning that it functions similarly to the standard Java AWT button but adds some functionality to make it a little fancier. So that you can see how the design for the fancy button bean comes together, it doesn't derive from the AWT Button class but instead implements all of its own button functionality from scratch.
There are a few things about the fancy button bean that set it apart from the standard AWT button. Similar to the AWT button, the fancy button bean enables you to set the label for the button to any text you choose. However, it also enables you to set the font for the label, which can be one of a variety of typefaces in virtually any size. The fancy button bean knows how to automatically resize itself to accommodate the varying sizes of the label based on the font selection. Another neat feature of the fancy button bean is that you can change the background and foreground colors. The background color corresponds to the face of the button, and the foreground color determines the color of the label text.
The fancy button bean also supports a feature in which it can be used to represent an on/off state, much like a checkbox. In this mode, instead of automatically raising after you click it, the button remains down. Another mouse click restores it to its normal position. This feature is useful in toolbars, where some buttons reflect a two-state option. A good example is the bold button in some popular word processor toolbars, which remains down when clicked to indicate that the bold option is turned on.
Now that you have an idea of what the fancy button does, let's move on to designing some specifics about it. Recall from the previous chapter that the design of a bean can be broken down into three major parts: properties, methods, and events. The rest of this section focuses on the fancy button bean and the design of these major functional parts.
The properties for the fancy button bean must somehow represent the information required to support the functionality you just learned about. Fortunately, you don't have to specifically define all these properties yourself because you are going to derive the bean from an existing AWT class, which provides a great deal of overhead, including some very useful properties. The AWT class I'm referring to is Canvas, which represents a rectangular area onto which you can draw or trap input events from the user. The Canvas class provides the base functionality typically required of graphical beans, including background color, foreground color, name, and font properties. Actually, most of this functionality is provided by the Component class, which is the parent of Canvas.
Even though the Canvas and Component parent classes help out, you still must provide some properties of your own. You know the fancy button bean will have a label, so you can start off with a string label property. You also know the bean must support a sticky mode, which can easily be represented by a boolean property. Because the bean supports a sticky mode, you also need a property to keep track of whether the bean is up or down. Another boolean property serves this purpose just fine. These three properties are pretty well sufficient for modeling the high-level functionality required of the bean. In fact, combined with the properties provided by the Canvas class, these properties form the full set of properties for the fancy button bean. Keep in mind that although these are the only three properties you must define yourself, there could be other member variables in the fancy button bean that aren't exposed as properties. You'll learn about these member variables when you start writing the actual code in the "Developing the Fancy Button Bean" section.
Following are the properties required of the fancy button bean:
Now that you've defined the properties, it's time to move on to determine the public methods required of the fancy button bean. The easiest place to start is with the accessor methods for the bean. You already know the properties for the bean, so determining the accessor methods you need is pretty easy. Both the label and sticky mode properties for the bean are readable and writable, so you will need a pair of accessor methods for each of them. The property representing the bean's up/down state is a little different, because the state is determined by the user clicking the button. In other words, this property shouldn't be directly writable like the other two properties; instead, it should always be set indirectly by interacting with the button visually. So, for this property you only need one accessor method: a getter method.
Recall that the fancy button bean is supposed to resize itself based on the typeface and size of the font for the label text. This is necessary because selecting a larger font requires more physical space on the bean's surface to display the label text. Knowing that the bean must resize itself whenever the font property's value changes, what do you think this means in terms of accessor methods? If you're thinking that you must override the setter method for the font property, you are exactly right. It turns out that the setter method for the font property is defined in the Component class, along with the font property itself. By overriding it in the fancy button bean, you can easily resize the bean after setting the new font value.
Beyond accessor methods, you have to consider the other public methods that the bean must provide. It turns out that the fancy button bean needs only two other public methods. The first of these, paint(), is overridden from the parent Canvas class to enable the bean to paint itself. The paint() method is pretty much required of all graphical beans because it provides a central location for placing all of a bean's drawing code. The other public method required of the bean isn't quite as obvious: It is the getPreferredSize() method, which calculates and returns the preferred size of the bean based on its current state. This method is necessary only because the fancy button bean has a preferred size based on the label text and font.
Following are the public methods required of the fancy button bean:
The last part of the fancy button bean you must focus on at this stage is events. Because the bean is a button, it's necessary for it to fire an action event when the user clicks it. This is what enables the bean to be wired to other beans or applications in order to trigger them with a button click. Because the event fired in this case is an action event, part of supporting it is providing event listener registration methods. A pair of these methods is all you need to support the addition and removal of action event listeners.
The actual firing of the action event is another issue altogether. The bean is required to support some type of mechanism by which an action event is passed on to all the listeners registered. This mechanism must be handled by a single event-processing method that iterates through the listeners and dispatches the event to each one appropriately.
The final area of interest relating to events is how the bean processes events for itself. It's one thing to be able to broadcast events to others, but the fancy button bean must also manage events that occur within itself. For example, when the user clicks the bean it must change its appearance to show the button pressing down. The events that the bean must respond to consist of focus changes, mouse clicks, mouse drags, and key presses. The focus change events are necessary to process because the button draws a focus rectangle on its surface whenever it has focus. The mouse click-and-drag events must be processed in order for the bean to change its state appropriately and act like a button. Finally, the key press events must be processed to provide a keyboard interface for the bean and simulate a mouse button click for keys like the Enter key. These events are processed in individual event processor methods that are overridden from the bean's parent class.
Following are the event-related methods required of the fancy button bean:
Now that you have a pretty solid design to go by, you're ready to jump right into the code for the fancy button bean. You will probably be pleasantly surprised by how little difference there is between the code for beans and the code for normal Java classes. Beans are, in fact, normal Java classes with support for a few extra facilities such as introspection and serialization. In many cases these extra facilities are handled automatically, so the bean code really does look just like a normal Java class.
In this section you learn about different parts of the code for the fancy button bean. The discussion here tackles small parts of the code, so you might not immediately see how everything fits into the overall bean class structure purely from a code perspective. If you are having trouble with this approach, check out the complete source code for the bean, which is included on the accompanying CD-ROM. The main code for the fancy button bean is in the FancyButton class, which appears on the CD-ROM in the file FancyButton.java.
The first place to start in developing the fancy button bean is laying out the properties. Following are the member variable properties for the bean based on the initial design:
private String    label;


private boolean   sticky;


private boolean   down;
As you can see, these member variables directly correspond to the properties mentioned earlier in the initial design. Notice that they are all built-in Java types, which means that property editors are already provided by JavaBeans for each of them. This means you don't have to do any extra work to provide visual editing support for the fancy button bean's properties. Along with these properties, the bean also requires a few other member variables for internal use:
private transient ActionListener  actionListener = null;


private transient boolean         hasFocus;
The actionListener member is an ActionListener interface used to manage the list of action event listeners. This list is used by the action event processing method to fire events to each listener. You learn more about the actionListener member later in the chapter when you get into the specifics of how the fancy button bean processes events. The hasFocus member is used to keep track of the focus state of the bean. The focus is important to keep up with because it affects the visual appearance of the bean.
You might be a little curious as to why both of these member variables are declared as being transient. If you recall from Chapter 7, "Persistence: Saving Beans for a Rainy Day," transient member variables are those that aren't saved and restored through bean persistence. The actionListener and hasFocus member variables represent information that is specific to a particular session, meaning that it isn't necessary to save them persistently as part of the bean's state. That sums up all the member variables for the bean. Let's move on to the constructors!
The fancy button bean provides two constructors: a default constructor and a detailed constructor that takes all three properties as arguments. Following is the code for both of these constructors:
public FancyButton() {


  this("Push Me", false, false);


}


public FancyButton(String l, boolean s, boolean d) {


  // Allow the superclass constructor to do its thing


  super();


  // Set properties


  label = l;


  sticky = s;


  down = d;


  setFont(new Font("Dialog", Font.PLAIN, 12));


  setBackground(Color.lightGray);


  // Enable event processing


  enableEvents(AWTEvent.FOCUS_EVENT_MASK |


  ÂAWTEvent.MOUSE_EVENT_MASK |


    AWTEvent.MOUSE_MOTION_EVENT_MASK | AWTEvent.KEY_EVENT_MASK);
}
The first constructor simply calls the second constructor with default property values. The second constructor is responsible for actually doing all the work. This constructor begins by calling the superclass constructor and then moves on to set all the properties. Notice that the two inherited properties, font and background color, are set by calling their setter methods instead of directly setting the member variables. This is a result of the fact that properties are always declared as private, which means that you are required to use a setter method to access them. In this case, it works out well because the fancy button bean provides its own setter method for the font property.
With the properties set, the constructor moves on to enabling a group of events for the bean to process by calling the enableEvents() method. If it didn't call this method, the bean would be incapable of directly trapping any events. The purpose of selectively enabling certain events is to optimize the event-handling procedure by only looking for events in which you are specifically interested. In this case, the fancy button bean is interested in focus, mouse click, mouse move, and key press events.
Moving right along, the next piece of the bean puzzle is accessor methods, which provide access to bean properties. Following is the code for the label property's accessor methods:
public String getLabel() {


  return label;


}


public void setLabel(String l) {


  label = l;


  sizeToFit();


}
The getLabel() getter method is pretty self-explanatory in that it simply returns the value of the label member variable. The setLabel() setter method is slightly more involved in that it calls the sizeToFit() method after setting the label member variable. The sizeToFit() method, about which you learn in detail in the "Support Methods" section, is responsible for determining the optimal button size based on the label and font.
The accessor methods for the sticky property, isSticky() and setSticky(), are very minimal in that they simply get and set the value for the sticky member variable, with no additional functionality. Likewise, the getter method for the button state, isDown(), simply returns the value of the down member variable. Things get a little more interesting when you get to the overridden setter method for the font property, setFont(), which follows:
public void setFont(Font f) {


  super.setFont(f);


  sizeToFit();


}
The whole point of overriding this method is to make sure the bean is resized when any change occurs in the value of the font property. Notice that the superclass setFont() method is called to perform the actual setting of the property before the bean is resized with a call to sizeToFit().
There are two important public methods in the bean to look at now: paint() and getPreferredSize().The paint() method is used to paint the visual appearance of the bean; its source code follows:
public synchronized void paint(Graphics g) {


  int width = size().width;


  int height = size().height;


  // Paint the background with 3D effects


  g.setColor(getBackground());


  g.fillRect(1, 1, width - 2, height - 2);


  g.draw3DRect(0, 0, width - 1, height - 1, !down);


  g.setColor(Color.darkGray);


  if (down) {


    g.drawLine(1, height - 3, 1, 1);


    g.drawLine(1, 1, width - 3, 1);


  }


  else {


    g.drawLine(2, height - 2, width - 2, height - 2);


    g.drawLine(width - 2, height - 2, width - 2, 1);


  }


  // Paint the foreground text


  g.setColor(getForeground());


  g.setFont(getFont());


  FontMetrics fm = g.getFontMetrics();


  if (down)


    g.drawString(label, ((width - fm.stringWidth(label)) / 2) + 2,


      ((height + fm.getMaxAscent() - fm.getMaxDescent()) / 2) + 1);


  else


    g.drawString(label, (width - fm.stringWidth(label)) / 2,


      (height + fm.getMaxAscent() - fm.getMaxDescent()) / 2);


  // Paint the focus rect


  if (hasFocus) {


    g.setColor(Color.gray);


    g.drawRect(4, 4, width - 8, height - 8);


  }


}
The paint() method starts off by getting the width and height of the bean, filling the background, and painting a 3D effect around the edges. Notice that the 3D effect is painted differently depending on the value of the down member variable. The foreground label text is painted next by selecting the appropriate font and calculating the coordinates so that the text is centered within the bean. Finally, if the hasFocus member variable is set to true, a focus rectangle is drawn on the bean to indicate that it has the input focus.
The getPreferredSize() method is used to return the favored size of the bean to any interested party, including itself. When I say "favored size" I mean the ideal visual size of the bean so that the label text is positioned in the bean with a proper spacing from the edges. The calculation of this size takes into account the selected font along with the label text. Following is the code for the getPreferredSize() method:
public Dimension getPreferredSize() {


  // Calculate the preferred size based on the label text


  FontMetrics fm = getFontMetrics(getFont());


  return new Dimension(fm.stringWidth(label) + TEXT_XPAD,


    fm.getMaxAscent() + fm.getMaxDescent() + TEXT_YPAD);
}
The event registration methods in the fancy button bean are used to enable the addition and removal of listeners for the bean's action events. The code for these methods follows:
public synchronized void addActionListener(ActionListener l) {


  actionListener = AWTEventMulticaster.add(actionListener, l);


}


public synchronized void removeActionListener(ActionListener l) {


  actionListener = AWTEventMulticaster.remove(actionListener, l);


}
These methods simply add and remove action listeners from the actionListener vector, which is the ActionListener interface used to keep up with what receives action events. The listeners themselves are managed by the underlying AWTEventMulticaster class, which is a helper class in the Java API designed to keep track of event listeners.
The fancy button bean provides a variety of event-processing methods, primarily because the bean must listen for a few different types of input events to function properly. The first of these methods, processActionEvent(), isn't related to processing an input event, however; instead, it is used to dispatch action events to all the registered action event listeners. Following is the code for this method:
protected void processActionEvent(ActionEvent e) {


  // Deliver the event to all registered action event listeners


  if (actionListener != null)


    actionListener.actionPerformed(e);


}
The processActionEvent() method is responsible for firing actionPerformed events to all registered event listeners. It does this by calling the actionPerformed() method on the actionListener member, which represents a chain of event listeners. The actionPerformed() method is the only method defined in the ActionListener interface, and is typically called any time an action occurs in an event source such as a bean. In the case of the fancy button bean, an action is defined as a button push, but an action can mean other things in other beans.
There are four other event-processing methods used by the fancy button bean, although they act a little differently than processActionEvent(). Following is the code for the first of these methods, processFocusEvent():
protected void processFocusEvent(FocusEvent e) {


  // Get the new focus state and repaint


  switch(e.getId()) {


    case FocusEvent.FOCUS_GAINED:


      hasFocus = true;


      repaint();


      break;


    case FocusEvent.FOCUS_LOST:


      hasFocus = false;


      repaint();


      break;


  }


  // Let the superclass continue delivery


  super.processFocusEvent(e);
}
This method is called whenever the focus for the bean changes. Its only function is to monitor changes in the bean's focus and update the appearance of the bean accordingly. The processMouseEvent() method is a little more interesting in that it responds to mouse button presses and releases. Following is the code for this method:
protected void processMouseEvent(MouseEvent e) {


  // Track mouse presses/releases


  switch(e.getId()) {


    case MouseEvent.MOUSE_PRESSED:


      down = !down;


      repaint();


      break;


    case MouseEvent.MOUSE_RELEASED:


      if (down && !sticky) {


        fireActionEvent();


        down = false;


        repaint();


      }


      break;


  }


  // Let the superclass continue delivery


  super.processMouseEvent(e);
}
The processMouseEvent() method is responsible for trapping mouse button presses and releases and making sure the bean behaves appropriately. When the mouse button is pressed, the down member variable is toggled and the bean is repainted. However, when the mouse button is released, the down and sticky member variables are first checked to determine the state of the button. If the bean isn't in sticky mode and is down, an action event is fired by the fireActionEvent() method, which you learn about in the "Support Methods" section. The down member variable is then set to false and the bean is repainted.
The processMouseMotionEvent() method is used to respond to events related to the movement of the mouse. Following is the code for this method:
protected void processMouseMotionEvent(MouseEvent e) {


  // Track mouse drags


  if (e.getId() == MouseEvent.MOUSE_DRAGGED && !sticky) {


    Point pt = e.getPoint();


    if ((pt.x < 0) || (pt.x > size().width) ||


      (pt.y < 0) || (pt.y > size().height)) {


      if (down) {


        down = false;


        repaint();


      }


    }


    else if (!down) {


      down = true;


      repaint();


    }


  }


  // Let the superclass continue delivery


  super.processMouseMotionEvent(e);
}
The processMouseMotionEvent() method is responsible for detecting mouse drags and making sure the bean behaves properly. The only purpose of responding to mouse drags is so the bean button raises up when the mouse is dragged off it, providing it's not in sticky mode. (In sticky mode, drags have no meaning because the bean changes state as soon as the mouse button is pressed.) If the bean isn't in sticky mode, the coordinates of the mouse are checked by the processMouseMotionEvent() method to see if they fall within the bean's bounding rectangle. If not, processMouseMotionEvent() restores the bean button to its raised position by setting the down member to false. If the mouse is within the bounding rectangle for the bean and the bean is raised, the down member is set to true.
The last of the event-processing methods is the processKeyEventMethod(), which is used to respond to key presses. Following is the code for this method:
protected void processKeyEvent(KeyEvent e) {


  // Simulate a mouse click for certain keys


  if (e.getKeyCode() == KeyEvent.VK_ENTER ||


    e.getKeyChar() == KeyEvent.VK_SPACE) {


    if (sticky) {


      down = !down;


      repaint();


    }


    else {


      down = true;


      repaint();


      fireActionEvent();


      down = false;


      repaint();


    }


  }


  // Let the superclass continue delivery


  super.processKeyEvent(e);


}
The processKeyEventMethod() is used to provide a keyboard interface for the bean. If the bean has focus and the Return or Spacebar key is pressed, it is treated just like clicking the mouse on the bean. The mouse click is simulated by setting the down member to true, firing an action event by calling fireActionEvent(), and then setting the down member to false. This is kind of a tricky way to get extra functionality without doing much work, which is something I'm always in favor of!
NOTE: You might be a little confused at this point about the processXXXEvent() methods, because one of them is being used to dispatch events whereas the others are used to respond to events. The reason for this apparent inconsistency is that the event-processing methods that respond to events are overridden versions of superclass methods. The original superclass versions are responsible for dispatching the events to listeners, whereas your versions are free to just add response code. Notice that all four of these methods call their respective superclass versions, which is a sure sign that the superclass methods are doing some additional work. In the case of the processActionEvent() method, there is no superclass version, so it must take on the responsibility of dispatching events to registered listeners.
The fancy button bean uses two private support methods that you haven't learned about yet: sizeToFit() and fireActionEvent(). These two methods provide functionality that the bean needs only internally, which is why they are declared as private. Nevertheless, they play a vital role in the inner workings of the bean. The code for the sizeToFit() method follows:
private void sizeToFit() {


  // Resize to the preferred size


  Dimension d = getPreferredSize();


  resize(d.width, d.height);


  Component p = getParent();


  if (p != null) {


    p.invalidate();


    p.layout();


  }


}
The sizeToFit() method is responsible for sizing the bean to fit the label text with just enough space between the text and the border so that the button looks visually appealing. The getPreferredSize() method is used to get the optimal button size, which is then used to resize the bean. Note that calling the resize() method alone isn't sufficient to resize the bean; you must also notify the bean's parent to lay out the bean again by calling the invalidate() and layout() methods on the parent.
The fireActionEvent() method is also important to the internal functioning of the bean. Following is its code:
private void fireActionEvent() {


  processActionEvent(new ActionEvent(this,


   ÂActionEvent.ACTION_PERFORMED,null));


}
fireActionEvent() is a simple method in that it consists of only a single call to the processActionEvent() method. The purpose of providing the fireActionEvent() method is to clean up the task of firing an action event by hiding the creation of the ActionEvent object passed into processActionEvent(). This isn't a big deal, but it does make the code calling fireActionEvent() in other methods a little cleaner.
You've now covered all the source code for the fancy button bean itself. Although the FancyButton class is all you really need to have a fully functioning bean, there is actually one other class worth mentioning: FancyButtonBeanInfo. If you recall from Chapter 5, "Introspection: Getting to Know a Bean," it is possible to provide explicit information about a bean in an associated bean information class. Part of this explicit information is the graphical icons used to display a bean for selection purposes in application builder tools. It is easy to provide selection icons for a bean through a bean information class. Following is the complete source code for the FancyButtonBeanInfo class, which is a bean information class that defines selection icons for the fancy button bean:
// FancyButtonBeanInfo Class


// FancyButtonBeanInfo.java


package PJB.Source.Chap10.FancyButton;


// Imports


import java.beans.*;


public class FancyButtonBeanInfo extends SimpleBeanInfo {


  // Get the appropriate icon


  public java.awt.Image getIcon(int iconKind) {


    if (iconKind == BeanInfo.ICON_COLOR_16x16) {


      java.awt.Image img = loadImage("FancyButtonIcon16.gif");


      return img;


    }


    if (iconKind == BeanInfo.ICON_COLOR_32x32) {


      java.awt.Image img = loadImage("FancyButtonIcon32.gif");


      return img;


    }


    return null;


  }


}
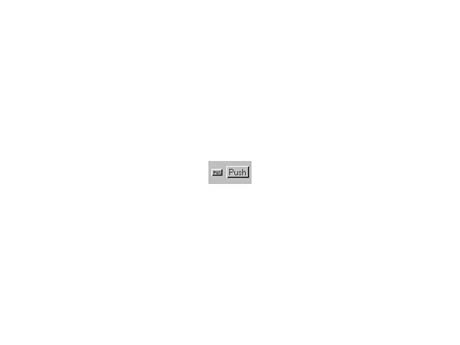
The only method defined in the FancyButtonBeanInfo class is getIcon(), which is typically called by application builder tools to retrieve an icon representing the bean. Notice that two icons are actually provided by the bean information class using different resolutions. The first icon is 16x16 pixels in size, and the second is 32x32 pixels. This enables application builder tools some degree of flexibility as to how they represent beans graphically for selection. The BeanBox tool that comes with the BDK specifically uses the 16x16 size icons. Both of the bean icons are provided as GIF 89A images, which is pretty standard for Java. Figure 10.1 shows how the icons for the fancy button bean look.
Figure
10.1. The bean information icons for the
fancy button bean.
There is one final part of the fancy button bean required before the bean can be
used in an application builder tool. I'm referring to the manifestation file required
of the JAR file in which the bean is placed. If you recall from Chapter 9, beans
must be distributed in a JAR file along with an appropriate manifestation file describing
the contents of the JAR file.
I'm not going to go into the details of manifest files because you really need to know very little about them in most scenarios. In the simple case of packaging up a bean for distribution, all you have to do is provide a few pieces of information. Signing a file for security purposes is a little more involved, but you don't need to worry about that for now. The code for the fancy button bean's manifestation file, FancyButton.mf, follows:
Manifest-Version: 1.0


Name: PJB/Source/Chap10/FancyButton/FancyButton.class


Java-Bean: True
As you can see, the manifest file is very simple; you basically just provide the name of your bean class and specify that it is in fact a bean. It is important to note that the package of the bean is specified as the bean's path in the manifest file. This is the only additional overhead you have to place in the JAR file for application builder tools to be able to extract information about your bean.
Of course, before you build the JAR file you still need to compile all of the bean's Java source code files into classes using the JDK compiler (javac). Before doing this, you need to make sure you have the CLASSPATH environment variable set so the compiler can find the bean's classes. This is necessary because the fancy button bean is defined as being part of a package (PJB.Source.Chap10.FancyButton). You basically just need to add the root path above the bean package hierarchy to the listing of paths in CLASSPATH. This directory is the parent directory of the PJB directory. So, if you installed the source code off the CD-ROM into a directory called Stuff, you would end up with a directory structure like this:
\Stuff\PJB\Source\Chap10\FancyButton
In this case, you would add the path \Stuff to CLASSPATH so that the compiler can locate support classes for the fancy button bean. This setting will also impact beans you develop in later chapters, so even if you don't plan on compiling the fancy button bean right now, you might want to go ahead and set the CLASSPATH variable accordingly. After setting CLASSPATH, you should be able to compile the fancy button bean by executing the following two commands:
javac FancyButton.java


javac FancyButtonBeanInfo.java
With the bean successfully compiled, you are ready to create the JAR file for it. Unfortunately, creating the JAR file for a bean isn't quite as straightforward as you might think. As you know, the fancy button bean is part of a package, which means that the classes and related resource files for the bean are found within a hierarchical directory structure dictated by the package name. This directory structure has implications that affect how the bean is placed in a JAR file, because classes are always loaded with respect to a package hierarchy. In other words, classes that reside in a package are always referenced from a directory structure that matches the package name, even when the classes are part of a JAR file. So, the classes and resource files for a bean must preserve their directory structure when they are placed in a JAR file.
The package hierarchy of a bean is enforced in a JAR file by way of the manifest file. As you saw a little earlier in this chapter, the fancy button bean's manifest file includes path information based on the package name of the bean. Although the manifest file handles the problem of enforcing a package hierarchy on a bean in a JAR file, it doesn't address a subtle problem in creating the JAR file in the first place. The problem I'm referring to has to do with the fact that the jar utility specifically looks for a bean class file that matches the package directory structure whenever it is used to create a JAR file for a bean. The problem is made more apparent by the fact that the jar utility won't even find a bean class file if the utility is run in the same directory where the file is located. The reason for this is that the jar utility tries to traverse a package directory structure to find the class. The solution is to execute the jar utility from a directory above the package directory structure where the bean files are located. In this case, you need to run the jar utility from the directory just above the PJB directory.
Even though the jar utility expects the bean class to be located within a directory structure, it doesn't automatically know to look for the class files and resources in this structure. This means you must specify explicit paths when you execute the jar utility from the directory above the package hierarchy. So, to build a JAR file that contains the fancy button bean and its resources, execute the following command in the directory above the bean package hierarchy:
jar cfm PJB\Source\Chap10\FancyButton\FancyButton.jar


  PJB\Source\Chap10\FancyButton\FancyButton.mf


  PJB\Source\Chap10\FancyButton\*.class


  PJB\Source\Chap10\FancyButton\*.gif
Notice in this command that the paths to all the files used by the jar utility are explicitly declared. This is necessary because the utility is being executed from the top of the bean package hierarchy. If you're thinking this seems like a roundabout way of doing things, you're exactly right. However, as of the beta 3 release of the JDK/BDK, this was the only way to build JAR files that contain beans that are part of a package. Hopefully, JavaSoft is working out a better approach for the final release, which might be available by the time you read this, so check the JavaSoft Web site (www.javasoft.com) for the latest information.
There is one other small problem that needs to be addressed in regard to the jar command just described. Many operating system shells don't provide a big enough command-line buffer to enter commands that long. Fortunately, there is an easy solution to this problem. I created a simple batch file that could be used to add any bean and its associated resources to a JAR file, without concerns about the length of the command line. The following is this batch file, which I named beanjar.bat:
@echo off


echo Rejar'ing %2...


jar cfm %1\%2.jar %1\%2.mf %1\*.class %1\*.gif %1\*.au


echo Rejar'ing finished.
This batch file takes two arguments: a path and a bean name. The path argument describes the relative path of the bean's class files and resources, while the bean name is the name of the main bean class file without the .class extension.
NOTE: The beanjar.bat batch file is intended to be an all-purpose utility for creating JAR files for beans. For this reason, it attempts to add all of the classes, images, and sounds for a bean to the JAR file, even if a bean doesn't necessarily use images or sounds. For beans that don't use images or sounds, an error message will appear stating that no files could be found matching the *.gif and *.au wildcards. You can just ignore this error message if your bean doesn't rely on image or sound resources.
Following is an example of creating a JAR file that contains the fancy button bean using the beanjar.bat batch file:
beanjar PJB\Source\Chap10\FancyButton FancyButton
Keep in mind that this command still needs to be executed from the top of the package directory hierarchy for the bean. After you execute this command, you should have a JAR file that contains the fancy button bean that is ready to be distributed and used.
NOTE: Keep in mind that the complete source code and related resources for the fancy button bean are located on the accompanying CD-ROM.
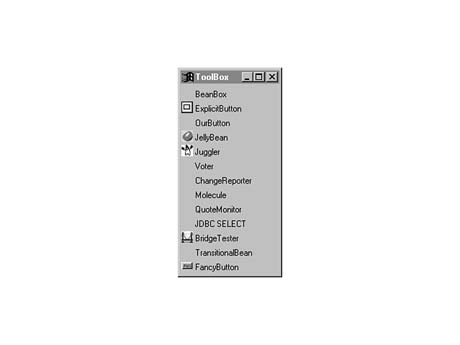
I mentioned in the previous section that most application builder tools, including the BeanBox test container, require beans to be packaged as JAR files. You just created a JAR file that contains the fancy button bean, which you will now test in the BeanBox. To add the bean to the BeanBox, you must first copy the JAR file to the jars directory beneath your BDK installation. If you installed the BDK according to the instructions in Chapter 9, then the appropriate directory is \jdk\beans\jars. The reason for copying the JAR file to this directory is that the BeanBox looks in this directory for all the beans to add to its ToolBox.
NOTE: As of this writing, the JavaBeans architects were in the process of working out a better way to integrate new beans into the BeanBox. One of the possible solutions was a new menu command under the Edit menu that would let you add beans through a file selection dialog box. You might want to check your version of the BeanBox and see if it supports this functionality.
You launch the BeanBox by executing the run.bat batch file, which you
learned about in Chapter 9. The BeanBox should appear at this point with your fancy
button bean added to the ToolBox. Figure 10.2 shows what the ToolBox looks like with
the bean added.
Figure 10.2. The BeanBox ToolBox window with the
fancy button bean added.
NOTE: Keep in mind that the run.bat batch file alters the CLASSPATH environment variable in order for the BeanBox to run properly. You'll need to manually set CLASSPATH back to its original value before compiling any beans again.
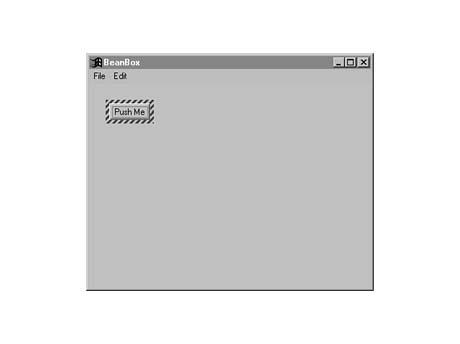
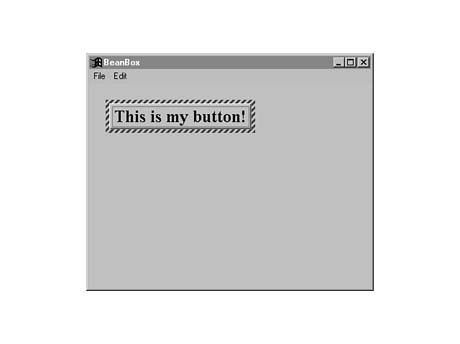
Notice in the figure that the last bean in the ToolBox is the fancy button bean, complete with the 16x16 icon you specified in the bean information class. Add a fancy button bean to the BeanBox by clicking it in the ToolBox and then clicking the main container window. Figure 10.3 shows the newly added fancy button bean.
Figure
10.3. The BeanBox main container window with
a fancy button bean added.
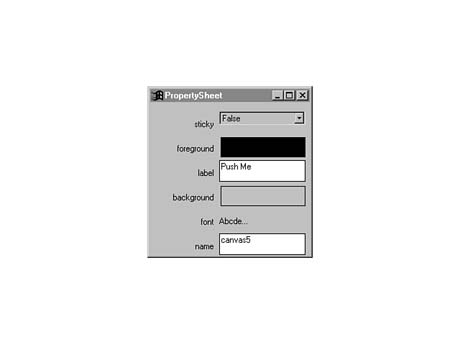
Now that the bean has been added to the container window, the real fun begins. Check
out Figure 10.4, which shows the PropertySheet window for the fancy button bean.
Figure
10.4. The BeanBox PropertySheet window for
the fancy button bean.
The PropertySheet window shows all the properties for the bean, including the inherited
foreground color, background color, font, and name properties, along with your own
sticky and label properties. All of these properties are fully editable using the
PropertySheet window. Try editing the label and font for the bean, because they impact
the appearance the most. Figure 10.5 shows the bean with the label and font properties
modified.
Figure
10.5. The BeanBox main container with a modified
fancy button bean.
You should also try out the sticky mode for the bean just to make sure it works like
you expected it to. Also keep in mind that the bean is designed to fire action events
whenever it is clicked, so you can easily wire it to other beans just as you did
with the OurButton bean in Chapter 9. You already know how to wire buttons to other
beans, so I'll let you explore that use of the fancy button bean on your own.
The last topic of this chapter deals with some areas in which the fancy button bean could be improved. I did all the work for you in developing the guts of the bean, so I want to give you some ideas about some modifications you could make yourself. No matter how good a bean is, there is always room for improvement in one way or another, and this bean is no different. So, following are a few suggestions for ways to add more features to the bean.
The first suggestion involves adding support for images, which means that the button would display an image along with the label text. As you are no doubt aware, image buttons are popular in most graphical environments. This addition could be as simple as adding a string property that holds the filename for an image drawn in the paint() method.
The second suggestion is related to the sticky mode of the button. In some situations it would be useful for the button to fire events based on the state changing while it is in the sticky mode. In other words, it would be nice to know when the button is being pushed and raised. This basically consists of adding a new event interface and providing event types for the button being pushed and raised in the sticky mode.
You might not feel up to the challenge of implementing these suggestions just yet, because this was your first bean. However, at least try to think about the conceptual aspects of modifying the bean to support these features, because it will help you a great deal to gain bean design experience.
This chapter introduced you to the fine art of JavaBeans programming at a practical level; you built your very first bean! Although the theory you've learned throughout the book thus far is important in its own right, this chapter finally shows you how to do something real with JavaBeans. You started the chapter with an idea for a fancy button bean and carried it through a preliminary design and on to a complete implementation. You then took the bean for a spin and finished off by brainstorming some ways to improve it on your own. How empowering!
One of the most important things you learned in this chapter is how little JavaBeans programming differs from traditional Java programming. This chapter should have solidified the fact that beans are just Java classes with some extra features thrown in. This is no accident, seeing how the folks at JavaSoft wanted to make it easy for Java programmers to shift into JavaBeans programming. You should have been able to follow along in this chapter without too much trouble, because the bean you developed is so similar to normal AWT Java classes.
If you liked the practicality and hands-on aspect of this chapter, then you're in luck, because you are facing three more that are similar. Chapter 11, "A Meter Bar Bean," focuses on a meter bar bean that can be used to represent the status of time-consuming operations.
![]()
![]()
![]()
![]()
![]()