This chapter marks the final chapter of your foray into building your own JavaBeans components. So far, you've developed a fancy button bean (Chapter 10, "A Fancy Button Bean), a meter bar bean (Chapter 11, "A Meter Bar Bean"), and an LED display bean (Chapter 12, "An LED Display Bean"). All of these beans are primarily graphically oriented, which means that their goal is to either accept visual input provided by the user or display graphical output for the user to see. The bean you develop in this chapter is a little different because it doesn't serve much of a purpose in terms of graphics. It is an audio player bean capable of playing audio clips. Its only graphical output is a simple icon that can be clicked to play the audio clip.
You begin this chapter by designing the audio player bean in conceptual terms just as you have done for all the other beans throughout Part III, "Creating Your Own Beans." You then move right into coding the bean, after which you test it out in the BeanBox test container. You finish the chapter with a look at some possible enhancements to the audio player bean you can make yourself. Keep in mind throughout this chapter that the audio player bean has a unique use in practically any environment; it is just as useful in a Java application as it is by itself in a Web page. This actually is true for practically any bean, but it is worth pointing out for this bean because of its interesting functionality.
You learn the following major topics in this chapter:
The audio player bean is strikingly different from the other beans you've developed thus far in that its functionality doesn't rely on graphical input or output. The bean primarily serves as a means of playing audio clips, and ultimately has only a graphical appearance so that a user can click it to hear an audio clip. It is possible to play an audio clip through the audio player bean purely by calling its public methods, so the bean really doesn't even need a graphical representation at all. However, it makes the bean a little more fun to give it an appearance and enable the user to click it to play (or replay) the associated audio clip.
NOTE: Beans that don't have a graphical representation are known as invisible beans and are used primarily for performing background tasks or as functional components in a nongraphical server application. You learn more about invisible beans in Chapter 15, "Advanced JavaBeans."
The audio player bean acts somewhat like a wrapper for a Java AudioClip interface, in that it provides all the overhead for loading and accessing an audio clip. If you aren't familiar with the AudioClip interface, it is provided in the java.applet package and defines a minimal interface for working with audio clips. Unfortunately, the AudioClip interface doesn't provide a means of loading an audio clip as a resource. Before Java 1.1, the only way you could even use the AudioClip interface was to load an audio clip using the getAudioClip() method provided in the Applet class. Although this is how JavaSoft intended the AudioClip interface to be used initially, it obviously doesn't cut it in the long run.
In the case of JavaBeans, you clearly don't want to be reliant on a parent applet as a means of loading an audio clip. In other words, the bean must be capable of loading and playing audio clips by itself without depending on functionality provided by a parent applet or application. So, to successfully implement a bean that can play audio clips, you must take another route altogether. Fortunately, Java 1.1 helped open the door for wider audio clip use by adding the getResourceAsName() method to the Class class. This method enables you to find and load a resource based on a URL, which in this case is a path to the audio clip file. Following is the definition of the getResourceAsName() method in the Java 1.1 API:
public String getResourceAsName(String name)
As you can see, getResourceAsName() takes a string as its only argument and also returns a string. The string argument is the name of the audio clip you want to load, and the returned string is the name of the URL corresponding to the audio clip. When you know the URL, you can load the audio clip using the URL class's getContent() method. If you are a little confused at this point about the importance of all this stuff, keep in mind that one of the main functions of the audio player bean is wrapping the overhead required to load a bean. The getResourceAsName() and getContent() methods are a big part of making this all possible. Without these two methods, there wouldn't be much of a point to designing the audio player bean because it wouldn't work.
NOTE: You might be thinking that this discussion of loading audio clips sounds vaguely familiar. You actually used this same technique to load images in Chapter 12's LED display bean. In that chapter, you wrote a method called loadImage() that uses both getResourceAsName() and getContent() to load images. The approach used for loading audio clips is no different, except the end result is an audio clip instead of an image.
With the big issue of loading audio clips behind you, let's move on to some more functional aspects of the audio player bean. The main function of the bean is to load and play audio clips. Knowing this, there are a few fairly obvious features that the bean must include. The first two of these are the simple capability to play and stop the audio clip. The next feature on the list is the capability to play audio clips in a loop, which means that the clip is played continuously until it is explicitly stopped. Normal nonlooped clips automatically stop after they have played through once. In the AudioClip interface, looping is handled by a completely different method than the one used to play clips normally. In the case of the bean, however, it makes more sense to use a single consistent method to play the clip, and then have the looping feature controlled by a separate boolean property. I'm getting a little ahead by talking about properties at this point; they are covered in the next section, "Properties."
You can also incorporate an autostart feature into the audio player bean, which means a serialized bean will immediately start playing its associated audio clip upon the bean's creation. The reason I say this feature applies only to serialized beans is because any other bean wouldn't know what audio clip to play. Serialized beans have typically already been set to a particular audio clip and therefore, when they are created, are capable of automatically playing the clip.
That pretty much sums up the functionality required of the audio player bean. As you can see, it's a simple bean because of its design, and fortunately it turns out to be straightforward on the coding side, too, as you learn in the "Developing the Audio Player Bean" section. For now, let's move on to covering some of the fundamental parts of the bean's design so the coding will go even more smoothly.
Like all the other beans you've developed throughout the book, the audio player bean derives from the Canvas class so that it can render itself graphically. You should recall from the development of the other beans that the Canvas class brings with it a group of properties: background and foreground colors, name, and font. Because the audio player bean needs to draw only an icon as its graphical representation, none of these inherited properties except the name apply. To keep users of the audio player bean from seeing these properties and getting confused, you'll use a familiar technique to hide them.
The first audio player bean property to cover is the raised property, which by now you should remember by heart from implementing it in the other beans you've developed. Just in case you are as forgetful as I am, I'll give you a quick recap of how to use this property. The raised property is used to determine the look of a 3D border drawn around the bean. In the audio bean, this border appears around the icon image for the bean. If raised is set to true, then the border is drawn to look raised from the screen. If not, the border is drawn to look inset. The raised property is a boolean property that adds a little flair to the look of the bean with very little additional overhead.
The next property to address is the audio clip filename property, which represents the name of the file for the audio clip. This property is necessary so that the user can change the audio clip being played. The audio clip filename property is a string property that the bean uses to load the appropriate audio clip resource.
An important property mentioned in the previous section, "Designing the Audio Player Bean," is the looping property, which determines whether the audio clip is to be played looped. The looping property is a boolean property whose value determines whether the audio clip is looped whenever it is played. This means that setting the looping property alone doesn't play the clip looped, it just states that the clip will be played looped whenever the appropriate play method is called.
The last property for the audio player bean is the autostart property, which determines whether a serialized bean automatically starts playing a clip when the bean is created. This is a boolean property that applies only to beans that are going to be loaded and re-created by serialization, because an existing bean has already passed its creation stage.
These properties are sufficient for modeling the functionality of the audio player bean. As a quick recap, following are the properties required of the audio player bean:
After you have fixed the properties, you can move on to the public methods required of the audio player bean. The best place to start is with the accessor methods for the bean. All the properties in the bean are readable and writable, so you know they will all require a pair of accessor methods.
Beyond accessor methods, you also must address the other public methods that the bean needs. The audio player bean needs four additional public methods: paint(), getPreferredSize(), play(), and stop(). The first of these, paint(), should be familiar to you because it plays a critical role in every bean you've created. The getPreferredSize() method is necessary because the audio player must be carefully sized around the icon image being displayed. Recall that both the fancy button and LED display beans from Chapters 10 and 12 use this method to return their own preferred sizes. The audio player bean requires similar functionality, except it calculates its preferred size based on the size of the icon image.
The other two public methods required of the bean, play() and stop(), are used to play and stop the audio clip. These two methods are essentially interfaces to the underlying audio clip represented by the audio player bean. The play() method is responsible for playing the associated audio clip based on the value of the looping property. If the looping property is set to true, the clip is repeated; otherwise, it is played only once. The stop() method stops the playing of the clip regardless of whether it is looping. If the clip isn't playing, the stop() method has no effect.
Following are the public methods required of the audio player bean:
The audio player bean is used primarily for audio output purposes, so its event processing overhead is minimal. Even so, there is one area the bean must address in terms of events. I'm referring to how the bean processes mouse-click events, which is an issue because you want the user to be able to click the bean to play an audio clip. As you learned in Chapter 10 with the fancy button bean, mouse-click events are processed in an individual event processor method that is overridden from the bean's parent class.
Now that the initial bean design is finished, let's move on to the actual implementation. To reference the complete source code as you work through the implementation of the bean, look on the accompanying CD-ROM. The main code for the audio player bean is in the AudioPlayer class, which appears on the CD-ROM in the file AudioPlayer.java.
The starting point in developing the audio player bean is laying out the properties. The following are the member variable properties for the bean based on the initial design:
private boolean             raised;


private String              audioFilename;


private boolean             looping;


private boolean             autoStarting;
These member variables directly correspond to the properties mentioned in the "Properties" section, which by now is just as you expected. Because they are all based on built-in Java types, property editors are already provided by JavaBeans for each of them. This saves you the trouble of having to implement your own property editors like you did with the meter bar bean in Chapter 11. Along with these properties, the bean also requires the following other member variables for internal use:
private transient AudioClip audio;


private transient Image     image;
The audio member variable is an AudioClip object used to represent the audio clip being played. This member variable holds the audio clip after it has been loaded. The image member variable is an Image object that represents the icon image used to paint the bean. The image member variable is loaded similarly to the audio member variable. The image stored in the image member variable is the 32x32 icon image for the bean, which you see next in the "Constructors" section.
That wraps up the member variables for the audio player bean. Let's move on to the constructors.
The audio player bean provides two constructors: a default constructor and a detailed constructor that takes all four properties as arguments. Following is the code for both of these constructors:
public AudioPlayer() {


  this(false, "Audio.au", false, false);


}


public AudioPlayer(boolean r, String afn, boolean l, boolean as) {


  // Allow the superclass constructor to do its thing


  super();


  // Load the icon image


  image = (Image)loadResource("AudioPlayerIcon32.gif");


  if (image == null)


    System.err.println("Couldn't load the AudioPlayerIcon32.gif 	    Âimage.");


  // Set properties


  raised = r;


  setAudioFilename(afn);


  looping = l;


  autoStarting = as;


  setBackground(Color.lightGray);


  sizeToFit();


  // Autostart the audio clip if necessary


  if (autoStarting)


    play();


  // Enable mouse event processing


  enableEvents(AWTEvent.MOUSE_EVENT_MASK);
}
The first constructor simply calls the second constructor with default property values. The second constructor is responsible for handling the bean initialization. This constructor begins by calling the superclass constructor, which is standard in AWT derived classes. The constructor then loads the icon image into the image member variable. The loading of the image is handled by the loadResource() method, about which you learn in the "Support Methods" section. With the image loaded, the constructor then sets all the properties. Notice that the audio clip filename is set using the setAudioFilename() setter method instead of setting the property directly. This is necessary because the audio clip is loaded from within the setAudioFilename() method.
You might also have noticed that the sizeToFit() method is called immediately
after setting the properties. This call ensures that the bean is sized to
appropriately fit the icon image and 3D border. Because the constructor is executed
whenever the bean is created, it only makes sense that the constructor contain the
code for autostarting the bean if the autostart property is set. If the property
is set, the audio clip is played with a call to the play() method, about
which you learn in the "Accessor Methods" section.
The last order of business for the constructor is enabling the group of events related to the mouse by calling the enableEvents() method. Without calling this method, the bean would be incapable of directly trapping any mouse events.
The next part of the audio player bean to check out is its accessor methods, which provide access to the bean's properties. You've already seen the accessor methods for the raised property in earlier beans, so I'll save you the trouble of seeing them again by not covering them here. The first new property to address is the audio clip filename property, whose accessor methods follow:
public String getAudioFilename() {


  return audioFilename;


}


public void setAudioFilename(String af) {


  audioFilename = af;


  // Load the audio clip


  audio = (AudioClip)loadResource(audioFilename);


  if (audio == null)


    System.err.println("Couldn't load the " + audioFilename +


      " audio clip.");
}
The getAudioFilename() getter method is self-explanatory in that it simply returns the value of the audioFilename member variable. The setAudioFilename() setter method takes on the responsibility of loading the audio clip after setting the property member variable. The loading is accomplished by the loadResource() method, about which you learn in the "Support Methods" section.
The next set of accessor methods in the audio player bean belong to the looping property. The code for these methods follows:
public boolean isLooping() {


  return looping;


}


public void setLooping(boolean l) {


  looping = l;
}
The getter method, isLooping(), simply returns the value of the looping member variable. Likewise, the setter method, setValue(), is simple in that it just sets the value of the looping property.
The final set of accessor methods in the audio player bean belong to the autostart property. The code for these methods follows:
public boolean isAutoStarting() {


  return autoStarting;


}


public void setAutoStarting(boolean as) {


  autoStarting = as;
}
Like the accessor methods for the looping property, these accessor methods get and set the autostart property without any additional responsibilities.
There are a few public methods in the bean that you need to tackle now: paint(), getPreferredSize(), play(), and stop(). The source code for the first of these methods, paint(), follows:
public synchronized void paint(Graphics g) {


  int width = size().width;


  int height = size().height;


  // Paint the background with 3D effects


  g.setColor(getBackground());


  g.fillRect(1, 1, width - 2, height - 2);


  g.draw3DRect(0, 0, width - 1, height - 1, raised);


  // Paint the icon image


  g.drawImage(image, 3, 3, this);
}
The paint()method starts off by getting the width and height of the bean, filling the background, and painting a 3D effect around the edges. This code should look familiar to you because it is borrowed directly from the other beans you've developed in Chapters 10-12. The icon image for the audio player is painted last with a call to drawImage().
The getPreferredSize()method is used to return the preferred size of the bean. You've seen other versions of this method in beans you developed in Chapters 10-12. The version of getPreferredSize() in the audio player bean is a little different from the other versions you've seen, but it ultimately serves the same purpose. Following is the code for the getPreferredSize() method:
public Dimension getPreferredSize() {


  // Calculate the preferred size based on the label text


  return new Dimension(IMAGE_SIZE + 6, IMAGE_SIZE + 6);
}
The getPreferredSize() method calculates the size of the audio player based on the size of the icon image, which is 32x32. Notice that the calculation also includes some padding so the image fits nicely inside the 3D border.
The last two all-purpose public methods defined in the audio player bean are play() and stop(), which provide a clear and concise means of playing and stopping the audio clip. Following is the code for the play() method:
public void play() {


  if (audio != null) {


    if (looping)


      audio.loop();


    else


      audio.play();


  }


  else


    System.err.println("Error playing audio clip.");
}
The play()method is responsible for playing the audio clip either looped or normally, depending on the value of the looping property. This functionality is easy to see in the source code by examining the inner if statement that tests the looping property. Based on the value of the looping property, the play() method calls the appropriate method on the underlying AudioClip object. Notice that the transient audio clip member variable, audio, is checked for a null value before it is played. This is to make sure there are no problems in case the play() method is called on an invalid audio clip. An audio clip could be invalid because of some type of initialization error such as a load error.
The stop()method forms the second half of the audio clip control interface. Following is its source code:
public void stop() {


  if (audio != null)


    audio.stop();


  else


    System.err.println("Error playing audio clip.");
}
This method is similar to the play() method in that it first checks the audio member variable to make sure it isn't null. If this member variable checks out, then the stop() method is called on the underlying AudioClip object to actually stop the playing of the audio clip. That's it for the public methods!
As you learned in the "Designing the Audio Player Bean" section, the audio player bean requires an event processing method for responding to mouse clicks. The source code for this method, processMouseEvent(), follows:
protected void processMouseEvent(MouseEvent e) {


  // Track mouse presses


  if (e.getId() == MouseEvent.MOUSE_PRESSED)


    play();
}
The processMouseEvent() method is responsible for trapping mouse button presses, which are used to trigger and play the audio clip. When the user presses the mouse button, the play() method is called to play the audio clip. There isn't a whole lot more to say about processMouseEvent(), so let's move on to the support methods for the audio player bean.
The audio player bean uses a few private support methods that haven't been covered
yet: sizeToFit() and loadResource(). These two methods provide
functionality that the bean needs only internally, which is why they are
declared as private. You've seen the sizeToFit() method a few times
before in earlier beans, so there's no sense in rehashing it here.
The loadResource() method is much more important to the internal functioning of the audio player bean. The source code for it follows:
private Object loadResource(String name) {


  try {


    URL url = getClass().getResource(name);


    return url.getContent();


  }


  catch (Exception e) {


    return null;


  }
}
The loadResource() method returns an Object object corresponding to the string name of a resource such as an image or audio clip. This is accomplished by first constructing a URL (Uniform Resource Locator) based on the name of the image, and then using the URL to load the resource by the getContent() method. You used this same approach to load images in the LED display bean from Chapter 12. The audio player bean must load both images and audio clips, so the loadImage() method was generalized to loadResource(), which works for both. The difference is that the Object object returned from loadResource() must be cast to the specific resource type (Image or AudioClip).
That wraps up the source code for the audio player bean itself. As you well know by now, that isn't quite all there is to the story. The audio player bean still requires a bean information class to specify icons that graphically represent the bean in application builder tools, as well as to hide the bean's inherited properties that aren't applicable. Listing 13.1 contains the complete source code for the AudioPlayerBeanInfo class.
// AudioPlayerBeanInfo Class


// AudioPlayerBeanInfo.java


package PJB.Source.Chap13.AudioPlayer;


// Imports


import java.beans.*;


public class AudioPlayerBeanInfo extends SimpleBeanInfo {


  // Get the appropriate icon


  public java.awt.Image getIcon(int iconKind) {


    if (iconKind == BeanInfo.ICON_COLOR_16x16) {


      java.awt.Image img = loadImage("AudioPlayerIcon16.gif");


      return img;


    }


    if (iconKind == BeanInfo.ICON_COLOR_32x32) {


      java.awt.Image img = loadImage("AudioPlayerIcon32.gif");


      return img;


    }


    return null;


  }


  // Explicit declare the properties


  public PropertyDescriptor[] getPropertyDescriptors() {


    try {


      PropertyDescriptor


        // Inherited properties


        foreground = new PropertyDescriptor("foreground",   ÂAudioPlayer.class),


        background = new PropertyDescriptor("background",    ÂAudioPlayer.class),


        font = new PropertyDescriptor("font", AudioPlayer.class),


        name = new PropertyDescriptor("name", AudioPlayer.class),


        // New properties


        raised = new PropertyDescriptor("raised",    ÂAudioPlayer.class),


        audioFilename = new PropertyDescriptor("audioFilename",


          AudioPlayer.class),


        looping = new PropertyDescriptor("looping", ÂAudioPlayer.class),


        autoStarting = new PropertyDescriptor("autoStarting",


          AudioPlayer.class);


      // Hide the foreground, background, and font properties


      foreground.setHidden(true);


      background.setHidden(true);


      font.setHidden(true);


      PropertyDescriptor[] pd = { foreground, background, font, Âname, raised,


        audioFilename, looping, autoStarting };


      return pd;


    }


    catch (IntrospectionException e) {


      throw new Error(e.toString());


    }


  }
}
The first method in the AudioPlayerBeanInfo class, getIcon(),
is practically identical to the versions of the method you provided in the other
beans you've developed in Chapters 10-12. The only difference is the specification
of the GIF files for the icons themselves. These icons are provided as GIF 89A images
and are shown in Figure 13.1.
Figure
13.1. The bean information icons for the
audio player bean.
The second method used in the AudioPlayerBeanInfo class is getPropertyDescriptors(),
which is used to explicitly specify the properties exposed by the bean. The purpose
of implementing this method is to keep the inherited foreground, background, and
font properties from being exposed by the bean.
As in all the other beans you've developed, the audio player bean requires a manifestation file to be included in the JAR file that contains the bean. The code for the audio player bean's manifestation file, AudioPlayer.mf, follows:
Manifest-Version: 1.0


Name: PJB/Source/Chap13/AudioPlayer/AudioPlayer.class


Java-Bean: True
The only difference between this manifest file and the others you've seen is the name of the bean class and its package association.
CAUTION: Before you compile the audio player bean, make sure you have the CLASSPATH environment variable properly set so that the compiler can locate its support classes. In other words, make sure the root path above the bean package hierarchy is included in CLASSPATH. This directory is the parent directory of the PJB directory.
NOTE: The complete source code and related resources for the audio player bean are located on the accompanying CD-ROM.
Before the audio player bean can be used in the BeanBox, you need to add it to the BeanBox by following these steps:
1. Copy the JAR file that contains the bean and its resources to the jars directory beneath your BDK installation.
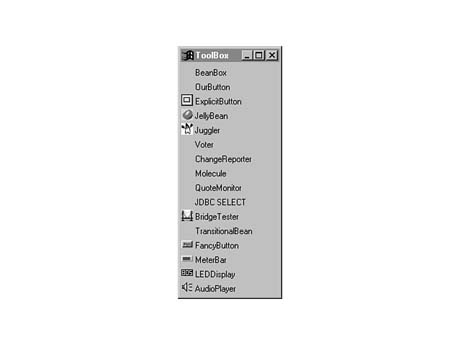
After you perform these steps, which should be old hat to you by now, the BeanBox will appear with your audio player bean added to the ToolBox. Figure 13.2 shows how the ToolBox looks with the bean added.
Figure
13.2. The BeanBox ToolBox window with the
audio player bean added.
The figure shows that the audio player bean has been added to the end of the ToolBox,
complete with the 16x16 icon you specified in the bean information class. Try out
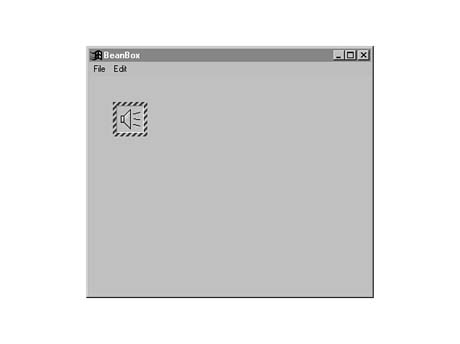
the bean by adding it to the BeanBox; just click it in the ToolBox and then click
the main container window. Figure 13.3 shows the newly added audio player bean.
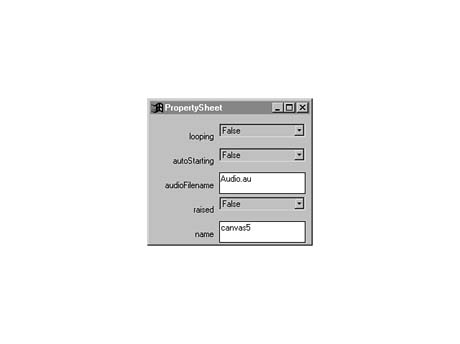
Look at the PropertySheet window and assess the properties exposed by the bean. Figure 13.4 shows the PropertySheet window for the audio player bean.
Figure 13.3. The BeanBox main container window with an audio player bean added.
Figure
13.4. The BeanBox PropertySheet window for
the audio player bean.
The PropertySheet window shows all the properties for the bean, including the inherited
name property and the properties you defined. Notice that the background, foreground,
and font properties are all missing due to the bean information class. At this point,
you can use the PropertySheet window to modify the audio filename, looping, and autostart
properties for the bean. Before you do, try clicking the bean to make sure you hear
an audio clip being played. The default audio clip the bean plays is called Audio.au,
which is provided with the bean. You could enter the name of your own audio clip
if you had one with the bean.
NOTE: It's worth noting that the bean will look for audio clips in the location in which the bean is stored. In this case, it means that the bean will look in the JAR file that contains the bean. This might seem like a nuisance until you realize that the JAR utility makes adding and removing files to and from an archive very easy. In addition, if you are using the audio player on the Web, you will want to benefit from the compression and packaging provided by JAR files.
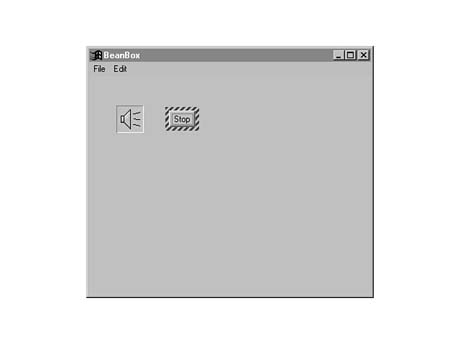
Test the looping property by setting it to true and then clicking the bean. You should hear the musical audio clip repeat over and over. Unfortunately, you can't stop it because the BeanBox doesn't give you a direct means of calling methods. However, you can wire a button to the stop() AWT response method, which has the same effect as calling the public stop() method directly. Try this by adding a fancy button bean to the container window with its label set to Stop. Figure 13.5 shows how the main container window looks with both of these beans added.
Figure
13.5. The BeanBox main container window with
an audio player bean and a fancy button bean.
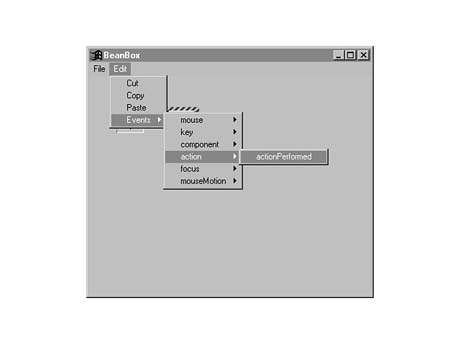
You begin wiring the button to the audio player by clicking the Edit menu with the
button bean selected. From the Edit menu, select Events | Action. You'll then have
only one menu item available: the actionPerformed event. Figure 13.6 shows
how to select this event item from the menu.
Figure
13.6. The Edit menu with the actionPerformed
event selected.
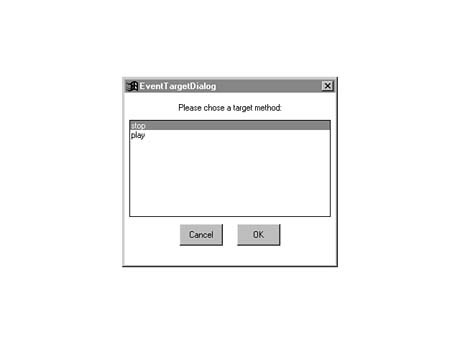
After you select this event, you'll be presented with a moving line that is controlled
by the mouse. The line originates from the fancy button bean and is meant to be guided
to the bean with which you want to connect the actionPerformed event. Click
the audio player bean and you will be presented with the EventTargetDialog dialog
box in Figure 13.7.
Figure
13.7. The EventTargetDialog dialog box for
the audio player bean.
This dialog box shows the two AWT event response methods you defined in the audio
player bean. To connect the button to the stop() method, just click the
stop() method in the list and then click OK. At this point, you can click
the fancy button bean and it will stop the playing of the audio player. Pretty slick!
You can also add a button that connects to the play() method to finish the
visual interface.
You can try out the autostart property by setting it to true and then cutting the audio player bean by selecting Cut from the Edit menu. Then select Paste from the Edit menu to add the bean back to the container. The cut and paste functions in the BeanBox use JavaBeans persistence services to save and restore beans, so the audio player bean is re-created and automatically played based on the autostart property.
NOTE: Note that the bean connection and cut and paste features in the BeanBox were all tested on an early beta version of the BeanBox, which was somewhat unstable. It is expected that the version of the BeanBox that ships with the final BDK will be much more robust.
Just like all the other beans covered throughout the book, the audio player could benefit from a few enhancements here and there. Following is a list of possible improvements that would make the audio player bean a little more interesting and useful:
The first enhancement involves adding play and stop buttons as part of the bean itself. These buttons would be very useful because they would enable you to play and stop the audio clip without any additional manipulation of the bean, such as wiring other buttons to it. This modification requires the bean to be derived from Container instead of Canvas so that it can hold the buttons. Even though this is a little trickier than just adding another property or tweaking a method, you should now have enough Java skills to tackle it.
The second suggestion is to provide a set of animation images that are cycled while the audio clip is being played. This change would require a new transient member variable to hold the array of images. The only problem with this approach is that there isn't currently a way to detect when an audio clip has finished playing, so you would just have to tie the animation to the play() and stop() methods. Admittedly, this approach doesn't quite get the desired effect, but it works well enough to make the bean a little more fun.
The final suggestion involves redesigning the bean so that it is invisible. Recall from the "Designing the Audio Player Bean" section that an invisible bean has no graphical representation. The audio player bean's graphical output is mostly for show, so it could easily work as an invisible bean. To do this, you would derive the bean from Object instead of Canvas, which removes the bean's graphical underpinnings. You would still provide the bean information icons so that the bean could be viewed and manipulated at design time.
In this chapter you learned about the audio player bean, which is used to play audio clips. You began the chapter as you have Chapters 10-12 by working through a preliminary design of the bean. You then actually coded the bean, which should be familiar to you based on the experience you gained in building other beans. After working through the code for the audio player bean, you gave it a test spin in the BeanBox and even connected it with the fancy button bean developed in Chapter 10. You also tried out the default persistence support in JavaBeans by cutting and pasting an audio player bean in the BeanBox. From there, you learned a few ways in which the bean could be enhanced.
This chapter caps off what you probably will agree is the most difficult part of the book so far. Although the code listings might have been taxing at times, you learned a great deal in working through the hands-on examples in Chapters 10-13. Just think, you now have four complete beans under your belt, which puts you in a position to hit the ground running in terms of building your own beans. Just in case this part of the book has left you too tired to do any running, you'll be glad to know that the next part of the book lightens up on the coding just a little.
![]()
![]()
![]()
![]()
![]()