In the previous four chapters, you saw how beans are used and manipulated in the BeanBox test container, which imitates the visual design approach used by application builder tools. Although this is the ideal approach in using beans to their fullest, there is no reason why you can't use beans in straight Java code just as you use traditional Java classes. This chapter begins the final part of the book by taking a look at how JavaBeans components are used in a hand-coded application. You probably will be pleasantly surprised to learn that integrating beans into applets and applications at the code level is extremely similar to traditional Java programming with classes.
The chapter begins with a general discussion about the issues surrounding the use of beans in a non-visual environment. Although you lose all the application builder tool support with this approach, beans are just as functionally full-featured when they are used directly in source code. After learning about the main issues surrounding the hand coding of beans, you spend the rest of the chapter coding by hand a complete application that uses all of the beans you built in the previous part of the book. This application is very interesting because it shows how beans work together at the code level. Even if you fully plan to use beans in visual application builder tools, you still gain a lot of insight into how beans work by manipulating them at the code level.
You learn about the following topics in this chapter:
One of the biggest benefits of the JavaBeans technology is its built-in support for visual layout and editing using application builder tools. You've learned a great deal about this support throughout the book, including how your own beans operate in a visual environment. Even though laying out and editing beans visually is the design approach promoted by JavaBeans for a variety of reasons, it isn't the only approach available to developers. You also can use beans directly in source code very much like traditional Java classes. This source code approach doesn't really provide any higher degree of flexibility, but it might still be favored by some developers who are more comfortable working directly with code. For this reason, it is important for you to understand how to use beans directly in Java source code.
The first thing to understand about using beans directly in Java code is that beans are not very different from any other Java classes. In fact, the only real difference is that beans include additional overhead for component-related features such as exported properties, introspection, and application builder tool support. Beans also support persistence and event processing, but these two services are useful for all Java classes, not just beans. The point I'm getting at here is that a bean can be treated like a normal Java class with some extra overhead that can be largely ignored when working directly with code.
The process of building applets or applications out of beans at the code level is conceptually similar to using application builder tools for the same purpose. The primary difference, obviously, is that you have to do everything in code that the builder tools enable you to do visually. More specifically, the following steps are required to build applets or applications out of beans in a non-visual environment:
NOTE: This discussion focuses on using beans directly in Java code to build stand-alone applications. Developing applets with beans is a very similar process, so the discussion applies to it as well.
In a visual application builder tool, creating an instance of a bean is as simple as selecting the bean from a toolbox and clicking in the editing window for the application you are developing. Creating instances of a bean directly in source code isn't much more difficult, but it definitely isn't as elegant as pointing and clicking with the mouse. To create a bean directly in code, you basically create an instance of the bean class just as if it were any other Java class. In applications, the best place to perform this creation is within the constructor for the application class. The following line of code creates a meter bar bean with default settings:
MeterBar meter = new MeterBar();
If you want to use settings that are different than the default, you can use the second constructor for the bean and pass in all the settings as arguments. The following line of code does this:
MeterBar meter = new MeterBar(HVOrientation.VERTICAL, true, 0.0f, Â100.0f);
After you have created the meter bar bean, you still need to add it to the application's window in order for it to be associated with the application. This is due to the fact that an application class is a container class, which means that it is capable of holding graphical AWT elements such as beans. To add a bean to an application, you just call the add() method, which is inherited from the Container class. The following is an example of adding the meter bar bean to an application using the add() method:
add(meter);
As you can see, adding a bean to an application is a very simple process. Keep in mind that this code is placed in the application class's constructor along with the bean creation code. You typically will create all your beans and then add them to an application in the application class's constructor.
After you create and add all of your beans to an application, you must then customize them to fit the needs of the application. Bean customization is just as important as bean creation because it determines how the beans will function and appear in the application. If you used detail constructors to create some of the beans, you might not even need to customize them. However, you typically will need to customize at least a few beans before you can use them. Customizing a bean is simply a matter of calling one or more of its public methods with the desired settings. Usually, you will use a bean's accessor methods to customize the bean by setting its properties to different values.
The initial bean customization should occur just after you create and add beans to an application. Within the application class's constructor is also a good place to handle this chore. You can use the following piece of code to customize the meter bar bean after you create it and add it to an application:
MeterBar meter = new MeterBar();


add(meter);


meter.setRaised(true);


meter.setNumParts(75.0f);
This code creates and adds a meter bar bean and then customizes it by setting two of its properties. The raised property is first set to true, which results in the meter having a raised 3D border. The number of parts property is also set, which determines how much of the meter bar is filled in. You're probably thinking that you could have just as easily set these properties by using the detail constructor for the meter bar bean, like this:
MeterBar meter = new MeterBar(HVOrientation.HORIZONTAL, true, Â75.0f, 100.0f);
add(meter);
This would work for the properties you modified, but what about inherited properties? For example, how would you alter the color of the meter bar without customizing the bean outside of the constructor? You wouldn't. The only way to modify inherited bean properties is by setting them with an accessor method, like this:
MeterBar meter = new MeterBar(HVOrientation.HORIZONTAL, true, Â75.0f, 100.0f);


add(meter);


meter.setForeground(Color.red);
This code sets the foreground color of the meter bar to red, which draws in red the meter bar itself. As you can see, bean customization is a very straightforward process of calling the appropriate public methods (usually setter methods) to get the desired results.
The last step in using beans directly in source code is connecting them together via events. JavaBeans fully supports the capability to connect beans together by responding to events that a bean fires. For example, the fancy button bean fires action events whenever it is pushed. If you are familiar with Java 1.1 event processing, you will notice that the approach used in JavaBeans is exactly the same due to the fact that JavaBeans uses the same event model as Java 1.1.
Connecting beans together using events is primarily a process of registering event listeners with a bean and then adding the necessary response code to respond to the event. The first step in this process is deciding which beans are generating events to which you want to respond. For each of these beans, you will need to call the appropriate event listener registration method for adding event listeners to the bean. For example, in the case of the fancy button bean you would call the addActionListener() method to register event listeners with the bean. The event listener passed into this method can be any class that implements the appropriate EventListener derived interface. In the case of the fancy button bean, the class would need to implement the ActionListener interface.
Implementing listener interfaces touches on a tricky problem with event handling in JavaBeans, as well as in Java 1.1. The problem is based on the fact that the event model in JavaBeans and Java 1.1 is based on event types, which are used as the basis for dispatching events to the appropriate event listener. This situation alone isn't the problem; the problem is that there is no clean way to distinguish between two beans dispatching events of the same type. In other words, there isn't a good way to distinguish between the source of events if the events are of the same type. As an example of this problem, consider an application that contains multiple fancy button beans. Regardless of which button you click, the same actionPerformed() method will be called on the registered class that implements the ActionListener interface.
The solution to the problem is to use different listener classes to respond to events for each button. However, this approach would quickly get annoying because it requires you to implement several little classes that do nothing more than respond to button events for an application. This solution not only is annoying, but it goes against object-oriented principles and ultimately results in a disorganized class structure. What should you do?
The architects at JavaSoft have managed to stay a step ahead of the game when it comes to dealing with problems like this. Their approach to solving this particular issue ended up requiring a change to the Java language syntax. The solution is to use inner classes, which are classes that can be defined in any scope, including within other classes. Inner classes are new to Java 1.1, which means that all classes in Java 1.1 can be defined in any scope. You probably are still wondering just how inner classes help solve the problem of responding to multiple events of the same type. Inner classes enable you to define small helper classes within the context of an application class for the express purpose of handling events.
It will be much easier for you to understand the benefit of inner classes if you see a practical example. Consider the scenario in which you have an application with two buttons: an OK button and a Cancel button. The following is the code that registers event listeners for each of these buttons in the constructor for the application:
okButton.addActionListener(new OKButtonAdapter());


cancelButton.addActionListener(new CancelButtonAdapter());
Notice in this code that the event listener classes passed into these methods are called OKButtonAdapter and CancelButtonAdapter. Adapter classes are classes that implement listener interfaces for the sole purpose of adding response code. These classes are the ones that are placed inline in the application class as inner classes. The following is the code for these classes:
class OKButtonAdapter implements ActionListener {


  public void actionPerformed(ActionEvent e) {


    System.out.println("You clicked OK!");


  }


}


class CancelButtonAdapter implements ActionListener {


  public void actionPerformed(ActionEvent e) {


    System.out.println("You clicked Cancel!");


  }
}
These classes each implement a single method, actionPerformed(), which responds to the event for each button separately. This approach to responding to events is very clean and still fits in well with the object-oriented design of the application because the event adapter classes are hidden within the application.
To connect beans to each other with this approach, you simply call the desired public methods on a bean within an event response method. For example, if you had a fancy button bean called playButton and an audio player bean called player, you could use the following code to cause the audio player to be played based on a button push:
class PlayButtonAdapter implements ActionListener {


  public void actionPerformed(ActionEvent e) {


    player.play();


  }
}
Of course, to use this code you must have registered the PlayButtonAdapter adapter class with the fancy button bean in the constructor for the application, like this:
playButton.addActionListener(new PlayButtonAdapter());
That wraps up the fundamental issues surrounding the direct use of beans in source code. Now move on to a complete example so you can put some of this newfound knowledge to work.
The rest of this chapter is devoted to the design, development, and testing of the bean tester application, which uses all the beans you developed in the previous part of the book (Part III, "Creating Your Own Beans"). The design of the application is pretty straightforward because the goal is simply to test out all of the beans together using the hand-coded development approach about which you've learned throughout this chapter. Even so, you'll find that this application serves as a good example of how to use beans directly in source code.
Because the goal of the bean tester application is to test the beans, your most important design decision is figuring out how the beans should interact with each other. The fancy button bean is really the only user input bean in the group, so it makes sense to use it for the application's input needs. The LED display bean is an output bean that displays a numeric value. A good way to test it out would be to connect two buttons to it that increment and decrement its value. Similarly, the meter bar bean displays a fractional value in the form of a meter bar, which you could test using the same increment and decrement buttons. The only remaining bean is the audio player bean, which you could test with buttons that play and stop the player.
You can connect the buttons to the beans using the event adapter approach discussed in the previous section of this chapter, "Connecting the Beans." You then alter the beans in the event response methods by calling their public methods. Following is a list of the main functional requirements of the bean tester application:
The development of the bean tester application follows very closely the steps you learned earlier in this chapter to create, customize, and then connect the beans. These are the basic steps you will always follow when you use beans to hand code applications. As you work through the code for the application, you probably will notice that there is very little code beyond the maintenance of the beans. This fits in perfectly with the goal of JavaBeans, which is to keep all of a bean's functionality wrapped up tightly inside the bean.
NOTE: The complete source code for the bean tester application is located on the accompanying CD-ROM. The main source code file is BeanTester.java, which contains the BeanTester application class.
The implementation of the bean tester application begins with the member variables, which are simply the bean instances used by the application. These member variables follow:
private FancyButton playButton,


                    stopButton,


                    incButton,


                    decButton;


private LEDDisplay  led;


private MeterBar    meter;
private AudioPlayer player;
No surprises here! All of the member variables are references to bean objects that are waiting to be created and used. The code that actually handles the creation of the beans is found in the createBeans() method, which follows:
private void createBeans() {


  // Create the beans


  try {


    playButton = (FancyButton)Beans.instantiate(null,


      "PJB.Source.Chap10.FancyButton.FancyButton");


    stopButton = (FancyButton)Beans.instantiate(null,


      "PJB.Source.Chap10.FancyButton.FancyButton");


    incButton = (FancyButton)Beans.instantiate(null,


      "PJB.Source.Chap10.FancyButton.FancyButton");


    decButton = (FancyButton)Beans.instantiate(null,


      "PJB.Source.Chap10.FancyButton.FancyButton");


    meter = (MeterBar)Beans.instantiate(null,


      "PJB.Source.Chap11.MeterBar.MeterBar");


    led = (LEDDisplay)Beans.instantiate(null,


      "PJB.Source.Chap12.LEDDisplay.LEDDisplay");


    player = (AudioPlayer)Beans.instantiate(null,


      "PJB.Source.Chap13.AudioPlayer.AudioPlayer");


  }


  catch (Exception e) {


    System.out.println(e);


  }


  // Add the beans


  add(playButton);


  add(stopButton);


  add(incButton);


  add(decButton);


  add(led);


  add(meter);


  add(player);
}
This method first creates the beans using the instantiate() method provided by the Beans class, and then assigns them to the appropriate member variables. Notice that the entire package name is used to refer to each bean when it is instantiated. The createBeans() method then systematically adds each of the new beans to the application by calling the add() method for each of them.
NOTE: You might be wondering why the Beans.instantiate() method was used to create the beans instead of just using the new operator like when creating other Java objects. The reason is because Beans.instantiate() is capable of performing additional bean creation overhead as JavaBeans evolves over time. In other words, the JavaBeans architects acknowledge that JavaBeans is a young technology and suggest using Beans.instantiate() to create beans so that code is guaranteed to be compatible in future versions of JavaBeans.
That pretty well wraps up the creation and initialization of the beans. Let's move on to the customization of the beans! Following is the code for the customizeBeans() method, which handles customizing the beans:
private void customizeBeans() {


  // Customize the buttons


  Font f = new Font("Helvetica", Font.BOLD, 20);


  playButton.setLabel("Play");


  playButton.setFont(f);


  playButton.setForeground(Color.red);


  stopButton.setLabel("Stop");


  stopButton.setFont(f);


  stopButton.setForeground(Color.blue);


  f = new Font("Helvetica", Font.PLAIN, 16);


  incButton.setLabel("Increment");


  incButton.setFont(f);


  incButton.setForeground(Color.red);


  decButton.setLabel("Decrement");


  decButton.setFont(f);


  decButton.setForeground(Color.blue);


  // Customize the meter bar


  meter.setOrientation(HVOrientation.VERTICAL);


  meter.setForeground(Color.magenta);


  // Customize the audio player


  player.setLooping(true);
}
The customizeBeans() method takes care of customizing the button beans, along with the meter bar and audio player beans. The buttons are customized so that they use a different font and different colors for the label text. The meter bar is customized so that the foreground color is magenta, which results in a magenta colored meter bar. Finally, the audio player bean is customized so that the audio clip is looped when played.
The createBeans() and customizeBeans() methods take care of
the first two bean development steps. The only remaining step is connecting the beans
together, which is handled by the connectBeans() method, which follows:
private void connectBeans() {


  // Register the button action listeners


  playButton.addActionListener(new PlayButtonAdapter());


  stopButton.addActionListener(new StopButtonAdapter());


  incButton.addActionListener(new IncButtonAdapter());


  decButton.addActionListener(new DecButtonAdapter());
}
The connectBeans() method is perhaps the most important of the three because it takes care of registering event adapter classes with the button beans by calling the addActionListener() method on each. Of course, the event adapter classes are where the action is really taking place, so let's move on to them. Following are the event adapter classes, PlayButtonAdapter and StopButtonAdapter, for the Play and Stop buttons:
class PlayButtonAdapter implements ActionListener {


  public void actionPerformed(ActionEvent e) {


    player.play();


  }


}


class StopButtonAdapter implements ActionListener {


  public void actionPerformed(ActionEvent e) {


    player.stop();


  }
}
These classes are very similar to the sample classes you saw earlier in this chapter. They simply call the play() and stop() methods on the audio player bean to play and stop the audio clip whenever the buttons are pushed. The other two event adapter classes, IncButtonAdapter and DecButtonAdapter, are responsible for responding to action events fired by the Increment and Decrement buttons. These classes follow:
class IncButtonAdapter implements ActionListener {


  public void actionPerformed(ActionEvent e) {


    meter.incParts(5.0f);


    led.setValue(led.getValue() + 1);


  }


}


class DecButtonAdapter implements ActionListener {


  public void actionPerformed(ActionEvent e) {


    meter.decParts(5.0f);


    led.setValue(led.getValue() - 1);


  }
}
The IncButtonAdapter class increments the meter bar's value by calling the incParts() method on it. The value of the LED display is then altered by calling the setValue() method and passing the LED display's previous value incremented by one. The DecButtonAdapter class performs a very similar function, except it increments the values instead of decrementing them.
That just about finishes off the code for the bean tester application. The only thing missing is the code responsible for initializing the application, which is contained in the application's constructor. The code for the application's constructor follows:
public BeanTester(String title) {


  // Pass the title on to the parent


  super(title);


  // Change the background to light gray


  setBackground(Color.lightGray);


  // Change the layout


  setLayout(new FlowLayout());


  // Enable event processing


  enableEvents(AWTEvent.WINDOW_EVENT_MASK);


  // Create, customize, and connect the beans


  createBeans();


  customizeBeans();


  connectBeans();
}
The constructor first sets the background color of the application to light gray, which goes much better with the 3D look of the beans. The constructor then sets the layout of the application to a flow layout and enables window events so that it can detect when the main frame window has been closed. Finally, the constructor takes care of the three-step bean maintenance process by calling the createBeans(), customizeBeans(), and connectBeans() methods. These methods, as you've already learned, take care of everything in regard to getting the beans up and running together.
After you have designed and developed the bean tester application, you're probably itching to see it in action. You can try out the application by executing the application class, BeanTester.class, within the Java 1.1 interpreter, like this:
java BeanTester
CAUTION: Make sure the CLASSPATH environment variable is set so that the bean classes are accessible by the Java interpreter. This means that the root directory of the sample bean classes needs to appear in the listing of paths stored in CLASSPATH. If you installed the bean examples to your hard drive from the accompanying CD-ROM, then this directory will be the root directory of your hard drive.
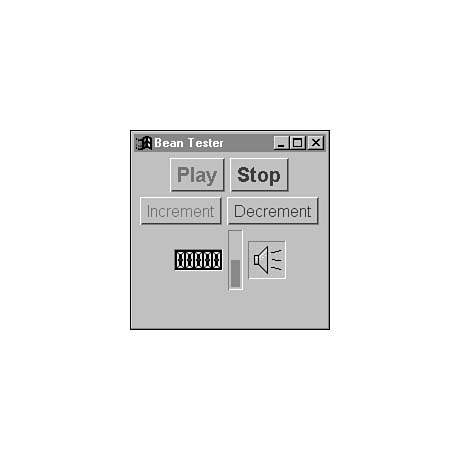
When you execute the application in the Java interpreter, you'll see something similar to Figure 14.1.
Figure
14.1. The bean tester application upon being
executed.
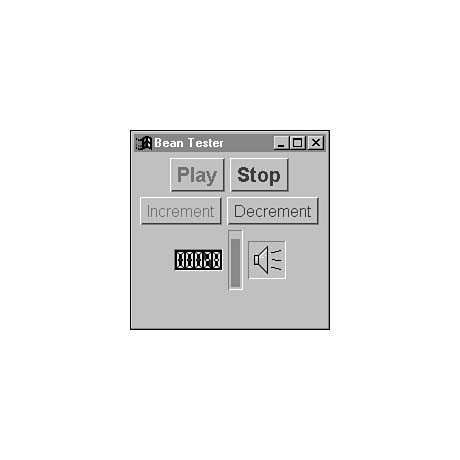
Try pushing the different buttons to see how they impact the rest of the beans. Notice
that both the LED display and the meter bar beans are impacted by the Increment and
Decrement buttons. Figure 14.2 shows how the application looks after you try out
these buttons.
You should also try pressing the Play and Stop buttons to see how they affect the audio player bean. Because the bean is set to looping, you'll have to press the Stop button to stop the playing after you press Play.
You've now tested out all your beans in a non-visual development environment, which is proof that JavaBeans components are as easy to use at a programmatic level as normal Java classes. In the process, you gained some extra insight about the internals of how beans are used together.
Figure 14.2. The bean tester application after you push the buttons to interact with the beans.
This chapter focused on using JavaBeans in non-visual development environments where you have to do everything in straight source code. Although this isn't the recommended development approach in regard to JavaBeans, it is nevertheless a reality that you might have to use it at one time or another. Besides, reverting back to source code can often give you more insight about what is happening in an automated visual environment, which can come in handy. You began the chapter by learning about the primary issues involved in using beans at the source code level. You then moved on to design and develop the bean tester application, which used all the beans you developed in Part III of the book. The chapter finished up by testing out the bean tester application.
If nothing else, this chapter hopefully showed you that JavaBeans components are very similar to traditional Java classes, especially in how they are used at the source code level. This is an important realization because it highlights the fact that there is nothing secret or magical about the JavaBeans technology. Sure, some neat things go on behind the scenes when you use a bean with an application builder tool, such as automatic introspection, but when it comes down to it, a bean is really just a normal Java class with some extra component-related functionality. This chapter exposed this fact by using beans in a traditional hand-coded application.
The next chapter steps back from the coding a great deal by looking into some advanced JavaBeans concepts. Feel free to breathe a sigh of relief if you've felt overburdened by all the source code thrown at you in the past few chapters!
![]()
![]()
![]()
![]()
![]()