by Paul Mahar
Today you will work with more forms than on any other day. By the end of the day, you will have designed and modified six of the eight forms that make up the shopping cart application. Day 11 begins with the creation of a new form and continues into tying up some loose ends left from yesterday's JavaScript adventure. These are the tasks of the day:
At the end of today's lesson, shoppers will be able to enter the store through the Help form and do a quick search for books. The Results form will show shoppers a list of all found books and let shoppers descend to the Details form to get more information on any listed book.
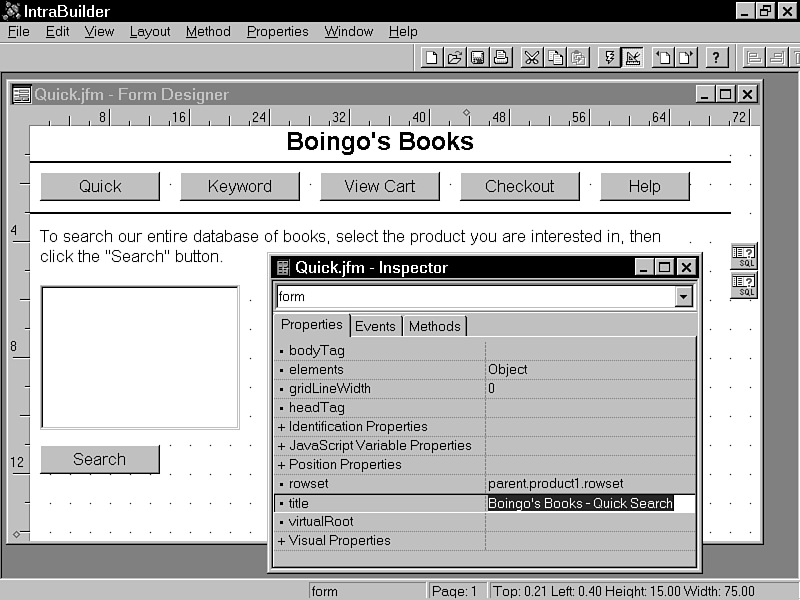
So what does the Quick form need to be complete? On the surface, it needs only a better title and one more HTML component to tell the shopper what the form does. Under the covers, the buttonSearch_onServerClick() method needs revising to pass on the user key to the Results form. The Quick form also needs a better way to handle searches that find no books and searches initiated without a selected product.
The new search handlers require a new generic form that you can use to provide simple feedback to the shopper. The Message form is the generic feedback form, and it contains only one component in addition to what it inherits from the toolbar custom form class. The new component is an HTML control containing the message that you want to send back to the shopper.
The Message form is the simplest form in the shopping application. It takes only a few minutes to create. Use these steps:
| NOTE |
You can call _sys.forms.design() with or without a filename. If you do not pass a filename, the Designer opens with a new untitled form. Passing an existing name opens that form in Design mode. If you pass a non-existent filename, the Designer opens with a new, titled, yet unsaved form. Naming a new file at the start of the design session eliminates the new filename prompt when you close the Designer. |
That's all you need for the Message form. If you run the form, the default text, "HTML1", appears as the message text. When the form is incorporated into the shopping cart application, the text property is set dynamically to an appropriate value prior to opening the form. Listing 11.1 shows the JavaScript generated by the Form Designer.
![]()
Listing 11.1. The Message form.
 1: // {End Header} Do not remove this comment//

 2: // Generated on 11/02/96

 3: //

 4: var f = new messageForm();

 5: f.open();

 6: class messageForm extends ToolbarCForm from "TOOLBAR.JCF" {

 7:    with (this) {

 8:       height = 15;

 9:       left   = 0;

10:       top    = 0;

11:       width  = 75;

12:       title  = "Boingo's Books - Message";

13:    }

14:    with (this.htmlMessage = new HTML(this)){

15:       height = 2;

16:       left   = 1;

17:       top    = 3.5;

18:       width  = 65;

19:       color  = "black";

20:       text = "HTML1";

21:    }

22: }
![]() Such a simple form might appear too basic for any analysis. Actually, it is the form's simplicity that makes it a good candidate to demonstrate how the IntraBuilder dynamic object model works. The best
place to see this is in the Script Pad. Open the Script Pad and enter the following JavaScript statements:
Such a simple form might appear too basic for any analysis. Actually, it is the form's simplicity that makes it a good candidate to demonstrate how the IntraBuilder dynamic object model works. The best
place to see this is in the Script Pad. Open the Script Pad and enter the following JavaScript statements:
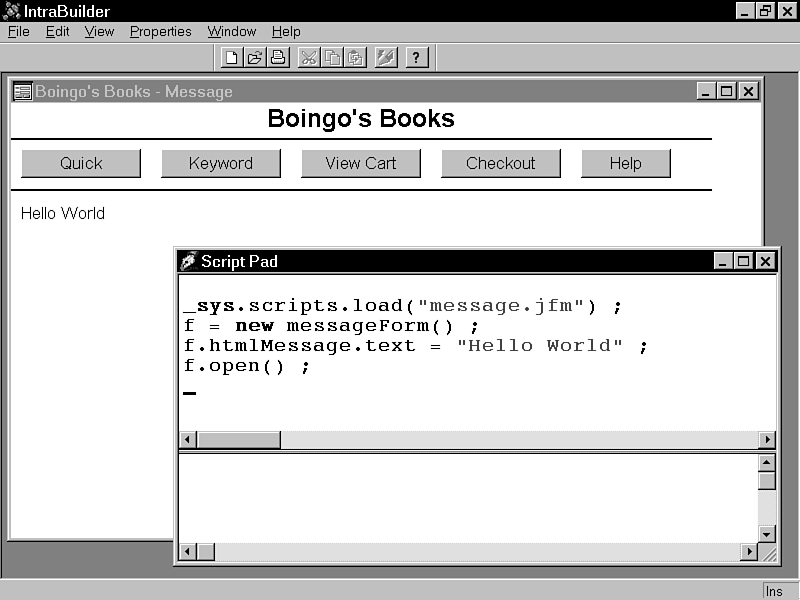
_sys.scripts.load("message.jfm") ;

f = new messageForm() ;

f.htmlMessage.text = "Hello World" ;

f.open() ;
The Script Pad lets you experiment with setting properties dynamically without the need to create or compile a JavaScript script. Assigning the text property in the Script Pad overrides the original value set on line 20. Figure 11.1 shows the form and Script Pad interacting.
Figure 11.1 : Using the Script Pad to test the Message form.
A dynamic object model is an implementation of object classes that enables the creation of properties outside the class definition. The ability to create properties at runtime allows for truly data-driven applications where the desired property set is unknowable at compile time. |
To take this experiment a step further, you can create an instance of a message form directly from the toolbar custom form class. First close the Message form but leave the Script Pad open. Enter the following JavaScript statements to open the custom form class and create a new Message form.
_sys.scripts.load('toolbar.jcf') ;

f = new ToolbarCForm() ;

f.htmlMessage = new HTML(f) ;

f.htmlMessage.top = 3.5 ;

f.htmlMessage.text = "Hello World" ;

f.open() ;
This time you are not only setting a property on-the-fly, but you are creating a new component outside of a form class. The new form looks almost identical to the one defined in the message.jfm file. The only difference is in the title bar that is set in line 12. You can fix this while the form is open. Enter the following assignment statement into the Script Pad to change the title of the open form:
f.title = "Boingo's Books - Message" ;
You can also delete components and inspect properties of an open form. Try deleting htmlMessage and open the Inspector to check out the form's properties. Enter the following statements:
f.htmlMessage.release() ;

inspect(f) ;
The ability to create and release components of a running form is key to creating dynamic forms that adjust to the current data set and user requirements. In this application, the dynamic object model will prove vital to the implementation of the shopping cart form.
At this point, the Quick form can run independently of the Help form, but it does not keep track of the user key. Once you complete the Quick form, neither will be true. Keeping track of the user key is dependent upon starting with the Help form. The benefit of ignoring the user key issue up to now was that you could test the link between the Quick form and the Results form.
Being confident that the link works okay, it is time to finish the Quick form. Follow these steps to add another HTML object and make a few other modifications:
If you try any of the buttons, you will get a runtime error. To prevent these errors, you will need to modify the store.h file and recompile the Help form. Before doing that, take a closer look at the Quick form in Listing 11.2.
![]()
Listing 11.2. The Quick form.
  1: // {End Header} Do not remove this comment//

  2: // Generated on 11/02/96

  3: //

  4: var f = new quickForm();

  5: f.open();

  6: class quickForm extends ToolbarCForm from "TOOLBAR.JCF" {

  7:    with (this) {

  8:       height = 15;

  9:       left = 0;

 10:       top = 0;

 11:       width = 75;

 12:       title = "Boingo's Books - Quick Search";

 13:       onServerLoad = {;this.buttonQuick.visible = false};

 14:    }

 15:

 16:    with (this.product1 = new Query()){

 17:       left = 70;

 18:       top = 4;

 19:       sql = 'SELECT * FROM "product.dbf"';

 20:       active = true;

 21:    }

 22:


 23:    with (this.product1.rowset) {


 24:    }

 25:


 26:    with (this.title1 = new Query()){

 27:       left = 70;

 28:       top = 5;

 29:       sql = 'SELECT * FROM "title.dbf"';

 30:       active = true;

 31:    }

 32:


 33:    with (this.title1.rowset) {


 34:    }

 35:


 36:    with (this.selectProducts = new ListBox(this)){

 37:       height = 5;

 38:       left = 1;

 39:       top = 5.5;

 40:       width = 20;

 41:       onServerLoad = class::selectProducts_onServerLoad;

 42:    }


 43:

 44:    with (this.buttonSearch = new Button(this)){

 45:       left = 1 ;

 46:       top = 11;

 47:       width = 12;

 48:       text = "Search";

 49:       onServerClick = class::buttonSearch_onServerClick;

 50:    }

 51:


 52:    with (this.htmlHelp = new HTML(this)){

 53:       height = 2;

 54        left = 1;

 55:       top = 3.5;

 56:       width = 65;

 57:       color = "black";

 58:       text = 'To search our entire database of books, select ' +

 59:              'the product you are interested in, then click ' +

 60:              'the "Search" button.';

 61:    }

 62:

 63:    this.rowset = this.product1.rowset;

 64:

 65:    function selectProducts_onServerLoad()

 66:    {

 67:       var rProduct = this.parent.product1.rowset ;

 68:       this.productArray = new Array() ;

 69:       while ( ! ( rProduct.endOfSet ))

 70:       {

 71:          this.productArray.add( rProduct.fields["product"].value) ;

 72:          rProduct.next();

 73:       }

 74:       this.productArray.sort() ;

 75:       this.options =  "Array this.productArray"

 76:    }

 77:

 78:    function buttonSearch_onServerClick()

 79:    {

 80:        if ( this.form.selectProducts.value.length > 0 )

 81:        {

 82:           this.form.searchProduct = this.form.selectProducts.value ;

 83:           this.form.title1.rowset.filter =

 84:              "PRODUCT = '" + this.form.searchProduct + "'" ;

 85:        }

 86:        var nCount = this.form.title1.rowset.count() ;

 87:        if (nCount == 0)

 88:        {

 89:           var nextForm = new messageForm() ;

 90:           nextForm.htmlMessage.text = "<H3>No titles found for: " +

 91:              this.form.selectProducts.value + "</H3>" ;

 92        }

 93:        else

 94:        {

 95:           var nextForm = new resultsForm() ;

 96:           nextForm.titleCount = nCount ;

 97:           nextForm.title1.rowset.filter = this.form.title1.rowset.filter ;

 98:        }

 99:        nextForm.user = this.form.user ;

100:        nextForm.open() ;

101:        this.form.release() ;

102:    }

103: }
![]() The first thing the form does when it loads is to execute the code block on line 13. The code block hides the Quick button. When you run the form in the Designer, the Quick button is visible for a
split second before the visible property is set to false. At first this might seem like something needs fixing, but it is not so. When the form runs in a browser, the Quick button is never visible.
The first thing the form does when it loads is to execute the code block on line 13. The code block hides the Quick button. When you run the form in the Designer, the Quick button is visible for a
split second before the visible property is set to false. At first this might seem like something needs fixing, but it is not so. When the form runs in a browser, the Quick button is never visible.
Similarly, the list box opens as an empty box before getting filled through the onServerLoad event linked on line 41. When the list fills up in the Designer, it causes a noticeable flicker. Think of the Designer's Run mode as a dress rehearsal. When you run something in the Designer, function is more important than style. The same select list makes a perfectly clean debut when appearing in a browser.
When a shopper does not select a product, the value property
of the select list is an empty string. Otherwise, it is
the selected value. An empty string has a length of zero. The
button search method checks for this on line 80 and applies a
filter only if a product is selected.
An empty string is a string with a length of zero. An empty string is not equal to a null value. An expression that includes an empty string can result in a non-empty string. Expressions containing a null value always yield a null value. |
if ( this.form.selectProducts.value.length > 0 )

{

   this.form.searchProduct = this.form.selectProducts.value ;

   this.form.title1.rowset.filter =

      "PRODUCT = '" + this.form.searchProduct + "'" ;

}

var nCount = this.form.title1.rowset.count() ;
Line 86 figures the title count for both the Quick form and the
Results form. After the filter is set, the count does not change.
All three forms could recount the rows as needed, but this would
slow down the application. To keep counting to a minimum, the
count is made once and passed on to the Results form. The Results
form displays the count and passes it on to the Details form.
| NOTE |
The Rowset::count() method does not move the row pointer, but setting the filter property does. If you set a filter property, the current row changes unless the current row matches the filter condition. The Rowset::count() method counts rows using an independent row cursor that can ignore the index order for faster counts. |
The Quick form uses the count to determine whether any rows match the current filter. Another way to check whether rows exist for a filter is to evaluate the endOfSet property. When the count is zero, endOfSet is true.
The next form to open depends on whether any rows have been found. If the count is zero, line 89 creates an instance of the Message form. The text for the message includes HTML heading tags to make the message appear with a bolder font.
if (nCount == 0)

{

   var nextForm = new messageForm() ;

   nextForm.htmlMessage.text = "<H3>No titles found for: " +

      this.form.selectProducts.value + "</H3>" ;

}
If books have been found, line 95 creates an instance of the Results form and passes on the row count and title filter. For the filter to pass from one form to another, both forms should contain query objects with identical sql properties.
else

{

   var nextForm = new resultsForm() ;

   nextForm.titleCount = nCount ;

   nextForm.title1.rowset.filter = this.form.title1.rowset.filter ;

}
The same nextForm reference is used for both the Message form and the Results form. This allows both to share the same user key assignment and form open statements on lines 99 and 100.
nextForm.user = this.form.user ;

nextForm.open() ;

this.form.release() ;
Remember that store.h file created back on Day 9? Now that the application has grown from one Help form to four forms (Help, Quick, Message, and Results), the time for store.h has come. This file will open all the JavaScript form files needed to run the application. With all the scripts loaded into memory, any server-side event will be able to create an instance of any form.
To add a form to the store.h file, you will add a call to _sys.scripts.load() and an #include preprocessor directive. During development, the application will rely on the slightly more resource-intensive, script loading system. You are not likely to see the difference between the two techniques, but it never hurts to end up with the most efficient systems possible.
When you call _sys.scripts.load(), IntraBuilder first looks for a compiled version of the script. If it finds the compiled version, that version loads into memory. If only a source file is found, IntraBuilder automatically calls the _sys.scripts.compile() method to create a new compiled object file. An error occurs if neither a source script nor a compiled object is found.
JavaScript object files use a simple naming convention. The last
letter of the extension of the source file is replaced with the
letter o to designate the object file. If you are familiar
with Visual dBASE, you recognize this naming convention.
| NOTE |
JavaScript compiles to object files that use the instruction set of the IntraBuilder virtual machine rather than the instruction set of a physical CPU. The advantage of using a virtual machine is platform independence. The Java language also uses the virtual machine's model to run on a wide variety of operating systems. Although the IntraBuilder virtual machine is currently available only for Windows platforms, it is designed for portability. |
IntraBuilder can run compiled object files without the accompanying source file. If you are a developer who is selling applications systems, you can use this feature to protect your source code. You might distribute object files to clients or customers. Your applications require no changes to take advantage of this technique. Calls to source files such as _sys.scripts.run("myscript.js") work when the myscript.jo exists without myscript.js.
To update the store.h file, move to the IntraBuilder Explorer's Custom tab and double-click the header file. This opens the header file in the Script Editor. Edit the file to match Listing 11.3.
![]()
Listing 11.3. Loading the Help, Message, Quick, and Results forms.
 1: #define DEBUG  // for development only

 2: #ifndef STORE

 3:    #define STORE

 4:    #ifdef DEBUG

 5:       // Load scripts

 6:       // _sys.script.load statements go here.

 7:       _sys.scripts.load("help.jfm") ;

 8:       _sys.scripts.load("message.jfm") ;

 9:       _sys.scripts.load("quick.jfm") ;

10:       _sys.scripts.load("results.jfm") ;

11:    #elseif

12:       // Include scripts

13:       return null

14:       // #include statements go here

15:       #include <help.jfm>

16:       #include <message.jfm>

17:       #include <quick.jfm>

18:       #include <results.jfm>

19:    #endif

20: #endif
![]() Lines 7 through 10 open the four forms that you have created already. These lines correspond to lines 15 through 18. As long as you're continuing to modify forms, leave in line 1 so that all the forms
are loaded at runtime. The #include statements should be used only when you are ready to deploy the application.
Lines 7 through 10 open the four forms that you have created already. These lines correspond to lines 15 through 18. As long as you're continuing to modify forms, leave in line 1 so that all the forms
are loaded at runtime. The #include statements should be used only when you are ready to deploy the application.
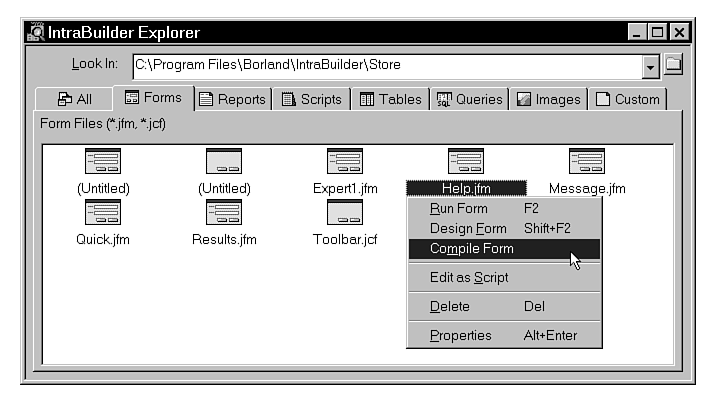
To make the new header take effect, you must explicitly recompile the Help form. You can recompile quickly any JavaScript file using the shortcut menu from the IntraBuilder Explorer, shown in Figure 11.3. If you do not recompile the file, the changes to store.h will not take effect until you make some other changes to the Help form file. IntraBuilder forces a compile when you modify a form with the Form Designer or the Script Editor. When you make changes to store.h, the Help form is not modified directly so IntraBuilder doesn't know to force a recompile.
Figure 11.3 : Recompiling the Help form to incorporate changes in the store.h file.
After you recompile the Help form, it's time to take the browser
test. The last time you ran the application through a browser,
you could go from the static HTML index to the Help JavaScript
form, and that was it. The number of possible links has gone up
from one to 10 as shown in Table 11.1.
| From | |||||
| Index | |||||
| Help | |||||
| Quick | |||||
| Results | |||||
| Message |
Table 11.1 shows how shoppers can jump to the Help from any other JavaScript form. This contrasts greatly from the HTML index page. None of the JavaScript forms provide a link to the index page. The reasoning is that if a shopper jumps to an external page such as the HTML index, the user key value is lost.
Except for the Quick form itself, any JavaScript form can jump to the Quick form. All forms that have an associated toolbar button work like this. The Results and Message forms are accessible only through the Quick form. Use the following steps to try the various jumps:
| TIP |
For faster performance when using the Borland Web Server as a local host, uncheck the Enable Client Name Lookup from the server property sheet. You will find this property on the Status tab. |
Leaving the agent count at one can hamper performance when an
application is placed into a production environment with many
users. The number of agents is equal to the number of simultaneous
requests that IntraBuilder can handle. This is not to say that
a single agent can service only one user. If all the requests
are quick, a single agent can handle many requests from different
users. It is long requests, such as complex reports, that can
tie up a single agent for several minutes. If one agent is processing
a long request when another request comes in, the new request
is sent to an available agent.
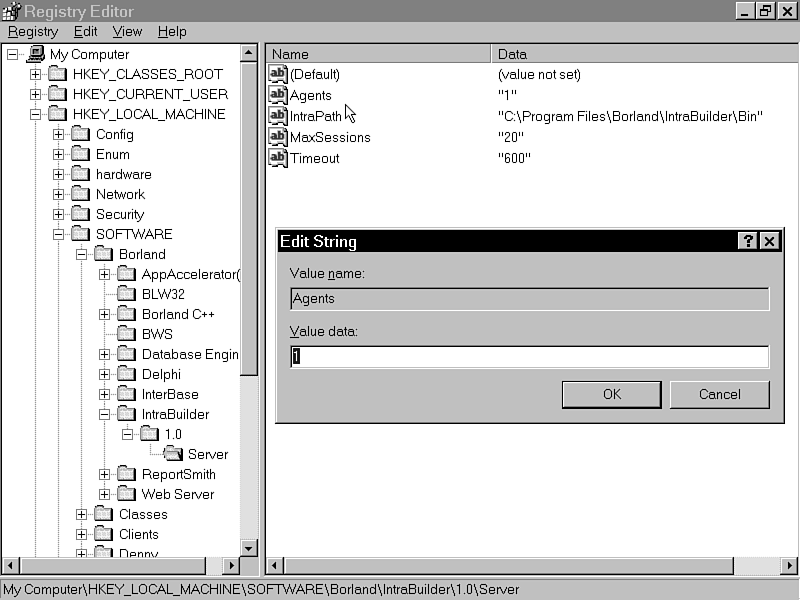
| NOTE |
The IntraBuilder Server reads the registry settings at initiation only. If you modify any registry settings, close down all agents and restart the IntraBuilder Server to see them take effect. |
The Keyword, View Cart, and Checkout toolbar buttons call form classes that do not yet exist. This sends an IntraBuilder Alert back to the browser without any links back to the application. |
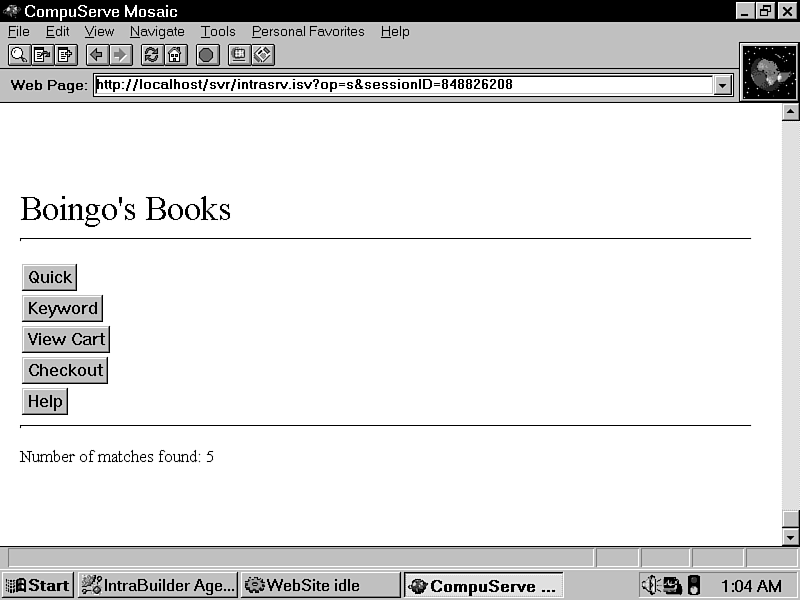
As you test your forms, make sure they look acceptable in both Netscape Navigator and Microsoft Internet Explorer. This will cover almost every person ever destined to visit your site. You will find that many of the less popular browsers do not support all of the HTML layout tags that IntraBuilder streams out. If the application does not use Java applets, ActiveX controls, or client-side JavaScript, it will function properly on older browsers. The only problems are cosmetic, as demonstrated by Figure 11.7. This figure shows how the toolbar gets a vertical orientation within an older version of SPRY Mosaic. This is the version that CompuServe bundled with WinCim 2.
Figure 11.7 : Viewing the Results form with SPRY Mosaic.
Currently, the Results form contains a query on the Title table and an HTML control showing the book count. To complete the form, you can add a select list showing book titles, a button to get details on a selected book, and some help text. The finished Results form is similar to the Quick form in that the select list shows the values of field objects and the button acts on what the user selects from the list.
The Quick form modifies the Results form in two ways before opening it. First, it adds the titleCount property, which the Results form uses to display the book count. Second, the Quick form modifies the filter property for the title1 query. This relieves the Results form of any responsibility in figuring out what rows to show, which is set up already. Now the only thing the Results form needs to do is show the rows and pass the filter and count on to the Details form.
| NOTE |
The selectTitle_onServerLoad() function is similar to the function in the Quick form that fills the product select list. The main difference is in how items are added to the array. In the Quick form, the array starts empty, and the Array::add() method creates a new element for each pass through the while loop. Dynamically adding array elements works well when the final size is unknown. The extra time consumed by calling the Array::add() method is offset by not having to add an extra call to Rowset::count(). The Results form is different in that it already has a property containing the required row count. Having this number up front makes the method in the Results form more efficient than the predecessor in the Quick form. By passing the size to the array constructor, IntraBuilder can allocate a block of memory for the array elements in one pass. |
| NOTE |
Unlike most controls, buttons do not have height or font properties. When you run a form through a browser, buttons conform to the default font of the browser, and the height is matched to the same font. |
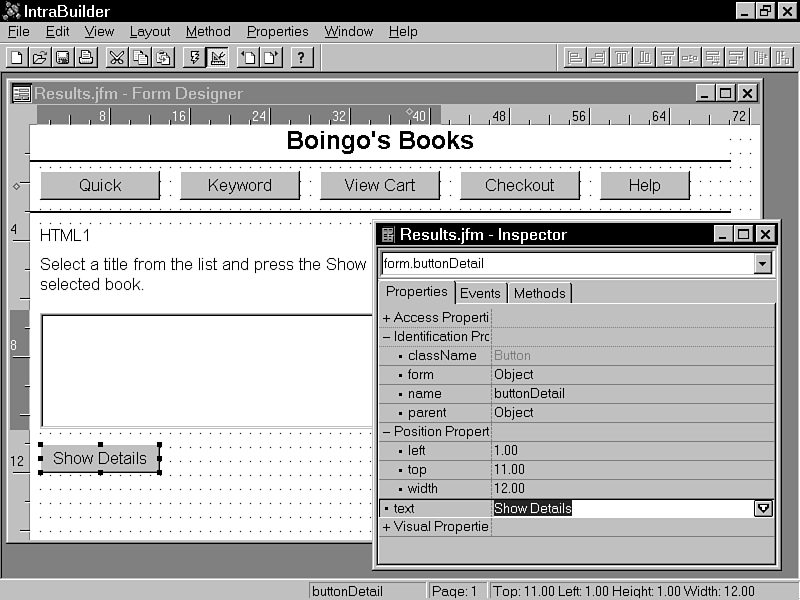
Save the form and try it out. The buttonDetail_onServerClick event is a stub function to call a new form. You need to add to this function to pass several new properties down to the Details form.
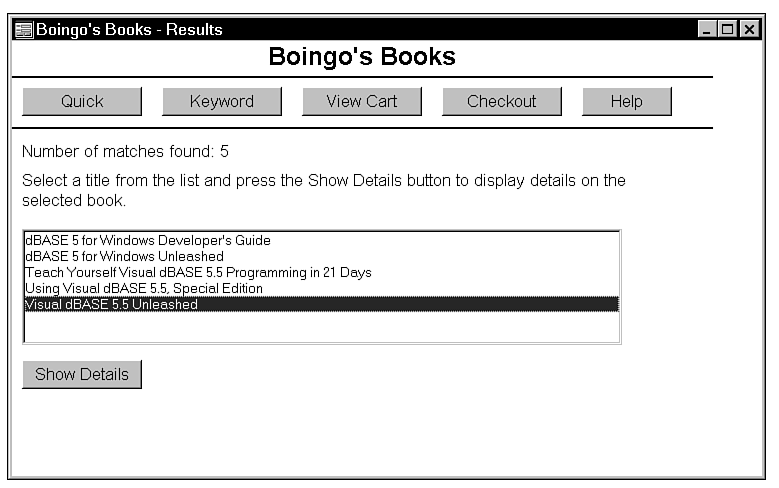
You can run the form through the Designer or through a browser to test the new select list. Remember that like other forms, the Results form is dependent on the user key and cannot run as a standalone form. If you run the Help form, click Quick, select Visual dBASE, and choose Search, the Results form lists five books, as shown in Figure 11.9.
Figure 11.9 : Running the Results form in the Designer.
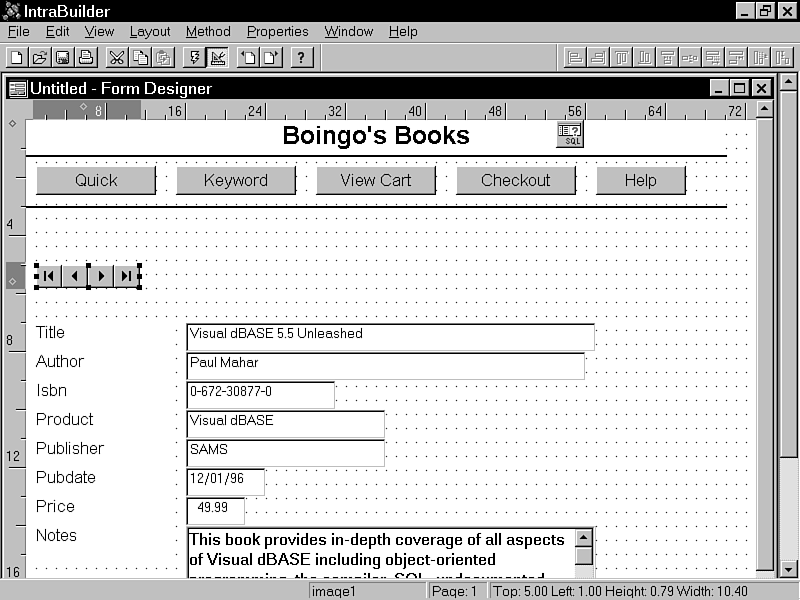
The Details form needs to show all the fields from the Titles table. It also must enable shoppers to navigate through titles. To complete the form, you also need another button that adds the current book to the shopping cart. You can easily accomplish the first two objectives through the Form Expert.
Creating a form through the Form Expert enables you to try the connection from the Results form to the Details form. It also gives you a jump start on the new form. As you go through the development of the Details form, you will replace much of the original Expert code. In fact, so much of the original code ends up on the cutting room floor that you might wonder whether it would have been better to start from scratch.
Starting a data entry form from scratch can be quicker after you are thoroughly familiar with the Designer and query manipulation concepts. For now, the Expert code provides a solid framework for data entry form design.
One of the enhancements to make to the default data entry form is a way to inform shoppers of where they are in a table. Desktop database managers, such as Access and Visual dBASE, show the current row number in a status bar at the bottom of a window. The position is usually presented as Row X of Y, where X is the current and Y is the total number of rows in the current view. You can add an HTML object that displays similar information to a JavaScript data entry form.
Currently, the Results form opens the Details form without passing any filter or position information. Before adding position information, the Results form needs some modifications.
On Day 10, you used the Form Expert to create a form for the Title table. That form contained a few fields, a query-by-form button, and a filter-by-form button. The new prototype needs to have all the fields from the Title table and some navigation buttons. This time, you leave off the search buttons. Use the following steps for creating the Details form prototype:
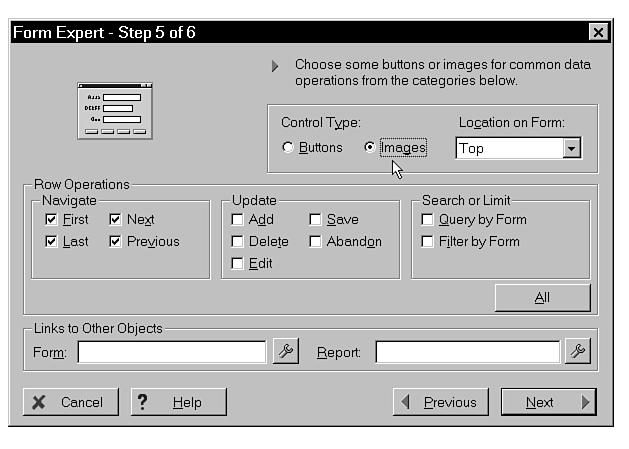
Each time the Form Expert creates a unique navigation image, it adds a GIF file to the current folder. Depending on your choices, the Form Expert can create a single image that handles multiple operations or separate images for each action.
When you select all the navigation options, the Form Expert creates a single GIF called expinavh.gif. You can use the IntraBuilder Explorer to rename it to something a little more intuitive. The image looks like the buttons on a VCR. Follow these steps to rename the image to vcr.gif and change the form reference:
When you close the Script Editor, the form opens in the Designer's
Run mode. Try the navigation buttons on the form. The new image
provides the same look and function as the navigation buttons
built into the IntraBuilder Designer's own toolbar.
| NOTE |
Unlike JavaScript variable names, the filenames are not case sensitive. Table names might be case sensitive depending on the data source. dBASE, Paradox, and Access table names are never case sensitive. Some SQL servers enable optional case sensitivity. |
To test the Details form with the rest of the application, you need to update the store.h file. Open the header file in the Script Editor and add load and include lines for the detail.jfm file, as shown in Listing 11.4.
![]()
Listing 11.4. Adding support for the Details form.
 1: #define DEBUG  // for development only

 2: #ifndef STORE

 3:    #define STORE

 4:    #ifdef DEBUG

 5:       // Load scripts

 6:       // _sys.script.load statements go here.

 7:       _sys.scripts.load("detail") ;

 8:       _sys.scripts.load("help.jfm") ;

 9:       _sys.scripts.load("message.jfm") ;

10:       _sys.scripts.load("quick.jfm") ;

11:       _sys.scripts.load("results.jfm") ;

12:    #elseif

13:       // Include scripts

14:       return null

15:       // #include statements go here

16:       #include <detail.jfm>

17:       #include <help.jfm>

18:       #include <message.jfm>

19:       #include <quick.jfm>

20:       #include <results.jfm>

21:    #endif

22: #endif
![]() Except for lines 11 and 20, this version of the header file is exactly like its pre-decessor. Keep in mind that, at this point, line 20 is ignored by the compiler. If you are curious about how the
preprocessor works, check out the SET PREKEEP section of Appendix B, "The Undocumented IntraBuilder."
Except for lines 11 and 20, this version of the header file is exactly like its pre-decessor. Keep in mind that, at this point, line 20 is ignored by the compiler. If you are curious about how the
preprocessor works, check out the SET PREKEEP section of Appendix B, "The Undocumented IntraBuilder."
After updating the header file, recompile the Help form. You can
force a compile from the IntraBuilder Explorer shortcut menu,
from the Script Editor menu, or by using the _sys.scripts.compile()
method. You must recompile the help.jfm file before any
changes in store.h take effect.
If you have run the Help form since you last started the IntraBuilder Designer, you need to exit and restart the application to load the new compilation. The Help form loads itself into memory, and the version in memory is the only version you can run until you exit and restart the application. This architecture also manifests itself if you try to modify a form in an IntraBuilder Designer while an IntraBuilder Agent is currently running the same form. An agent can continue using the previous version until you exit and restart the IntraBuilder Server. |
When you run the application, you can open the Details form by clicking on the Show Details button in the Results form. The only problem is that the Details form always shows the first row of the Title table, rather than the selected title. To remedy the situation, the buttonDetail_onServerClick() method needs enhancements.
Try using the Script Editor rather than the Form Designer when all the changes you are making to a form are non-visual. In this case, you do not need to make any changes to the look of the Results form. Follow these steps to take advantage of IntraBuilder's Two-Way-Tools:
![]()
Listing 11.5. The Results form with the new buttonDetail_onServerClick() method.
  1: // {End Header} Do not remove this comment//

  2: // Generated on 11/02/96

  3: //

  4: var f = new resultsForm();

  5: f.open();

  6: class resultsForm extends ToolbarCForm from "TOOLBAR.JCF" {

  7:    with (this) {

  8:       height = 15 ;

  9:       left = 0 ;

 10:       top = 0 ;

 11:       width = 75 ;

 12:       title = "Boingo's Books - Results" ;

 13:    }


 14:

 15:    with (this.title1 = new Query()){

 16:       left = 70 ;

 17:       top = 4 ;

 18:       sql = 'SELECT * FROM "title.dbf"' ;

 19:       active = true ;

 20:    }

 21:

 22:    with (this.title1.rowset) {

 23:    }

 24:

 25:    with (this.htmlCount = new HTML(this)){

 26:       onServerLoad = class::htmlCount_onServerLoad;

 27:       height = 1;

 28:       left = 1;

 29:       top = 3.5;

 30:       width = 65;

 31:       color = "black";

 32:       text = "HTML1";

 33:    }

 34:

 35:    with (this.selectTitle = new ListBox(this)){

 36:       onServerLoad = class::selectTitle_onServerLoad;

 37:       height = 4;

 38:       left = 1;

 39:       top = 6.5;

 40:       width = 60;

 41:    }

 42:

 43:    with (this.buttonDetail = new Button(this)){

 44:       onServerClick = class::buttonDetail_onServerClick;

 45:       left = 1;

 46:       top = 11;

 47:       width = 12;

 48:       text = "Show Details";

 49:    }

 50:

 51:    with (this.htmlHelp = new HTML(this)){

 52:       height = 2 ;

 53:       top = 4.5 ;

 54:       width = 65 ;

 55:       color = "black" ;

 56:       text = "Select a title from the list and press " +

 57:              "the Show Details button to display details " +

 58:              "on the selected book." ;

 59:    }

 60:

 61:    this.rowset = this.title1.rowset ;

 62:

 63:    function htmlCount_onServerLoad()

 64:    {

 65:       this.text = "Number of matches found: " +

 66:                   this.form.titleCount ;

 67:    }

 68:

 69:    function selectTitle_onServerLoad()

 70:    {

 71:       var rTitle = this.parent.title1.rowset,

 72:           i = 0 ;

 73:       this.dataSource = new Array( this.parent.titleCount ) ;

 74:       rTitle.first() ;

 75:       while ( ! ( rTitle.endOfSet ))

 76:       {

 77:          this.dataSource[i] = rTitle.fields["TITLE"].value ;

 78:          rTitle.next() ;

 79:          i++ ;

 80:       }

 81:       this.dataSource.sort() ;

 82:       this.options =  "Array this.dataSource" ;

 83:    }

 84:

 85:    function buttonDetail_onServerClick()

 86:    {

 87:       var nextForm = new detailForm() ;

 88:       nextForm.titleCount              = this.form.titleCount ;

 89:       nextForm.title1.rowset.filter    = this.form.title1.rowset.filter ;

 90:       if (! (this.form.title1.rowset.canGetRow == null))

 91:       {

 92:          nextForm.scopeAll = this.form.scopeAll ;

 93:          nextForm.keyfield = this.form.keyfield ;

 94:          nextform.keywords = this.form.keywords ;

 95:          nextForm.title1.rowset.canGetRow = KeywordCanGetRow ;

 96:       }

 97:       nextForm.title1.rowset.first() ;

 98:       nextForm.currentRow = 1 ;

 99:       if ( ! ( this.form.selectTitle.value == "" ) )

100:       {

101:          while ( ! (nextForm.title1.rowset.fields["TITLE"].value ==

102:                  this.form.selectTitle.value ) )

103:          {

104:             nextForm.title1.rowset.next() ;

105:             nextForm.currentRow++ ;

106:          }

107:       }

108:       nextForm.user = this.form.user ;

109:       nextForm.open() ;

110:       this.form.release() ;

111:    }

112:

113: }
![]() The Results form is like a transfer station, a short stop along the way rather than a destination. It takes information from one of two search forms, makes some enhancements, and passes a little more
information to the Details form. The two search forms are the Quick form and currently "vaporware" Keyword form.
The Results form is like a transfer station, a short stop along the way rather than a destination. It takes information from one of two search forms, makes some enhancements, and passes a little more
information to the Details form. The two search forms are the Quick form and currently "vaporware" Keyword form.
Opening the Results form fires the htmlCount_onServerLoad() method, which is linked to an event on line 26. This method uses a titleCount property to display the number of titles appearing in the list. The titleCount property is not created in the class constructor. It must be added by an external routine prior to the form opening. The responsibility for adding the titleCount property falls to the search forms. Because line 66 references the titleCount when the form opens, its absence will cause an immediate error.
function htmlCount_onServerLoad()

{

   this.text = "Number of matches found: " +

               this.form.titleCount ;

}
The following partial function also shows how the titleCount property becomes an integral part of building the array for the select list. Notice that line 73 references titleCount through this.parent.titleCount instead of this.form.titleCount. For controls, the references are identical. Events on a query object require that the container be referenced through parent instead of form.
function selectTitle_onServerLoad()

{

   var rTitle = this.parent.title1.rowset,

       i = 0 ;

   this.dataSource = new Array( this.parent.titleCount ) ;
The most complex method in the class begins on line 85. A good portion of the buttonDetail_onServerClick() method involves assigning property values. Some assignments modify existing properties of the Details form, whereas others create new custom properties.
function buttonDetail_onServerClick()

   {

      var nextForm = new detailForm() ;
The count and filter properties are passed as identical properties of the Details form. Remember that both of these properties also have been passed to the Results form. The values are passed unmodified to the Details form.
nextForm.titleCount              = this.form.titleCount ;

nextForm.title1.rowset.filter    = this.form.title1.rowset.filter ;
The following block works with the Keyword form. You will learn more about each of these properties during the design of the Keyword form. For now, keep in mind that the scopeAll, keyfield, and keywords properties are passed in the same way the titleCount property was previously. These three properties are passed to the Results form from the Keyword form and are passed from there to the Details form.
Line 95 assigns the KeywordCanGetRow() function to the canGetRow event. This JavaScript function resides outside any class definitions and is therefore not a method. The canGetRow event enables complex searches that cannot be expressed in SQL.
if (! (this.form.title1.rowset.canGetRow == null))

{

   nextForm.scopeAll = this.form.scopeAll ;

   nextForm.keyfield = this.form.keyfield ;

   nextform.keywords = this.form.keywords ;

   nextForm.title1.rowset.canGetRow = KeywordCanGetRow ;

}
After setting up the same search criteria for the Details form as exist for the current Results form, the function calculates the current row position. Unlike records in Visual dBASE, IntraBuilder rows have no number. Here, a currentRow property simulates a row number. Line 98 sets currentRow to 1 for the first row.
nextForm.title1.rowset.first() ;

nextForm.currentRow = 1 ;
As in the Quick form, this form also checks to see whether the user did not select an item. This is optional validation for a condition that occurs only when running in the IntraBuilder Designer. The HTML select list always forces at least one selection on lists that do not support multiple selection.
if ( ! ( this.form.selectTitle.value == "" ) )

{
To calculate the current row, a while loop moves through the table until it finds the row that matches the item highlighted in the select list. Line 105 increments the currentRow property each time the correct row is not found.
while ( ! (nextForm.title1.rowset.fields["TITLE"].value ==

           this.form.selectTitle.value ) )

{

   nextForm.title1.rowset.next() ;

   nextForm.currentRow++ ;

}
The function finishes out with the standard call statements to open the next form. The user property is assigned outside the with block to remain consistent with all the other nextForm open routines.
   }

   nextForm.user = this.form.user ;

   nextForm.open() ;

   this.form.release() ;

}
| NOTE |
At first glance, the buttonDetail_onServerClick() method looks like a good place to use a with block. However, a with block helps only when assigning values to existing properties. A complete reference is required to add a new property to an object. |
As when you make any major changes, it is a good idea to first run the application through the IntraBuilder Designer and then through a browser. Minor errors such as misspellings or mismatched capitalization are easy to fix in the Designer. After you know the application is free of runtime errors, you need to verify the look and feel from the browser perspective.
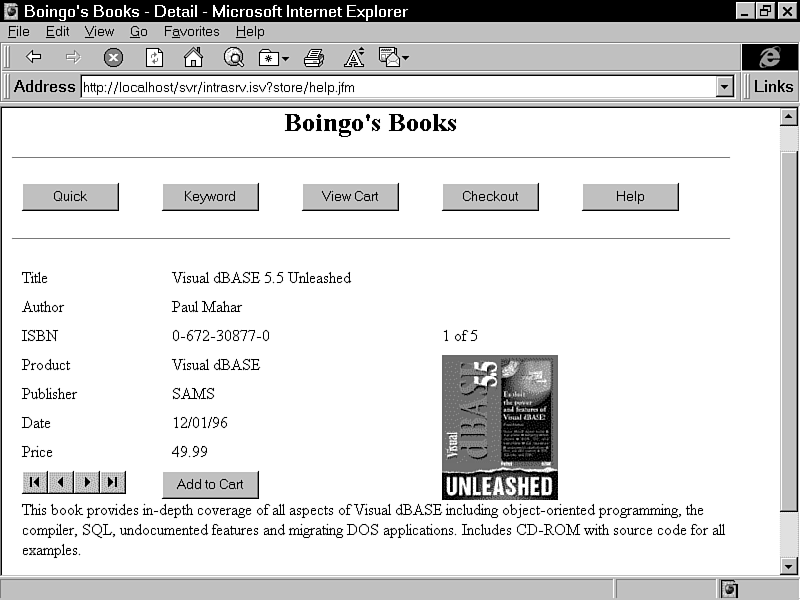
At this point, close the IntraBuilder Designer and load the IntraBuilder Server. Start a browser and open the Quick form from the Help form. Pick a product that has titles and continue to the Results form. Make sure the positions of the select list, text, and buttons look okay on the Results form. Highlight a title and see whether the correct title opens in the Details form. Figure 11.14 shows a shopper selecting the Borland C++ 5 Resource Kit.
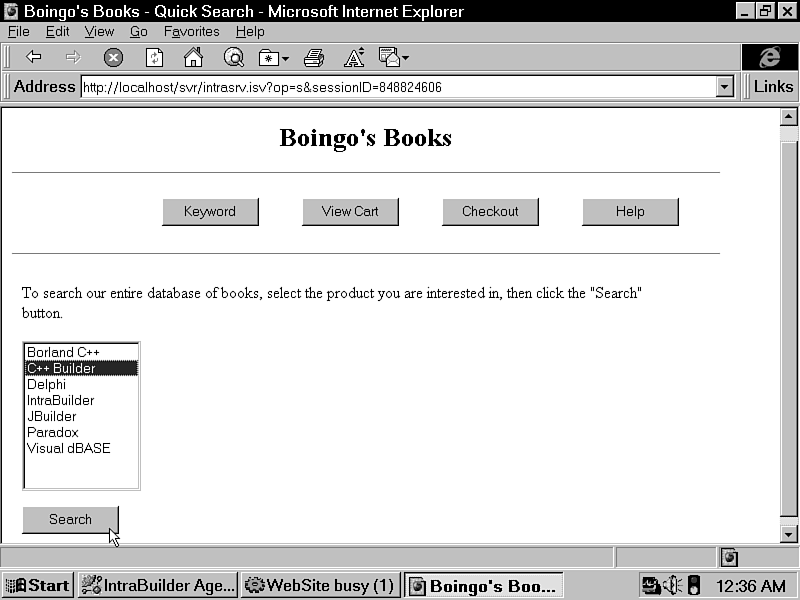
Figure 11.14 : Viewing the Quick form's select list in Internet Explorer.
After you get to the Details form, a major flaw in the form's current implementation becomes apparent. Shoppers can modify the data and the form commits all the changes to the table. In this case, the concept of live data is going a bit too far. IntraBuilder provides several ways to cope with the situation. For this form, HTML controls would be more appropriate than Text or TextArea controls. Users will never mistake an HTML control as something that they can edit. Text and TextArea controls will always appear editable even in a read-only form. You can use any of the following techniques to create a read-only, data-entry form.
For the shopping cart application, the Details form contains no values that you can allow a shopper to update. It would not work out very well if a shopper decided to change the titles or lower the prices to 50 cents per book. There are also no radio buttons or checkboxes required. As a result, the technique of replacing each Text control with an HTML control works best.
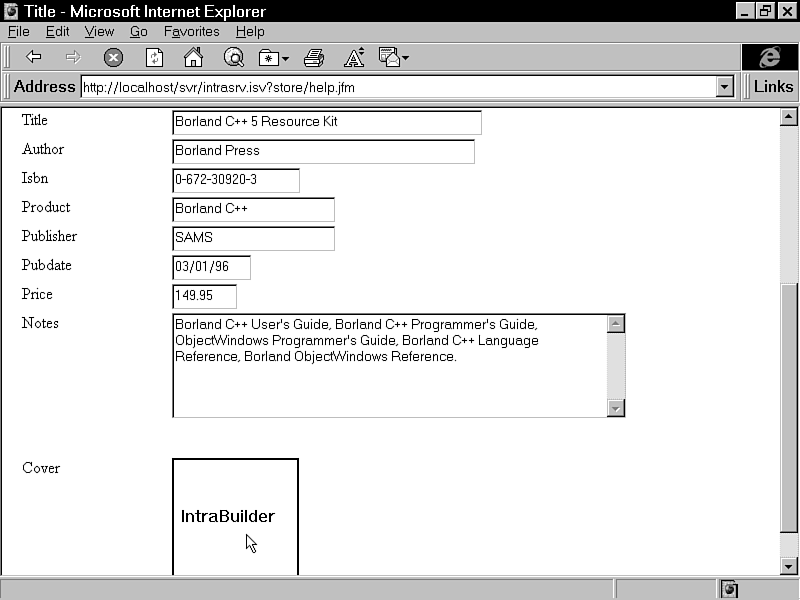
Viewing the Details form through a browser reveals another potentially confusing item. The Title table does not contain cover images for all books. When a book does not have a cover image, the IntraBuilder Server sends a default image that says "IntraBuilder," as shown in Figure 11.15. If the example application had been a shopping cart for organic potatoes, this image would not have caused confusion. However, in a store that has books on IntraBuilder, a cover image saying "IntraBuilder" for a C++ book just doesn't look appropriate.
Figure 11.15 : An image with an empty dataSource.
| NOTE |
Image controls do not show the default IntraBuilder image when run within the IntraBuilder Designer. Instead, the images are transparent, and the form background appears where the image typically would be. |
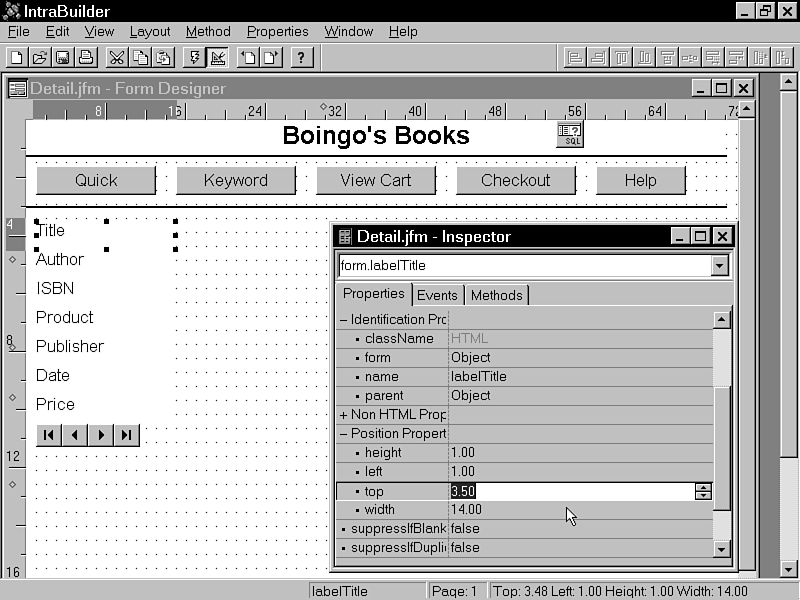
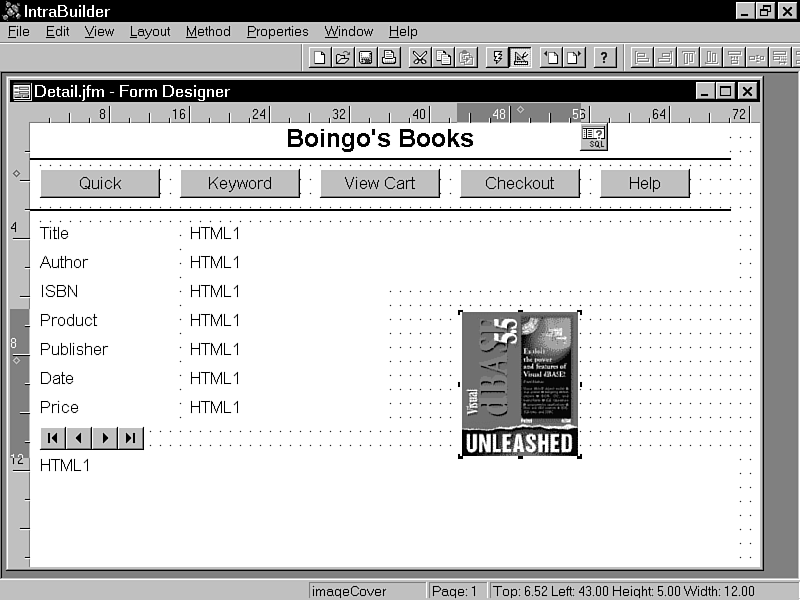
The first task in morphing the current Details form into something
better suited for a Web shopper is to replace the Text controls
with HTML controls and add a new method to update the text properties.
Morphing means to change one thing into another. The term usually is associated with a graphics technique used in science fiction movies, such as Terminator 2, where one actor is transformed into another. You will find the term used throughout the IntraBuilder help system where it describes techniques to transform coded field values into descriptive text. |
In the first pass, the controls will only show data from the first row. After this is working, you can go back and call the method as needed. So, let's start the renovation.
| New name | Old text | New text | |
| labelTitle | Title | Title | |
| labelAuthor | Author | Author | |
| labelISBN | isbn | ISBN | |
| labelProduct | Product | Product | |
| labelPublisher | Publisher | Publisher | |
| labelPubdate | Pubdate | Date | |
| labelPrice | Price | Price | |
| (delete) | Notes | ||
| (delete) | Cover |
| Name | ||||
| valueTitle | ||||
| valueAuthor | ||||
| valueISNB | ||||
| valueProduct | ||||
| valuePublisher | ||||
| valuePubdate | ||||
| valuePrice | ||||
| valueNotes |
After adding the code block, save and run the form. In the Designer, all HTML value controls display HTML1. When you run the form, the HTML text shows values from the current record. If you navigate through rows with the VCR buttons, the text remains static and only the cover image reflects the row navigation.
The next task is to enhance the navigation operation so the HTML value controls refresh as necessary. This also is an appropriate time to add a row position indicator to the form. To accomplish the task, you will need to revamp the navigation code that occurs for the onServerImageClick event.
Images fall into three basic categories within an IntraBuilder application: static images, dynamic images, and action images. The simplest type is the static image that always shows the same picture and does nothing when clicked. Static images can be logos or pictures that beautify a Web page, without adding any links or processing. Dynamic images change as events take place. The book cover in the Detail form is a dynamic image that needs to refresh with different covers during row navigation. An action image does something when clicked. Web pages often use action images for links to other Web pages. The index.htm page for the store has an action image with a link to the Help form. Action images can also replace buttons as the VCR image does. Although not as common as the three basic image types, a dynamic image can also be an action image.
Some action images, such as the index page link, have a single
purpose. No matter where you click the index link image, the same
action always takes place. Other action images perform different
tasks depending on where you click. The VCR image is a multiple
action image. It functions as though it is four separate buttons.
If you click the far right, you move to the last row. Clicking
on the far left moves you to the first row. IntraBuilder supports
image mapping by passing the mouse click coordinates to the onImageServerClick
event.
Image mapping is the act of dividing an image into separate action regions. Image mapping enables you to use a single image for multiple actions. |
The four regions of the VCR image are represented by the symbols <<, <, >, and >>. Each region requires separate logic. The Form Expert uses if blocks to separate the logic for each region. As with any Form Expert event, the entire sequence is inside of a single code block, which is difficult to read.
{|nLeft, nTop|;if (nLeft >= 26*0 && nLeft < 26*1){form.rowset.first()}

åelse if (nLeft >= 26*1 && nLeft < 26*2){if (!form.rowset.next

å(-1)) form.rowset.next();}else if (nLeft >= 26*2 && nLeft < 26*3)

å{if (!form.rowset.next()) form.rowset.next(-1);}else

å{form.rowset.last()}}
The first and last regions use simple logic with no position validation.
The middle two regions are a little more complex. Each must check
to see whether the row pointer has gone past the edge of the view
to create a state known as being at endOfSet. The regions
break down as follows:
| Move to the first row. | |
| Move to the previous row. If moving to the previous row places the row pointer outside the rowset, move back to the original row. | |
| Move to the next row. If moving to the next row places the row pointer past the last row, move back to the original row. | |
| Move to the last row. |
The coordinates returned to the onImageServerClick are in pixels rather than the much larger scale used to lay out controls in the Form Designer. There are many applications that you can use to assist you in mapping out an image. Most create map files for CGI programs. Although IntraBuilder does not have direct support for map files, you can use the coordinates from a generated map file to set up the logic of an onImageServerClick.
If you do not have a mapping utility, you can create a simple JavaScript form to show coordinate values interactively. The Imap form in Listing 11.6 updates an HTML control with the left and top coordinates each time you click the GIF file. The coordinates return the same values when run in the IntraBuilder Designer as when run through a browser.
![]()
Listing 11.6. IMAP.JFM, a simple interactive map form.
 1: // {End Header} Do not remove this comment//

 2: // Generated on 11/02/96

 3: //

 4: var f = new imapForm();

 5: f.open();

 6: class imapForm extends Form {

 7:    with (this.image1 = new Image(this)){

 8:       dataSource = "filename VCR.gif";

 9:       alignment = 4;

10:       onImageServerClick = class::image1_onImageServerClick;

11:    }

12:

13:    with (this.html1 = new HTML(this)){

14:       top = 3;

15:       width = 50;

16:    }

17:

18:    function image1_onImageServerClick(nLeft, nTop)

19:    {

20:       this.form.html1.text = "Left: " + nLeft + " Top: " + nTop

21:    }

22: }
![]() The image is linked to the image1_onImageServerClick() method on line 10. Although the method name and the event match in this case, the form doesn't have to run. You could rename the
method to any valid function name as long as the names on lines 10 and 18 match.
The image is linked to the image1_onImageServerClick() method on line 10. Although the method name and the event match in this case, the form doesn't have to run. You could rename the
method to any valid function name as long as the names on lines 10 and 18 match.
The event automatically passes the coordinates to the linked method as parameters. Line 20 displays the parameter values by assigning them to the text property of an HTML object. This assignment uses the JavaScript automatic type conversion to combine string values with the numeric parameter values.
The relevant coordinates for the VCR file appear in Table 11.4.
The coordinates are zero- based. The VCR image is broken into
four square regions that are each 26 pixels wide and 23 pixels
high. Only the left value is needed to determine what region has
been clicked.
For the Details form, the VCR onImageServerClick needs both a regional specific enhancement and an added function call for all regions. Keeping track of the current row number is regional-specific. The HTML values need to be refreshed for all regions. The following are the steps to enhance the VCR image:
Listing 11.7. Keeping track of the current row.
 1: function imageVCR_onImageServerClick(nLeft, nTop)

 2: {

 3:    var lRefresh = true ;

 4:    if (nLeft >= 26*0 && nLeft < 26*1)

 5:    {

 6:       this.form.rowset.first() ;

 7:       this.form.currentRow = 1 ;

 8:    }

 9:    else if (nLeft >= 26*1 && nLeft < 26*2)

10:    {

11:       if (! this.form.rowset.next(-1))

12:       {

13:          this.form.rowset.next() ;

14:          lRefresh = false ;

15:       }

16:       else

17:       {

18:          this.form.currentRow-- ;

19:       }

20:    }

21:    else if (nLeft >= 26*2 && nLeft < 26*3)

22:    {

23:       if (! this.form.rowset.next())

24:       {

25:          this.form.rowset.next(-1) ;

26:          lRefresh = false ;

27:       }

28:       else

29:       {

30:          this.form.currentRow++ ;

31:       }

32:    }

33:    else

34:    {

35:       this.form.rowset.last() ;

36:       this.form.currentRow = this.form.titleCount ;

37:    }

38:    if (lRefresh)

39:    {

40:       class::UpdateValues(this.form) ;

41:    }

42: }
![]() This function contains two optimizations. Both deal with how often the UpdateValues() method is called. The first optimization deals with how the UpdateValues() method is called. An
onNavigate event is a more instinctive place to call the UpdateValues() method. However, invoking the UpdateValues() method in the onNavigate event leads to unnecessary processing.
This function contains two optimizations. Both deal with how often the UpdateValues() method is called. The first optimization deals with how the UpdateValues() method is called. An
onNavigate event is a more instinctive place to call the UpdateValues() method. However, invoking the UpdateValues() method in the onNavigate event leads to unnecessary processing.
Before the Details form opens, many navigation events take place as the Results form determines the currentRow value. If a shopper picks the fifth book from the Results form, the onNavigate event fires five times before the Details form opens.
The second optimization avoids extra calls to UpdateValues() through a lRefresh flag. Line 3 defaults the flag to true. It is set to false on lines 14 and 26 when a navigation operation fails.
function imageVCR_onImageServerClick(nLeft, nTop)

{

   var lRefresh = true ;
Each if block corresponds to an image region. The first if block spans from lines 4 to 8 and handles the first region that ranges from 0 to 25 pixels. Each if block relies on the region width being 26 pixels. The logic might look a little complicated because (nLeft <26) has the same result as (nLeft >= 26*0 && nLeft < 26*1). The advantage of the more complex expression is that it is really a formula for all the regions-the formula being (nLeft >26*<(region - 1)> && 26*<region>). The formula repeats for the second and third regions.
if (nLeft >= 26*0 && nLeft < 26*1)

{

   this.form.rowset.first() ;

   this.form.currentRow = 1 ;

}
| NOTE |
The Form Designer automatically makes the default the rowset for the first table you drop onto a form rowset for the form. You can use this.form.rowset to reference the default rowset. When you run a form within the IntraBuilder Designer, the default rowset works with options on the Table menu. |
The second region is handled by lines 9 through 20. The Rowset::next() method returns true if the navigation has been a success and false if it moved the row pointer to endOfSet. The nested if checks to see whether the navigation fails and moves the row pointer back to the previous row if it went to endOfSet. In this case, the row pointer appears to have never moved, and there is no need to refresh the HTML field value controls.
else if (nLeft >= 26*1 && nLeft < 26*2)

{

   if (! this.form.rowset.next(-1))

   {

      this.form.rowset.next() ;

      lRefresh = false ;

   }

   else

   {

      this.form.currentRow-- ;

   }

}
The third region is a mirror image of the second. If the navigation is successful, the counter increments. Otherwise, line 26 sets the refresh flag to false.
else if (nLeft >= 26*2 && nLeft < 26*3)

{

   if (! this.form.rowset.next())

   {

      this.form.rowset.next(-1) ;

      lRefresh = false ;

   }

   else

   {

      this.form.currentRow++ ;

   }

}
The last region is the default region. If the value of nLeft falls outside all the other regions, it must be valid for the last region which, appropriately enough, goes to the last row. No error trapping is done here. Line 35 calls Rowset::last() to move the row pointer to the last row. The only way this would fail is if the view has no rows, and in that case there is no valid row to recover to. When you're at the last row, the position is the same as the total number of rows in the set.
else

{

   this.form.rowset.last() ;

   this.form.currentRow = this.form.titleCount ;

}
The last section depends on whether the navigation has been successful rather than what the current region is. If a refresh is necessary, line 40 calls UpdateValues() with a reference to the current form. By accepting the form reference as a parameter, the UpdateValues() method is callable from events that use different properties to reference the form. For instance, the onServerLoad event uses this instead of this.form to reference the form. A query event uses this.parent instead of this.form.
   if (lRefresh)

   {

      class::UpdateValues(this.form) ;

   }

}
The Details form is almost done. Shoppers can navigate through selected titles and all the HTML value controls refresh. If you've followed all the recommended positioning, the form will configure the controls appropriately in both Navigator and Internet Explorer. Figure 11.20 shows the Details form with position information in Internet Explorer.
Figure 11.20 : Checking the current row position in the Details form.
The last task is to provide a button that lets shoppers place the current title into the shopping cart. This requires a new button, a new onServerClick method, and a new query. The new query is for the Cart table, and it will be the first that is updated directly from the application. Here now is the last set of steps for the Details form.
| Property | Value |
| name | buttonAdd |
| text | Add to Cart |
| left | 15 |
| top | 10.5 |
| width | 12 |
Listing 11.8. The Details form with buttonAdd_onServerclick().
1: // {End Header} Do not remove this comment//
2: // Generated on 11/02/96
3: //
4: var f = new detailForm();
5: f.open();
6: class detailForm extends ToolbarCForm from "TOOLBAR.JCF" {
7: with (this) {
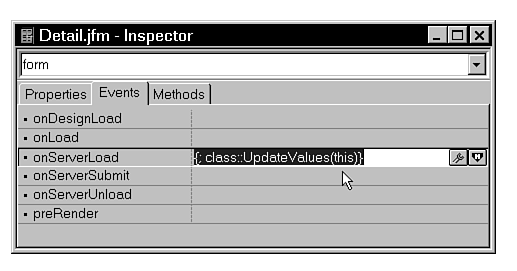
8: onServerLoad = {; class::UpdateValues(this)};
9: height = 16;
10: left = 0;
11: top = 0;
12: width = 75;
13: title = "Boingo's Books - Detail";
14: }
15:
16: with (this.title1 = new Query()){
17: left = 60;
18: top = 0;
19: sql = 'SELECT * FROM "title.dbf"';
20: active = true;
21: }
22:
23: with (this.title1.rowset) {
24: }
25:
26: with (this.cart1 = new Query()){
27: left = 55;
28: top = 0;
29: sql = 'SELECT * FROM "cart.DBF"';
30: active = true;
31: }
32:
33: with (this.cart1.rowset) {
34: }
35:
36: with (this.imageVCR = new Image(this)){
37: onImageServerClick = class::imageVCR_onImageServerClick;
38: height = 0.8;
39: left = 1;
40: top = 10.5;
41: width = 10.5;
42: dataSource = "filename VCR.gif";
43: alignment = 4;
44: }
45:
46: with (this.labelTitle = new HTML(this)){
47: height = 1;
48: left = 1;
49: top = 3.5;
50: width = 14;
51: color = "black";
52: text = "Title";
53: }
54:
55: with (this.labelAuthor = new HTML(this)){
56: height = 1;
57: left = 1;
58: top = 4.5;
59: width = 14;
60: color = "black";
61: text = "Author";
62: }
63:
64:
65: with (this.labelISBN = new HTML(this)){
66: height = 1;
67: left = 1;
68: top = 5.5;
69: width = 14;
70: color = "black";
71: text = "ISBN";
72: }
73:
74:
75: with (this.labelProduct = new HTML(this)){
76: height = 1;
77: left = 1;
78: top = 6.5;
79: width = 14;
80: color = "black";
81: text = "Product";
82: }
83:
84: with (this.labelPublisher = new HTML(this)){
85: height = 1;
86: left = 1;
87: top = 7.5;
88: width = 14;
89: color = "black";
90: text = "Publisher ";
91: }
92:
93: with (this.labelPubdate = new HTML(this)){
94: height = 1;
95: left = 1;
96: top = 8.5;
97: width = 14;
98: color = "black";
99: text = "Date";
100: }
101:
102: with (this.labelPrice = new HTML(this)){
103: height = 1;
104: left = 1;
105: top = 9.5;
106: width = 14;
107: color = "black";
108: text = "Price";
109: }
110:
111: with (this.imageCover = new Image(this)){
112: height = 5;
113: left = 43;
114: top = 6.5;
115: width = 12;
116: dataSource = parent.title1.rowset.fields["COVER"];
117: alignment = 3;
118: }
119:
120: with (this.valueTitle = new HTML(this)){
121: height = 1;
122: left = 16;
123: top = 3.5;
124: width = 55;
125: color = "black";
126: text = "HTML1";
127: }
128:
129: with (this.valueAuthor = new HTML(this)){
130: height = 1;
131: left = 16;
132: top = 4.5;
133: width = 55;
134: color = "black";
135: text = "HTML1";
136: }
137:
138: with (this.valueISBN = new HTML(this)){
139: height = 1;
140: left = 16;
141: top = 5.5;
142: width = 20;
143: color = "black";
144: text = "HTML1";
145: }
146:
147: with (this.valueProduct = new HTML(this)){
148: height = 1;
149: left = 16;
150: top = 6.5;
151: width = 20;
152: color = "black";
153: text = "HTML1";
154: }
155:
156: with (this.valuePublisher = new HTML(this)){
157: height = 1;
158: left = 16;
159: top = 7.5;
160: width = 20;
161: color = "black";
162: text = "HTML1";
163: }
164:
165: with (this.valuePubdate = new HTML(this)){
166: height = 1;
167: left = 16;
168: top = 8.5;
169: width = 20;
170: color = "black";
171: text = "HTML1";
172: }
173:
174: with (this.valuePrice = new HTML(this)){
175: height = 1;
176: left = 16;
177: top = 9.5;
178: width = 20;
179: color = "black";
180: text = "HTML1";
181: }
182:
183: with (this.valueNotes = new HTML(this)){
184: height = 4;
185: left = 1;
186: top = 11.5;
187: width = 70;
188: color = "black";
189: text = "HTML1";
190: }
191:
192: with (this.htmlPosition = new HTML(this)){
193: height = 1;
194: left = 43;
195: top = 5.5;
196: width = 12;
197: color = "black";
198: text = "HTML1";
199: }
200:
201: with (this.buttonAdd = new Button(this)){
202: onServerClick = class::buttonAdd_onServerClick;
203: left = 15;
204: top = 10.5;
205: width = 12;
206: text = "Add to Cart";
207: }
208:
209: this.rowset = this.title1.rowset;
210:
211: function UpdateValues(thisForm)
212: {
213: var fTitle = thisForm.title1.rowset.fields ;
214: thisForm.valueTitle.text = fTitle["TITLE"].value ;
215: thisForm.valueAuthor.text = fTitle["AUTHOR"].value ;
216: thisForm.valueISBN.text = fTitle["ISBN"].value ;
217: thisForm.valueProduct.text = fTitle["PRODUCT"].value ;
218: thisForm.valuePublisher.text = fTitle["PUBLISHER"].value ;
219: thisForm.valuePubdate.text = fTitle["PUBDATE"].value ;
220: thisForm.valuePrice.text = fTitle["PRICE"].value ;
221: thisForm.valueNotes.text = fTitle["NOTES"].value ;
222: thisForm.htmlPosition.text =
223: thisForm.currentRow + " of " + thisForm.titleCount ;
224: thisForm.imageCover.visible = (! (fTitle["COVER"].value == "")) ;
225: }
226:
227: function imageVCR_onImageServerClick(nLeft, nTop)
228: {
229: var lRefresh = true ;
230: if (nLeft >= 26*0 && nLeft < 26*1)
231: {
232: this.form.rowset.first() ;
233: this.form.currentRow = 1 ;
234: }
235: else if (nLeft >= 26*1 && nLeft < 26*2)
236: {
237: if (! this.form.rowset.next(-1))
238: {
239: this.form.rowset.next() ;
240: lRefresh = false ;
241: }
242: else
243: {
244: this.form.currentRow-- ;
245: }
246: }
247: else if (nLeft >= 26*2 && nLeft < 26*3)
248: {
249: if (! this.form.rowset.next())
250: {
251: this.form.rowset.next(-1) ;
252: lRefresh = false ;
253: }
254: else
255: {
256: this.form.currentRow++ ;
257: }
258: }
259: else
260: {
261: this.form.rowset.last() ;
262: this.form.currentRow = this.form.titleCount ;
263: }
264: if (lRefresh)
265: {
266: class::UpdateValues(this.form) ;
267: }
268: }
269:
270: function buttonAdd_onServerClick()
271: {
272: var rCart = this.form.cart1.rowset,
273: rTitle = this.form.title1.rowset ;
274: rCart.applyLocate(
275: "ISBN = " + "'" + rTitle.fields["ISBN"].value + "'"
276: + "AND CARTUSER = " + "'" + this.form.user + "'" ) ;
277: if ( rCart.endOfSet )
278: {
279: rCart.beginAppend() ;
280: rCart.fields["ISBN"].value = rTitle.fields["ISBN"].value ;
281: rCart.fields["CARTUSER"].value = this.form.user ;
282: rCart.fields["CARTDATE"].value = new Date() ;
283: }
284: rCart.fields["QTY"].value++ ;
285: rCart.save() ;
286: rCart.active = false ;
287: nextForm = new cartForm() ;
288: nextForm.user = this.form.user ;
289: nextForm.open() ;
290: this.form.release() ;
291: }
292:
293: }
![]() The detailForm class starts by assigning a code block to the onServerLoad on line 8. The code block contains a single call to the UpdateValues() method. This is almost the
same as directly linking the onServerLoad event to UpdateValues(). The difference is that a direct link does not enable you to pass custom parameters. Links pass either no parameters or a predefined set of parameters. Most events,
including onServerLoad, pass no parameters. The onImageServerClick is an example of an event with predefined parameters.
The detailForm class starts by assigning a code block to the onServerLoad on line 8. The code block contains a single call to the UpdateValues() method. This is almost the
same as directly linking the onServerLoad event to UpdateValues(). The difference is that a direct link does not enable you to pass custom parameters. Links pass either no parameters or a predefined set of parameters. Most events,
including onServerLoad, pass no parameters. The onImageServerClick is an example of an event with predefined parameters.
class detailForm extends ToolbarCForm from "TOOLBAR.JCF" {

   with (this) {

       onServerLoad = {; class::UpdateValues(this)};

       height = 16;

       left = 0;

       top = 0;

       width = 75;

       title = "Boingo's Books - Detail";

   }
The definitions for the HTML value controls have no links or code blocks to set up the initial text value. All the value definitions end by setting the text property to "HTML1". You can remove lines 126, 135, 144, 153, 162, 171, 180, 189, and 198 without affecting the form.
with (this.valueTitle = new HTML(this)){

   height = 1;

   left = 16;

   top = 3.5;

   width = 55;

   color = "black";

   text = "HTML1";

}
The onServerLoad fires the UpdateValues() method to assign the text properties on lines 214 through 223. Code blocks offer another way to accomplish the same thing. The following with block shows a technique that works without anything happening in the onServerLoad. When you use a code block in this manner, the code block executes only when the HTML control is rendered. Unlike a datalink, code blocks do not reevaluate when the row navigation occurs in the IntraBuilder Designer.
with (this.valueTitle = new HTML(this)){

      height = 1;

      left = 16;

      top = 3.5;

      width = 55;

      color = "black";

      text = {||this.form.title1.rowset.fields["TITLE"].value};

}
| NOTE |
When you are working with HTML controls in a report, code blocks do work more like a data link. As a report runs, navigation occurs and new HTML controls display the new data. The difference between the form and the report is that a form reuses the same HTML control for different rows. Reports create new HTML controls for each row. |
The UpdateValues() method assigns new values to the text properties of HTML controls. It uses the parameter thisForm to refer to the current form. Keep in mind that thisForm is a local variable unlike the native this and this.form references. The thisForm parameter enables the method to work with both the onServerLoad event of the form and the onServerImageClick event of the VCR image.
Line 213 creates the fTitle variable as a temporary shortcut reference to the fields object of the title1 query. You could substitute the entire reference wherever fTitle appears.
function UpdateValues(thisForm)

{

   var fTitle = thisForm.title1.rowset.fields ;

   thisForm.valueTitle.text     = fTitle["TITLE"].value ;

   thisForm.valueAuthor.text    = fTitle["AUTHOR"].value ;

   thisForm.valueISBN.text      = fTitle["ISBN"].value ;

   thisForm.valueProduct.text   = fTitle["PRODUCT"].value ;

   thisForm.valuePublisher.text = fTitle["PUBLISHER"].value ;

   thisForm.valuePubdate.text   = fTitle["PUBDATE"].value ;

   thisForm.valuePrice.text     = fTitle["PRICE"].value ;

   thisForm.valueNotes.text     = fTitle["NOTES"].value ;

   thisForm.htmlPosition.text  =

       thisForm.currentRow  + " of " + thisForm.titleCount ;

   thisForm.imageCover.visible = (! (fTitle["COVER"].value == "")) ;

}
Line 224 checks to see whether the binary field is blank. The value property of a binary field contains the entire bit stream for the field as a string. You can compare a binary value to a string, but you cannot use string methods to manipulate it.
The buttonAdd_onServerClick() method adds information from the current Title row to the shopping cart table. The process starts by looking to see whether the current title already is in the shopping cart for the current shopper. This is done through an alternate form of Rowset.applyLocate(). On Day 10, you learned how query by form uses an interactive form of Rowset::applyLocate(). With query by form, dataLinks control the search criteria. Lines 274 through 276 pass the search criteria to Rowset::applyLocate() as a SQL expression.
function buttonAdd_onServerClick()

{

   var rCart  = this.form.cart1.rowset,

       rTitle = this.form.title1.rowset ;

   rCart.applyLocate(

      "ISBN = " + "'" + rTitle.fields["ISBN"].value + "'"

      + "AND CARTUSER = " + "'" + this.form.user + "'" ) ;
You must escape any single quotes in look-up strings that you pass to Rowset.applyLocate() or the filter property. For example, if you want to locate Tom Swan's Mastering Borland C++ 5, the apostrophe after Swan must be prefixed with a triple backslash. The following code contains a handy sqlString() function. Using this function, it's possible that a look-up string could contain the single quote symbol. |
If the shopper already added the same book to the cart, the rowset will not be at endOfSet. Otherwise, line 279 creates a new row buffer and lines 280 through 282 fill the buffer with the ISBN, user key, and current date.
if ( rCart.endOfSet )

{

   rCart.beginAppend() ;

   rCart.fields["ISBN"].value = rTitle.fields["ISBN"].value ;

   rCart.fields["CARTUSER"].value = this.form.user ;

   rCart.fields["CARTDATE"].value = new Date() ;

}
The QTY field defaults to zero when new rows are added to the table. The field is incremented by one each time the user tries to add a book to the cart. If the book is already found, QTY increases by one. If it is a new book, the same logic makes QTY equal to one. After setting the quantity to the appropriate value, Rowset::save() commits the row buffer to the table and line 286 deactivates the query.
rCart.fields["QTY"].value++ ;

rCart.save() ;

rCart.active = false ;
The remainder of the function is very much like the end of buttonDetails_onServerClick(). It opens the cartForm after adding the user key property.
   nextForm = new cartForm() ;

   nextForm.user = this.form.user ;

   nextForm.open() ;

   this.form.release() ;

}
Before you can test the new Add button, you need to create a stub form for the shopping cart and tie it into the Help form. For now, the Cart form needs only the components inherited from the toolbar class. The first steps to building the Cart form are as follows:
| NOTE |
When creating stub forms, which contain nothing other than default or inherited properties, you must explicitly save the form before closing it. |
![]()
#define DEBUG  // for development only

#ifndef STORE

   #define STORE

   #ifdef DEBUG

      // Load scripts

      // _sys.script.load statements go here.

      _sys.scripts.load("cart.jfm") ;

      _sys.scripts.load("detail.jfm") ;

      _sys.scripts.load("help.jfm") ;

      _sys.scripts.load("message.jfm") ;

      _sys.scripts.load("quick.jfm") ;

      _sys.scripts.load("results.jfm") ;

   #elseif

      // Include scripts

      return null

      // #include statements go here

      #include <cart.jfm>

      #include <detail.jfm>

      #include <help.jfm>

      #include <message.jfm>

      #include <quick.jfm>

      #include <results.jfm>

   #endif

  #endif
Now you can try the Add to Cart button from the Details form and the View Cart toolbar button. When you click either the Add to Cart button or the View Cart toolbar button, a form containing only the toolbar opens.
Today, the shopping cart application really started to take shape. The following five forms are complete: the Help form, the Quick form, the Message form, the Results form, and the Details form. The day started with a very simple Message form that had only an HTML control and an inherited set of toolbar buttons. The simplicity of the Message form made it easy to demonstrate how you can experiment with the dynamic object model without creating any JavaScript files.
The Quick form and the Results form that you started on Day 10 got their finishing touches. You added an extensive routine to the Results form so that it could provide the Details form with enough information.
The major task of the day was the development of the Details form. This started as a prototype from the Form Expert. Starting with the Expert generated code, the form evolved to become a dynamic read-only form with simulated dataLinks. You learned some of the behind-the-scenes workings of images that perform actions. In replacing the Expert-generated navigation code block, you learned how to track the current row position and display it to the shopper.
The day ended with a foreshadowing of tomorrow. The last enhancement to the Details form was a call to the shopping cart form. You also created an empty Cart form to test the Add button. In Day 12, you'll develop the Cart form and learn how to simulate both the read-only datalinks and read-write datalinks. Of course, the whole purpose of simulating the read-only datalinks is to make them truly read-only. If you're wondering why on earth you would ever want to simulate a read-write datalink, be sure to tune in tomorrow and find out.
| Q: | I updated the store.h file, recompiled the Help form, and even restarted the IntraBuilder Designer-but whatever I do, I always encounter the error Class not loaded into memory: detailForm::detailForm. How can I fix this? |
| A: | Make sure the capitalization of the class name in the detail.jfm file matches the class name in the function that is attempting to create a new instance of the Details form. |
| Q: | When I run the Details form through Netscape Navigator, there is no space between one of the field labels and its value. It looks okay in the Designer and in Internet Explorer. How can I insert a space between the label and the value? |
| A: | You can force spaces between two columns of HTML controls by adding trailing spaces to values of the first column. For instance, if the Product field label is running into the Product field
value, you can add two spaces to the end of the text string, as shown here:
with (this.labelProduct = new HTML(this)){

      height = 1;

      left = 1;

      top = 6.5;

      width = 14;

      color = "black";

      text = "Product  ";

   }
|
| Q: | I'm having trouble whenever I run the shopping cart forms. I was able to design them without any problems, but when I run the forms through the browser, the controls shift around. If I run within the IntraBuilder Designer, the system becomes unstable as soon as I try to move from one form to another. What is going wrong? |
| A: | Make sure you are not running IntraBuilder version 1.0. Some of the techniques shown throughout this book are not compatible with the initial release. For instance, this.form.release() can crash IntraBuilder 1.0. You can replace each instance of this.form.release() with this.form.close() to get forms to run. Also, the positions of many controls will need adjusting to work with the relative coordinate system that was replaced in version 1.01. |
| Q: | When I create a form with the Form Expert, it sometimes creates new images in my current folder. Where do these image files come from? |
| A: | The Form Expert copies image files from a Designer files folder. By default the folder is located at
c:\Program Files\Borland\IntraBuilder\Designer\Form You can copy images directly from this folder for your own use. You can also modify the images to customize the look of a Form Expert generated form. |
The Workshop section provides questions and exercises to help you get a better feel for the material you learned today. Try to answer the questions and at least think about the exercises before moving on to tomorrow's lesson. You'll find the answers to the questions in Appendix A, "Answers to Quiz Questions."


