Day 18
Using Java Applets and ActiveX
Controls
by Paul Mahar
CONTENTS
Java and related technologies are spreading across the computer
industry like a wildfire on a dry and windy summer night. IntraBuilder
itself is an outgrowth of the Java phenomenon. The most prevalent
use of the Java language is for creating Java applets. An applet
is a small application that breaks through the limitations of
HTML while maintaining platform independence. ActiveX controls
are Microsoft's recasting of Java applets into a Windows orientation.
In this chapter you will learn how to extend your IntraBuilder
applications with both Java applets and ActiveX controls. Here
are the tasks for the day:
- Exploring Java and ActiveX resources on the Web: You will
visit sites created by Sun and Microsoft to promote their competing
strategies. This chapter also describes Gamelan, the Grand Central
Station for Java applets. As you travel through the various Web
sites, you will see what is available for free and what has a
fee. Along the way, you will also learn about the different security
features provided with Java and ActiveX.
- Taking Tumbling Duke out for a spin: One of the first Java
applets is Tumbling Duke. This is a little animation applet that
shows the Java mascot doing some cartwheels. You will learn how
to embed Tumbling Duke into an IntraBuilder application.
- Gluing IntraBuilder to a basic Java grid: A more serious use
of Java is to create a data grid. The Sun folks have created a
simple spreadsheet that you can use as a basic data grid. Doing
so demonstrates how to pass information between the IntraBuilder
Server and a Java applet.
- Popping off with an ActiveX popup: Microsoft has packaged
all the native Windows controls into ActiveX controls. If you
know your clients are going to be browsing through Windows NT
or Windows 95, you can embellish your forms with native controls
such as a Windows popup menu. In doing so, you will also learn
how to use VBScript functions within an IntraBuilder application.
Keep in mind that the external controls presented here are some
of the most primitive available. Advanced Java development environments
such as Visual J++, Visual CafŽ, and JBuilder are enabling
a second generation of controls that allow tighter integration
with database environments such as IntraBuilder.
The native IntraBuilder controls map to standard HTML controls
such as text, select lists, buttons, and check boxes. Native controls
are fully functional within the designer's run mode. You can also
dynamically create instances of any native component with a simple
call using the new operator. The widest array of clients-including
those running older browsers under Windows 3.1, UNIX, or the Mac
OS-can work with the native controls.
Using Java applets and ActiveX controls with IntraBuilder is similar
to using a VBX control with the Windows 3.1 versions of Visual
Basic, Visual dBASE, or PowerBuilder. You can set properties and
call methods of an external control just as you do with native
controls. The main difference for the developer is that an external
control does not run within the design environment. The designer
simply creates a placeholder for the external controls. To try
out the control, you must run it through a browser.
So what makes Java so hot? Other than some great public relations
on the part of Sun, there are at least three significant reasons
for Java-mania.
- Cross-platform compatibility: The same Java applet can run
on any platform that contains the Java virtual machine or a Java
just-in-time compiler. Today you can find Java support on all
popular computing environments ranging from low-end Macintosh
computers to large-scale, multiple-processor UNIX workstations.
The industry-wide adoption of Java frees developers from a dependency
on any one software vendor.
- Simple object orientation: Java combines the best object-oriented
aspects of C++ with automatic memory management. The Java virtual
machine recovers memory that is no longer required by an application.
This is sometimes referred to as garbage collection. Java's object
system supports all standard object constructs, such as encapsulation,
inheritance, and polymorphism. These features are also found in
IntraBuilder's extended JavaScript.
- Security: Java contains security levels that can restrict
a program from making any direct operating system calls. This
architecture makes it easy to prevent both intentional virus programs
and the accidental memory overwrites that are so common to Windows
developers.
 |
A virtual machine is software implementation of a CPU that can translate generic low-level function calls into platform-specific calls. Java compiles to the same virtual machine instruction set regardless of platform. The virtual machine is the
only portion of the Java architecture that requires a platform-specific implementation.
|
If you are already familiar with Java, you can skip past the next
section and see how to make Duke tumble in a JavaScript form.
If you are still not sold on Java, it is time to go surfing for
a caffeine buzz.
There are two hot spots at which you can check out Java on the
Web. They are JavaSoft and Gamelan. JavaSoft is the Java software
division of Sun Microsystems, and it is the birthplace of Java.
Gamelan, pronounced gamma-lahn, is the official directory
for Java-related Web sites. You will find shortcuts for both sites
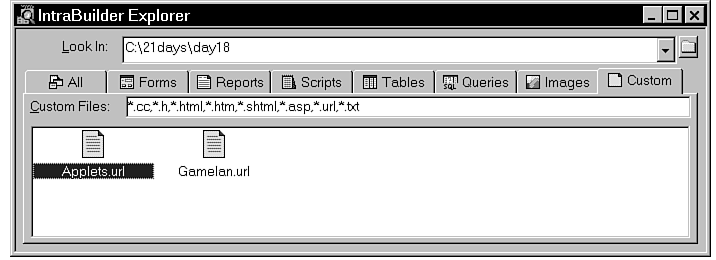
in the Day 18 folder on the CD-ROM. Figure 18.1 shows the URL
files as displayed in the custom tab of the IntraBuilder Explorer.
You can load your browser and go to the selected site directly
from the IntraBuilder Explorer.
Figure 18.1 : Viewing Web shortcuts in the IntraBuilder Explorer.
The Applets shortcut takes you to the JavaSoft applet index. Here
you will find the Java samples pages with complete source code
that you can copy and modify. There are some simple games, graphics,
and utility programs. The full URL for the applet index is
http://www.javasoft.com/applets/applets.html
You can run any of the Java applets from both Netscape Navigator
and Internet Explorer. As you run through the different Java applets,
you might notice a slight delay as the Java applets download to
your machine. Both browsers display an appropriate message in
the status bar when loading a Java class. Like standard HTML pages,
Java classes can also be retrieved from a browser cache for faster
loading.
The source for each Java class is contained in a file with a java
extension. When you run each example, the compiled versions of
the files with a class extension are downloaded to your
machine. The source file is not required to run a Java applet.
You can learn more about JavaSoft and the latest Java happenings
from www.javasoft.com. The JavaSoft site also contains
links to Gamelan. Visit the Gamelan site to see how commercial
control builders are taking advantage of Java. Unlike the JavaSoft
site, most of the controls found on Gamelan are not free to copy
or distribute.
| TIP |
You can use the Netscape Java Console to help track down problems that occur when loading Java applets. From Netscape 3.0, you can load the Java console from the options menu.
|
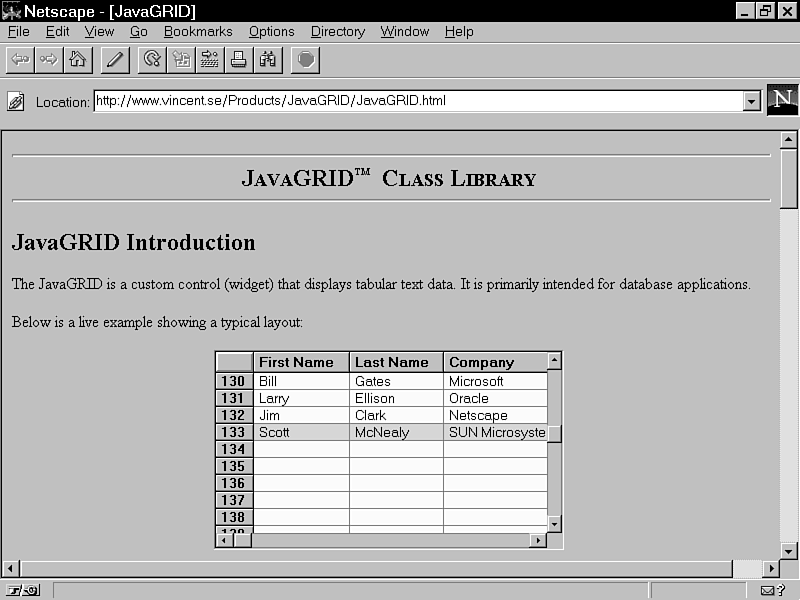
While you're visiting Gamelan, be sure to check out the latest
Java grid controls. Two promising controls are Vincent Engineering's
JavaGRID and Philippe ThamiŽ's Grid. Figure 18.2 shows the
JavaGRID demo page. After trying the JavaSoft spreadsheet applet,
you might want to try integrating JavaGRID with IntraBuilder.
Figure 18.2 : Vincent Engineering's JavaGRID control.
If you got a chance to visit with Tumbling Duke on the JavaSoft
site, you saw a silly triangular cartoon character doing cartwheels.
In this section, you will learn how to embed Tumbling Duke into
a JavaScript form and add a button that can start and stop the
tumble action. The start and stop methods are common Java applet
methods that start and stop the applet.
HTML includes an applets tag for embedding Java applets within
a Web page. The applets tag has a few standard properties for
identifying the Java class and setting the position of the applet.
Custom java properties are set through a params property
that points to a list of name-value pairs. The params
property maps to an IntraBuilder associative array. You will find
a Params Property Builder within the IntraBuilder Form Designer
to help you set up the name-value pairs.
|
A name-value pair is a property name and its associated value. For instance, top and 5 can be considered a name-value pair, where top is the name and 5 is the value. In the params associative array, the
name portion of the pair serves as an array index.
|
How you determine valid name-value pairs depends on where you
get the Java applet. For the JavaSoft applets, you can find them
in the source files. Commercial control vendors are more likely
to provide standard documentation in place of the source files.
If you do have the Java source file, look to the init()
method for calls to the Java getParameter() method. Listing
18.1 shows the init() method for the TumbleImage Java
applet.

Listing 18.1. The init()
method of TumbleImage.java.
 1: /**

 2: * Initialize the applet. Get attributes.

 3: */

 4: public void init() {

 5:    String at = getParameter("img");

 6:    dir = (at != null) ? at : "images/tumble";

 7:    at = getParameter("pause");

 8:    pause = (at != null) ? Integer.valueOf(at).intValue() : 3900;

 9:    at = getParameter("offset");

10:    offset = (at != null) ? Integer.valueOf(at).intValue() : 0;

11:    at = getParameter("speed");

12:    speed = (at != null) ? (1000 / Integer.valueOf(at).intValue()) : 100;

13:    at = getParameter("nimgs");

14:    nimgs = (at != null) ? Integer.valueOf(at).intValue() : 16;

15:    at = getParameter("maxwidth");

16:    maxWidth = (at != null) ? Integer.valueOf(at).intValue() : 0;

17: }
 The init() method is called whenever a new instance of the Java applet is created. The primary purpose of this init() method is to retrieve the parameter list and define defaults for
any parameter not in the name-value pair list. The six calls to getParameter() on lines 5, 7, 9, 11, 13, and 15 show that the class can work with up to six name-value pairs, including img, pause, offset, speed,
nimgs, and maxwidth.
The init() method is called whenever a new instance of the Java applet is created. The primary purpose of this init() method is to retrieve the parameter list and define defaults for
any parameter not in the name-value pair list. The six calls to getParameter() on lines 5, 7, 9, 11, 13, and 15 show that the class can work with up to six name-value pairs, including img, pause, offset, speed,
nimgs, and maxwidth.
All six parameters are optional. When a name-value pair is not
found for a parameter, getParameter() returns null.
If a null value is found, the init() method substitutes
a valid default. For example, line 6 assigns "images/tumble"
as the default for the img property.
The values for all name-value pairs are passed in as a string.
The TumbleImage class needs all but the first parameter
converted to an integer. In Java this is done through an Integer
class instead of the parstInt() or eval() functions
found in JavaScript.
In creating the Duke form, you will be assigning four of the name-value
pairs. The form will need only two controls. The first is a button
to start and stop the Java applet. The second is a placeholder
for the applet. The placeholder defines the area in which the
applet can paint, or in this case, tumble. Follow these steps
to create the Duke form.
- Load your browser and see that you can connect to the following
URL. The form relies on images and Java class files at this location:
http://www.javasoft.com/applets/applets/TumblingDuke/
- Open the Form Designer to create a new form called duke.jfm.
You can use the following JavaScript statement in the Script Pad
to name the form and open the designer:
_sys.forms.design('duke.jfm') ;
- Add a button in the top-left corner. Change the button's name
property to buttonToggle and the text property
to Stop.
- Add a Java applet control below the button. Set the position
and name properties as shown in Table 18.1.
Table 18.1. Name and location properties for javaDuke.
| Property | Value
|
| name | javaDuke
|
| height | 5
|
| left | 0 |
| top | 5 |
| width | 40
|
- Identify the Java class through the code and codeBase
properties. The code property is where you enter the
name of the compiled Java class. The codeBase is the
URL that points to where the class resides. Table 18.2 shows the
values required to access the Tumbling Duke class from the JavaSoft
Web site.
Table 18.2. Source properties for javaDuke.
As you work with the Java applet, you will see a coffee cup image
as a placeholder in the Form Designer. This image is replaced
by the applet when you run the form through a browser. Figure
18.3 shows the coffee cup as it appears for the Duke form.
Figure 18.3 : Working with a Java applet in the Form Designer.
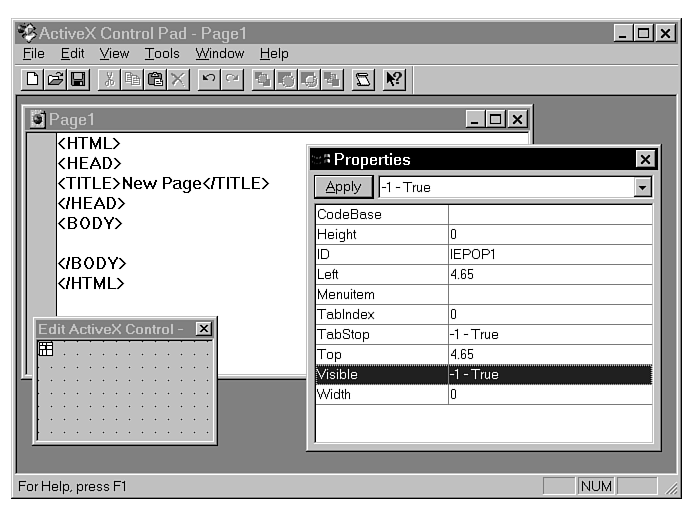
- Open the Params Property Builder to set properties of the
javaDuke object. So far, the properties you have been
working with are part of the HTML applet tag. The params
allow you to set properties that are associated directly with
the current instance of the Java class.
The Params Property Builder helps you create an associative array
of name-value pairs. You can open the Params Property Builder
by clicking on the Inspector's tool button for the params
property.
- The TumbleItem class can accept up to six name-value
pairs. In this form, you will create only four and let the other
two default to acceptable values. Add the first three name-value
pairs, as listed in Table 18.3.
Table 18.3. Name-value pairs for javaDuke.
| Name | Value |
| maxwidth | 100
|
| nimages | 16
|
| offset | 0
|
To enter each value, fill in the name and value and click on Add.
To modify an entry, click on Remove, change the value, and then
click on Add again. The order of the name-value pairs does not
affect the applet.
| NOTE |
You could also leave out the nimages and offset name-value pairs, because the values given in Table 18.3 are the default values. In this case, the name-value pairs serve as documentation and do not affect the resulting applet.
|
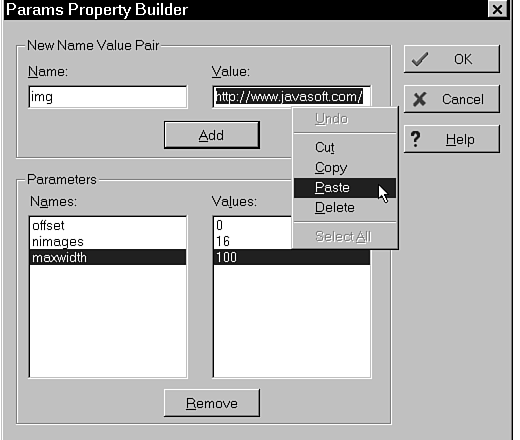
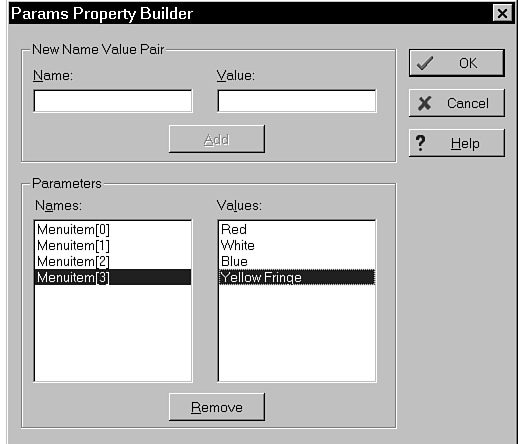
- The last name-value pair has a short name and a wide value.
The name is img and the value is the following URL. To
enter the value, enter the URL in a text editor first. Then copy
and paste the URL into the Params Property Builder, as shown in
Figure 18.4. After adding the fourth name-value pair, close the
Params Property Builder.
http://www.javasoft.com/applets/applets/TumblingDuke/images/tumble/
Figure 18.4 : Pasting in the img URL value.
 |
Do not forget to include the trailing slash on the URL values for the codeBase property and the img name-value pair. The browser will not be able to locate the files if you leave out the trailing slash.
|
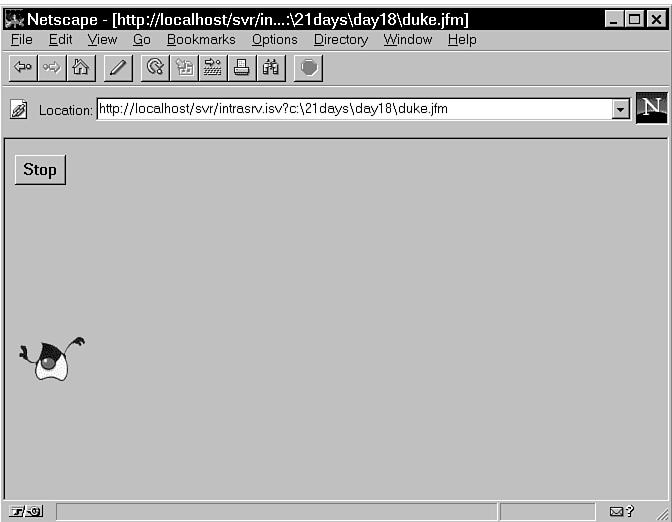
- Save the form and close the Form Designer. At this point,
you can check the form links to the JavaSoft site. Shut down the
IntraBuilder Designer and start up the IntraBuilder Server.
- Open the Duke form through either Netscape Navigator or Internet
Explorer. If you get a security error, check your connection to
the JavaSoft site. If the applet runs but does not present any
animation, check the img name-value pair. Figure 18.5
shows the form running in Netscape Navigator.
Figure 18.5 : Running the Duke form in Netscape Navigator.
When you have the form running, you can add some logic to control
the applet from client-side JavaScript. In this case, you want
the applet to stop and start when you click the button. If you
are running Internet Explorer, you might want to jump ahead to
the next section. The capability for client-side JavaScript to
call a Java method is currently only available with LiveConnect.
|
LiveConnect is a feature of Netscape Navigator. It allows JavaScript to interact with Java applets. LiveConnect is enabled if both Java and JavaScript are enabled.
|
You can use LiveConnect to call the start and stop methods from
client-side JavaScript. To see how LiveConnect works, follow these
steps to add a client-side onClick method to the Duke
form:
- Open up the Duke form in the Form Designer.
- Inspect the buttonToggle control and use the tool
button to create and link an onClick method.
- Enter the method as shown in Listing 18.2. When you are done,
save the form, close the IntraBuilder Designer, and run the form
through Netscape Navigator.
Listing 18.2. A client-side method that works with LiveConnect.
 1: function buttonToggle_onClick()

 2: {

 3:    if ( document.forms[0].buttonToggle.value == "Stop" ) {

 4:       document.forms[0].buttonToggle.value = "Start" ;

 5:       document.javaDuke.stop() ;

 6:    }

 7:    else {

 8:       document.forms[0].buttonToggle.value = "Stop" ;

 9:       document.javaDuke.start() ;

10:    }

11: }
The purpose of the buttonToggle_onClick() method is to start and stop the applet and modify the button text to show the current option. This method shows some of the differences between
client-side and server-side referencing.
Line 3 checks to see whether the button text is set to "Stop".
This one line shows differences between client-side and server-side
scripting. In client-side events, the current form is document.forms[0]
instead of this.form. The other difference is the property
that contains the text of the button. In a server-side event,
the text property has the button text. In a client-side
event, the value property contains the button text. If
you want to do the same check as line 3 for a server-side event,
the line would be as follows:
if ( this.form.buttonToggle.text == "Stop" ) {
Lines 4 and 8 toggle the button text from "Stop"
to "Start". Here again, the client-side event
substitutes the value property for the text
property. Lines 5 and 9 call the Java applet methods as though
they were native JavaScript methods.
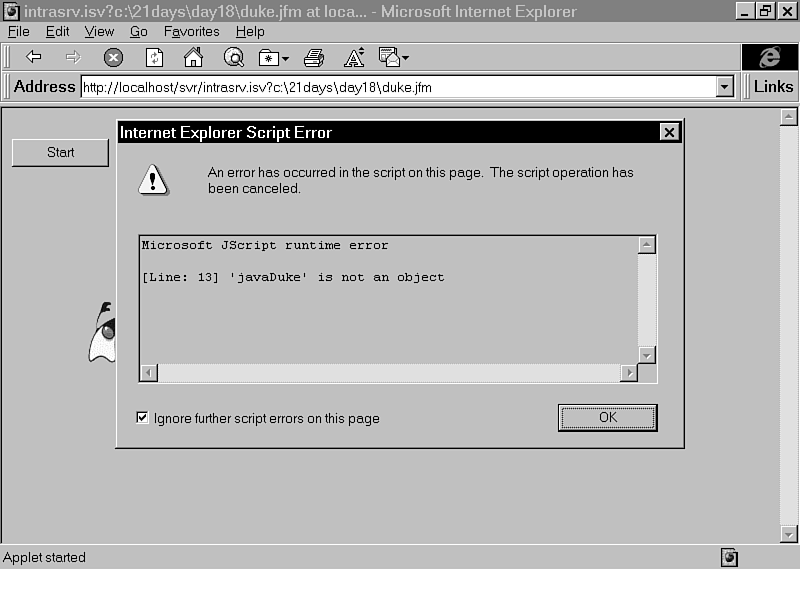
The buttonToggle_onClick() event works correctly only
when run through a Netscape browser. If you fire the event from
within the IntraBuilder Designer, a runtime error occurs when
the document object is not found on line 3. Running in a Microsoft
browser without LiveConnect support causes an error on lines 5
and 9. Figure 18.6 shows the error that occurs when you click
on the button in Internet Explorer. Notice that the Microsoft
version of JavaScript is called JScript.
Figure 18.6 : Trying to work with a Java applet in Internet Explorer.
Within a Netscape browser, clicking on the Stop button causes
Duke to stop in mid-tumble. This can catch the Duke in some funny
postures. Although this example has much more entertainment value
than practical functionality, it does demonstrate how to control
a Java applet from both the server and client sides. The name-value
pairs are all constructed on the server side, whereas the method
calls come from the client side. The complete Duke form is shown
in Listing 18.3.
Listing 18.3. The duke.jfm
JavaScript form file.
 1: // {End Header} Do not remove this comment//

 2: // Generated on 01/02/97

 3: //

 4: var f = new dukeForm();

 5: f.open();

 6: class dukeForm extends Form {

 7:   with (this.buttonToggle = new Button(this)){

 8:      onClick = class::buttonToggle_onClick;

 9:      width = 10;

10:      text = "Stop";

11:   }

12:

13:   with (this.javaDuke = new JavaApplet(this)){

14:      height = 5;

15:      top = 5;

16:      width = 40;

17:      code = "TumbleItem.class";

18:      codeBase = "http://www.javasoft.com/applets/applets/TumblingDuke/";

19:      params["offset"] = "0";

20:      params["img"] =

21:   "http://www.javasoft.com/applets/applets/TumblingDuke/images/tumble/";

22:      params["maxwidth"] = "100";

23:      params["nimages"] = "16";

24:

25:   }

26:

27:   function buttonToggle_onClick()

28:   {

29:      if ( document.forms[0].buttonToggle.value == "Stop" ) {

30:         document.forms[0].buttonToggle.value = "Start" ;

31:         document.javaDuke.stop() ;

32:      }

33:      else {

34:         document.forms[0].buttonToggle.value = "Stop" ;

35:         document.javaDuke.start() ;

36:      }

37:   }

38:

39: }
From the length of this form, you can see that it is pretty simple to integrate a Java applet into a JavaScript form. The most difficult part is figuring out the name-value pairs and callable methods
for the applet. For the TumbleItem class, the source code is available for determining both.
The Java applet is defined on lines 13 through 23. Line 13 creates
an instance of the IntraBuilder JavaApplet class. This
class represents a placeholder for the actual Java class defined
by the code property. The position properties are set up on lines
14, 15, and 16. There is no difference between setting up position
properties for a native control or an external control. Lines
17 and 18 identify the Java class and where on the Web it can
be found. The code property points to a compiled version of the
applet. The source file is not required to create the applet.
Lines 19 through 23 create four name-value pairs that serve as
parameters for the applet. Each pair is an element of an associative
array. The name is the index to the array. The order of name-value
pairs is irrelevant. In fact, the order might change when you
reopen the Params Property Builder.
|
LiveConnect sometimes fails in Navigator 3.0 after resizing the browser window. To prevent errors, reload the current form after you resize the browser window.
|
Now that you've had some fun with Tumbling Duke, it is time to
get down to some more practical business. In this section, you
will use the JavaSoft Spreadsheet applet as a grid for the shopping
cart application's Invoice table. Although the spreadsheet applet
is not the ideal database grid, it does show you how to integrate
server-side data with an applet.
Before you embark on creating a JavaScript form for the applet,
visit the JavaSoft site and experiment with the example found
there. Here is the complete URL for the JavaSoft example:
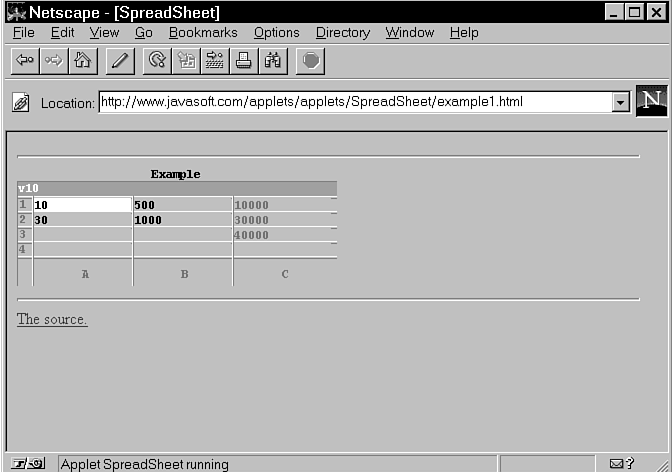
http://www.javasoft.com/applets/applets/SpreadSheet/example1.html
Try selecting the various cells. When you select a cell, the contents
are displayed just below the grid caption. The JavaSoft example
includes value cells and formula cells. The letter v
is prefixed to each value cell. You can modify any value cell
using numeric keys and the backspace. Pressing Enter commits the
change and updates any related formulas. If you change the value
in cell A1 from v10 to v15, the formula
in cell C1 reflects the change. If you select a formula
cell, the applet shows an f prefix. Figure 18.7 shows
the initial values in the spreadsheet example.
Figure 18.7 : Running the JavaSoft spreadsheet example.
Although it is not shown in the example, the spreadsheet applet
also supports an l cell prefix for labels and a u
prefix for URL values. This is revealed by examining the setUnparsedValue()
method in the applet source file. You can take advantage of the
value, formula, and label cells to create a grid that displays
information from the Invoice table and calculates the total cost
for each line item.
|
Do not try to use the arrow keys to navigate around the spreadsheet. The applet interprets arrow keys as high ASCII values.
|
Before creating the Grid form, make sure the Lineitem table has
several valid rows for invoice number 1. Vary the quantity amounts
and make sure that each ISBN relates to a row in the Title table.
See Day 8, "Designing the Shopping Cart Application,"
for more information about the table structures used in the shopping
cart application. The following four rows provide an example of
valid line item data.
Row#     INVOICE    ISBN              QTY

   1           1    0-7897-0591-5       2

   2           1    1-57521-103-3       1

   3           1    1-57521-104-1       4

   4           1    0-672-30877-0       1
The Grid form consists of two related queries-a Java applet and
a server-side event for loading the data into the grid. This form
works equally well in Netscape Navigator and Internet Explorer.
The following steps guide you through the creating of the Grid
form:
- Open the Form Designer to create a new form called grid.jfm.
_sys.forms.design("grid.jfm")
- Drag the Lineitem and Title tables from the IntraBuilder Explorer
onto the Form Designer.
| TIP |
You can make your forms more portable by removing the full path from the sql property. If the tables reside in the same folder as the form file, no path information is required by the database engine.
|
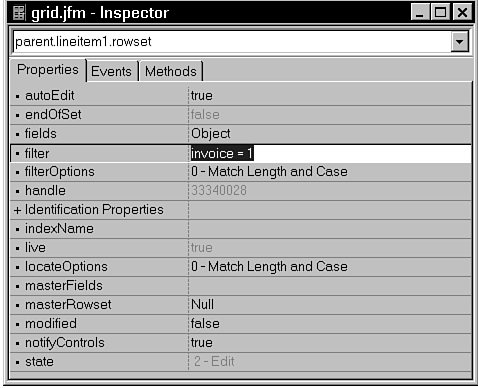
- Limit the lineitem1 rowset to only the first invoice.
Inspect the form.lineitem1.rowset. Locate the filter
property and enter invoice = 1, as shown in Figure 18.8.
Figure 18.8 : Filtering line items for the first invoice.
- Relate the Title query to the Lineitem query.
Inspect form.title1.rowset. Use the masterRowset
property drop-down list to select lineitem1. After setting
the masterRowset, you can use the masterFields
drop-down list to select ISBN as the linking field. Setting
the linking field also sets the indexName property.
- Add a Java applet and set the position and name properties,
as shown in Table 18.4.
Table 18.4. Name and location properties for javaGrid.
| Property | Value
|
| name | javaGrid
|
| height | 12
|
| left | 0 |
| top | 1 |
| width | 70
|
- Identify the Java class and location through the code
and codeBase properties. Use the values shown in Table
18.5 to point to the JavaSoft Web site.
Table 18.5. Source properties for javaDuke.
| Property | Value
|
| code | SpreadSheet.class
|
| codeBase | http://java.sun.com/applets/applets/SpreadSheet/
|
- Use the Inspector tool button to create and link a method
to the Java applet's onServerLoad event. Enter the method
as shown in Listing 18.4. After completing the method, save the
form, close the designer, and try it through a browser.
Listing 18.4. The javaGrid_onServerLoad()
method.
 1: function javaGrid_onServerLoad()

 2: {

 3:    var i         = 2,

 4:        lineRow   = this.form.lineitem1.rowset,

 5:        titleRow  = this.form.title1.rowset ;

 6:    this.params["title"] = "Line items" ;

 7:    this.params["columns"] = "5" ;

 8:    this.params["rows"]  = "" + ( lineRow.count() + 1 ) ;

 9:    this.params["a1"] = "lISBN" ;

10:    this.params["b1"] = "lQty" ;

11:    this.params["c1"] = "lTitle" ;

12:    this.params["d1"] = "lPrice" ;

13:    this.params["e1"] = "lTotal" ;

14:    lineRow.first() ;

15:    while (! lineRow.endOfSet ) {

16:       this.params["a" + i] = "l" + lineRow.fields["ISBN"].value ;

17:       this.params["b" + i] = "v" + lineRow.fields["QTY"].value ;

18:       this.params["c" + i] = "l" + titleRow.fields["TITLE"].value ;

19:       this.params["d" + i] = "v" + titleRow.fields["PRICE"].value ;

20:       this.params["e" + i] = "fB" + i + "*D" + i ;

21:       i++ ;

22:       lineRow.next() ;

23:    }

24: }
The purpose of the javaGrid_onServerLoad() method is to create name-value pairs that correspond to the Lineitem table. In the Duke form, all the name-value pairs were known in advance and
could be created as literal strings in the Params Property Builder. To populate the grid, you determine the name-value pairs at runtime. The onServerLoad event lets you do this.
On lines 3 through 5, the method defines the local variables.
The first variable, i, is used to point to the current
grid row. The grid coordinates are 1-based, and the first row
is used for column headings. The second row of the grid will be
the first to contain line item values. The other two variables
are shortcut references for the query rowsets.
The next three statements set the grid caption and size. The grid
caption is set through the title parameter on line 6.
The number of columns is always 5 for the ISBN, Qty, Title, Price,
and Total columns. Line 8 sets the number for rows to the current
number in the lineitem1 rowset plus one for the column
headings.
Lines 9 through 13 create column headings in row 1. The l
prefix allows for literal character expressions. When the grid
displays, the l is not visible in the cells.
The while loop on lines 15 through 23 populates the cells
with values, labels, and formulas. Labels are used for the ISBN
and Title character fields. To use the Qty and Price fields in
a formula, they must be identified with the value prefix. Line
20 creates a formula for multiplying the Qty and Price columns.
If you run the Grid form through a browser, you can modify the
Qty and Price fields and see the Total column automatically refresh.
Figure 18.9 shows how the layout of the Grid resembles the Cart
form of the shopping cart application.
Figure 18.9 : Viewing line items in the spreadsheet control.
The complete source for the Grid form is shown in Listing 18.5.
Refer to this listing if your form is not acting as expected.
The listing shows the queries with the full paths removed from
the SQL statements.
Listing 18.5. The grid.jfm
JavaScript form file.
 1: // {End Header} Do not remove this comment//

 2: // Generated on 01/02/97

 3: //

 4: var f = new gridForm();

 5: f.open();

 6: class gridForm extends Form {

 7:    with (this.lineitem1 = new Query()){

 8:       sql = 'SELECT * FROM "lineitem.DBF"';

 9:       active = true;

10:    }

11:

12:    with (this.lineitem1.rowset) {

13:       filter = "invoice = 1";

14:    }

15:

16:    with (this.title1 = new Query()){

17:       left = 4;

18:       sql = 'SELECT * FROM "title.DBF"';

19:       active = true;

20:    }

21:

22:    with (this.title1.rowset) {

23:       indexName = "ISBN";

24:       masterRowset = parent.parent.lineitem1.rowset;

25:       masterFields = "ISBN";

26:    }

27:

28:    with (this.javaGrid = new JavaApplet(this)){

29:       onServerLoad = class::javaGrid_onServerLoad;

30:       height = 12;

31:       top = 0;

32:       width = 70;

33:       code = "SpreadSheet.class";

34:       codeBase = "http://java.sun.com/applets/applets/SpreadSheet/";

35:    }

36:

37:   this.rowset = this.lineitem1.rowset;

38:

39:   function javaGrid_onServerLoad()

40:   {

41:      var i         = 2,

42:          lineRow   = this.form.lineitem1.rowset,

43:          titleRow  = this.form.title1.rowset ;

44:      this.params["title"] = "Line items" ;

45:      this.params["columns"] = "5" ;

46:      this.params["rows"]  = "" + ( lineRow.count() + 1 ) ;

47:      this.params["a1"] = "lISBN" ;

48:      this.params["b1"] = "lQty" ;

49:      this.params["c1"] = "lTitle" ;

50:      this.params["d1"] = "lPrice" ;

51:      this.params["e1"] = "lTotal" ;

52:      lineRow.first() ;

53:      while (! lineRow.endOfSet ) {

54:         this.params["a" + i] = "l" + lineRow.fields["ISBN"].value;

55:         this.params["b" + i] = "v" + lineRow.fields["QTY"].value;

56:         this.params["c" + i] = "l" + titleRow.fields["TITLE"].value;

57:         this.params["d" + i] = "v" + titleRow.fields["PRICE"].value;

58:         this.params["e" + i] = "fB" + i + "*D" + i ;

59:         i++ ;

60:         lineRow.next() ;

61:      }

62:   }

63:

64: }
Two main tasks are occurring in the Grid form. The first is setting up the related queries, and the second is creating the name-value pairs. The analysis of Listing 18.4 already covered the second task
that takes place in the javaGrid_onServerLoad() method. The query relations are set through the masterRowset and masterFields properties on lines 24 and 25. This technique of relating tables applies only to native dBASE and
Paradox tables. If you are working with SQL Server, you need to use the masterSource property instead.
The masterSource property lets you relate queries without
specifying an explicit index setting. This is critical when using
SQL-Link drivers that do not allow setting an explicit index on
a result set. You could replace lines 7 through 26 and achieve
the same effect with the following. These lines also work with
tables on remote servers such as Oracle or Microsoft SQL Server.
with (this.lineitem1 = new Query()){

   sql = 'SELECT * FROM lineitem WHERE invoice = 1';

   active = true;

}


with (this.title1 = new Query()){

   left = 4;

   sql = 'SELECT * FROM title WHERE ISBN=:ISBN';

   masterSource = parent.lineitem1.rowset;

   active = true;

}
| NOTE |
The masterSource property is not available in release 1.0. If you have release 1.0, install the 1.01 Trial edition to receive a free update.
|
ActiveX is a conglomeration of technologies that Microsoft is
using to create a tight integration between the Web applications
and Windows. The core of the ActiveX architecture comes from the
Microsoft OLE technologies. OLE started life as a way to embed
Excel data into a Word document. It was later expanded to include
OLE automation and replace Visual Basic VBX controls with OCX
controls. The OCX controls were then further morphed to work with
Internet Explorer. At this point, the OCX controls were christened
ActiveX controls.
More recently the ActiveX moniker was placed on services of the
Internet Information Server. These services execute server-side
VBScript in much the same way that Netscape LiveWire can execute
server-side JavaScript.
|
OLE automation allows the scripting language of one application to control another application. For example, OLE automation lets a Word Basic script control Excel. OLE automation is available to IntraBuilder JavaScripts through the
OleAutoClient class.
|
Although ActiveX controls are not nearly as platform-independent,
secure, or elegant in design as Java, they do have some distinct
advantages. Because they are not required to be platform-independent,
ActiveX controls can take direct advantage of any Windows components.
This allows them to easily work with native controls that might
not be available on other platforms. ActiveX controls can be created
through many languages including C++, J++, and Visual Basic. J++
is Java with some extensions specifically geared toward ActiveX.
Because you can use C++ to create ActiveX controls, there are
no security layers that prevent direct memory allocation or low-level
calls. It is very difficult to create a virus with Java, but it
is simple with an ActiveX control. An advantage is that a well-written
ActiveX control can almost always outperform the Java counterpart.
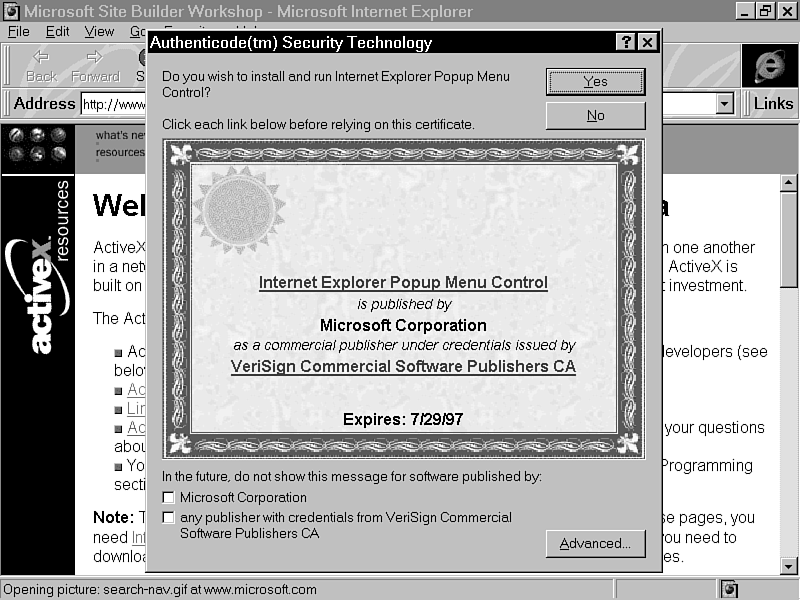
The ActiveX security scheme is more a matter of trust than a technical
solution. When you download a new ActiveX control, Internet Explorer
asks you if you trust the person or company from which you are
downloading the control. Independent credential verification companies
such as VeriSign ensure that a control provider has a valid address
and phone number. Figure 18.10 shows the confirmation dialog that
appears when downloading the ActiveX popup control from Microsoft.
Figure 18.10 : The ActiveX security scheme in action.
Perhaps the biggest advantage of ActiveX over Java is that Microsoft
is committing a tremendous amount of talent and resources to establish
ActiveX. Microsoft is by far the most influential software company
in the world today, and its push toward ActiveX is almost guaranteed
to make it a ubiquitous standard.
To see what ActiveX controls can do, visit the Microsoft ActiveX
resource area. This page is the ActiveX equivalent of the JavaSoft
site and Gamelan combined into one. Here you will find a wealth
of information on ActiveX, some great free downloads, and links
for ActiveX developers. The complete URL for the ActiveX resource
area is
http://www.microsoft.com/activex/
| TIP |
You can use the ActiveX Web site shortcut file that comes with IntraBuilder to quickly locate the ActiveX resource center. The ActiveX URL file is located in the IntraBuilder samples folder. The IntraBuilder Explorer shows URL files in the Custom tab. You
can also drag this file to your desktop for more convenience.
|
The example in the section uses the Popup Menu control. To see
how the control works, locate it in the ActiveX gallery. From
there you can download the control and run a page that contains
the control. Figure 18.11 shows the Microsoft Web site with the
ActiveX popup control.
Figure 18.11 : Running the ActiveX popup control from the Microsoft Web site.
After trying out the popup menu, locate and download the ActiveX
Control Pad. This utility shows all the ActiveX controls registered
on your system. It also shows the properties associated with each
ActiveX control. This utility makes ActiveX controls easier to
work with than Java applets. You do not need any extra documentation
or source code to determine the valid values for each property.
See what properties are available for the popup menu. Open the
ActiveX Control Pad and select Edit|Insert. This displays a list
of all the ActiveX controls registered on your machine. Select
Microsoft IE30 Popup Menu Control. This opens a Properties window,
as shown in Figure 18.12. Each property represents a name-value
pair for the params array.
Figure 18.12 : Exploring the properties of an ActiveX control.
You can also use the ActiveX Control Pad to find the CLSID for
a control. The CLSID is a GUID that represents the control in
the registry. You need the CLSID when defining the ActiveX control
in the IntraBuilder Form Designer. The CLSID for the popup menu
is 7823A620-9DD9-11CF-A662-00AA00C066D2.
|
A GUID is a global unique identifier. All OLE and ActiveX controls have a unique GUID. The GUID is used in place of a control name to prevent problems that might occur when two developers create controls with the same name.
|
The only name-value pair you will need to use is the Menuitem
property. This property represents the text of each menu item.
The property takes an array and cannot be set through the Property
window of the ActiveX Control Pad.
| NOTE |
You can quickly add standard ActiveX controls through the ActiveX custom component library. You can add this set of components to your control palette through the Set Up Custom Components dialog. The library is called activex.cc and can be found
in the following folder:
C:\Program Files\Borland\IntraBuilder\Custom
|
The Popup form opens from a button, much like the example shown
in the ActiveX gallery. The popup presents options for changing
the color of the current page to a color of the U.S. flag. The
red, white, and blue options fire server-side events to change
the color. The last option, yellow fringe, fires a client-side
event to say that the option is not implemented.
This form demonstrates passing values from an ActiveX control
to the IntraBuilder Server. It also shows how to incorporate a
hidden control and VBScript into a JavaScript form. The form consists
of four controls: a pushbutton, an ActiveX popup menu, an HTML
control, and a hidden control. The button fires a client-side
VBScript command that opens the popup. The HTML control contains
the actual VBScript and tags linking it to the button. The ActiveX
is the popup with a set of name-value pairs for defining the menu
items. The hidden control contains a value corresponding to the
menu selection and is accessible from both client and server events.
|
This example requires Internet Explorer. It will not run correctly in Netscape Navigator. Although you can add ActiveX support to Navigator using a plug-in, the plug-in does not add support for the VBScript shown here.
|
The following steps guide you through the first incarnation of
the Popup form. Here, you make sure that you can open the popup
from the button. Later, you will add the color changing server-side
method.
- Open the Form Designer to create a new form called popup.
_sys.forms.design("popup.jfm") ;
- Add a button and set the properties, as shown in Table 18.6.
Do not directly link any events to the button.
Table 18.6. Properties for the pushbutton.
| Property | Value
|
| name | pushbutton
|
| text | colors
|
| left | 0 |
| top | 0 |
| width | 10
|
- Add an HTML control below the pushbutton. You can leave the
text property as a default. Fill out the other properties, as
listed in Table 18.7.
Table 18.7. Properties for the vbscript
HTML control.
| Property | Value
|
| name | vbscript
|
| height | 1
|
| left | 0 |
| top | 3 |
| width | 60
|
- Add an ActiveX control below the vbscript HTML control.
Unlike most ActiveX controls, the position of this control doesn't
really matter. The client-side script that opens the popup determines
where it appears. Name the new control popColors and
set the classId property to the following:
CLSID:7823A620-9DD9-11CF-A662-00AA00C066D2
You must include the CLSID prefix in the classId
property. Remember that the CLSID is obtainable from
the ActiveX Script Pad.
- Open the Params Property Builder and enter the four array
elements shown in Table 18.8. Defining name-value pairs for an
ActiveX control is identical to defining name-value pairs for
a Java applet. Figure 18.13 shows the four menu items in the Params
Property Builder.
Figure 18.13 : Entering name-value pairs for the popup control.
Table 18.8. Name-value pairs for the popup control.
| Name | Value |
| Menuitem[0] | Red
|
| Menuitem[1] | White
|
| Menuitem[2] | Blue
|
| Menuitem[3] | Yellow Fringe
|
- Inspect the HTML control, and create and link a new method
for the onServerLoad event. Enter the method shown in
Listing 18.6. When you're done, save the form and try it out in
Internet Explorer.
Listing 18.6. The vbscript_onServerLoad()
method.
 1: function vbscript_onServerLoad()

 2: {

 3:    if (((new NetInfo()).userAgent).indexOf("MSIE") > -1) {

 4:       this.text =

 5:       '<script for="pushbutton" event="onClick" language="VBScript">'+

 6:       '   popColors.popup 10,60' +

 7:       '</script>' ;

 8:    }

 9:    else {

10:       this.text = "<H1>This form requires Internet Explorer.</H1>";

11:    }

12: }
This method checks to see whether the current browser is Internet Explorer. Line 3 looks for the string "MSIE" in the userAgent property of a NetInfo object. Notice
that the NetInfo object is never assigned to a variable. If the current browser is Internet Explorer, lines 4 through 7 define a block of VBScript. Any other browser causes the HTML control to act as a message line.
Line 5 associates the following VBScript commands with the onClick
event of a control called pushbutton. Notice the language
parameter that sets the language to VBScript. The default scripting
language for Internet Explorer is JavaScript.
The VBScript command appears on line 6. This is a method call
with two parameters. In VBScript, parameters are passed to the
method without enclosing them in parentheses. The popup()
method of the ActiveX popup control causes the popup to open.
In JavaScript, the statement would be
popColors.popup(10,60)
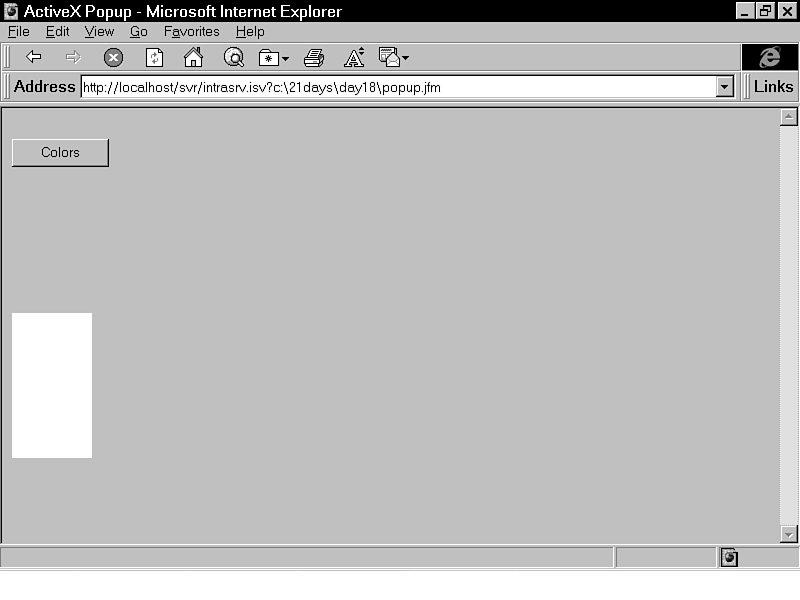
If you run the form now, the popup opens correctly but a white
box appears where the ActiveX is defined. Figure 18.14 shows the
box under the button. If you select any of the menu items, the
form is submitted to the server.
Figure 18.14 : Viewing the ActiveX definition area in the Internet Explorer.
The last task of the day is to pass the menu selection back to
the server so that it can take the appropriate course of action.
To do this, you add two methods and a hidden control to the form.
The first method is a client-side JavaScript method that is linked
by name to the popup onClick event. The second method
is linked to the onServerSubmit event and handles changing
the form color. Here are the steps to complete the Popup form:
- Open the Popup form in the Form Designer.
- Add a hidden control onto the form. Change the name of the
control to hiddenColor. It does not matter where you
place the hidden control.
- Change the form.title property to ActiveX Popup.
- Create and link a new method to the form.onServerSubmit
event. Use the following code to complete the method. This method
changes the form color based on the menu selection. See the analysis
following Listing 18.7 for more information on this method.
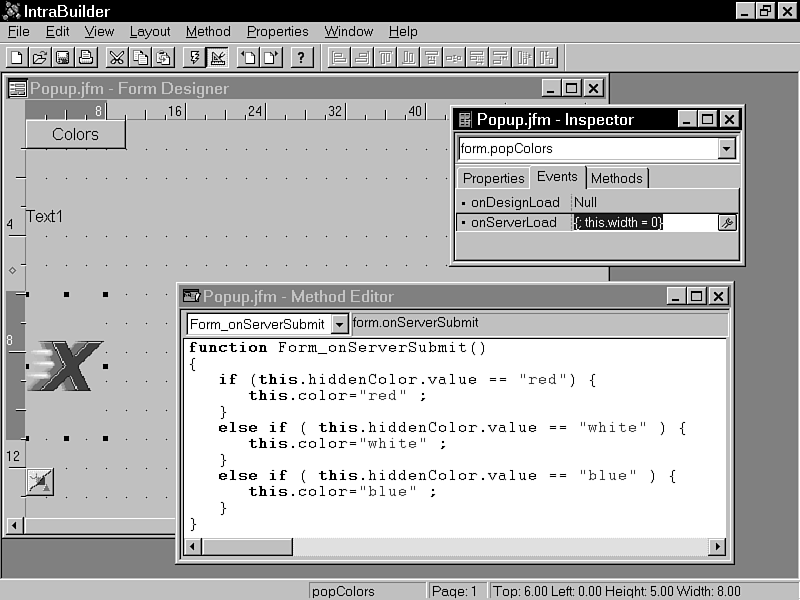
function Form_onServerSubmit()
{
if (this.hiddenColor.value == "red") {
this.color="red" ;
}
else if ( this.hiddenColor.value == "white" ) {
this.color="white" ;
}
else if ( this.hiddenColor.value == "blue" ) {
this.color="blue" ;
}
}
- Inspect the ActiveX control and add the following code block
to the onServerLoad event. This code block prevents the
white box from appearing in the browser.
{ ; this.width = 0 }
At this point, your form should resemble the one shown in
Figure 18.15. Keep in mind that the onServerLoad event
does not fire when opening the designer. The Form Designer continues
to display the ActiveX area for easy selection.
Figure 18.15 : Redesigning the Popup form.
- From the menu, select Method|New Method to create a method
that is not linked to any event. Rename the new method popColors_Click().
Add an nPopItem parameter and complete the method as
shown on lines 69 through 87 in Listing 18.7. When you are done,
save the form and try running it through Internet Explorer.
Listing 18.7. The popup.jfm
JavaScript form file.
 1: // {End Header} Do not remove this comment//

 2: // Generated on 01/02/97

 3: //

 4: var f = new popupForm();

 5: f.open();

 6: class popupForm extends Form {

 7:    with (this) {

 8:       onServerSubmit = class::Form_onServerSubmit;

 9:       title = "ActiveX Popup";

10:    }

11:

12:    with (this.pushbutton = new Button(this)){

13:       width = 10;

14:       text = "Colors";

15:    }

16:

17:    with (this.vbscript = new HTML(this)){

18:       onServerLoad = class::vbscript_onServerLoad;

19:       height = 1;

20:       top = 3;

21:       width = 60;

22:       color = "black";

23:       text = "Text1";

24:    }

25:

26:    with (this.popColors = new ActiveX(this)){

27:       onServerLoad = {; this.width = 0};

28:       height = 5;

29:       top = 6;

30:       width = 8;

31:       classId = "CLSID:7823A620-9DD9-11CF-A662-00AA00C066D2";

32:       params["Menuitem[1]"] = "White";

33:       params["Menuitem[0]"] = "Red";

34:       params["Menuitem[3]"] = "Yellow Fringe";

35:       params["Menuitem[2]"] = "Blue";

36:    }

37:

38:    with (this.hiddenColor = new Hidden(this)){

39:       top = 12;

40:       value = "";

41:    }

42:

43:    function vbscript_onServerLoad()

44:    {

45:       if (((new NetInfo()).userAgent).indexOf("MSIE") > -1) {

46:          this.text =

47:         '<script for="pushbutton" event="onClick" language="VBScript">'+

48:         '   popColors.popup 10,60' +

49:         '</script>' ;

50:       }

51:       else {

52:          this.text = "<H1>This form requires Internet Explorer.</H1>";

53:       }

54:    }

55:

56:    function Form_onServerSubmit()

57:    {

58:       if (this.hiddenColor.value == "red") {

59:          this.color="red" ;

60:       }

61:       else if ( this.hiddenColor.value == "white" ) {

62:          this.color="white" ;

63:       }

64:       else if ( this.hiddenColor.value == "blue" ) {

65:          this.color="blue" ;

66:       }

67:    }

68:

69:    function popColors_Click(nPopItem)

70:    {

71: // {Export} This comment causes this function body to be sent to the client

72:       if ( nPopItem == 1 ) {

73:          document.forms[0].hiddenColor.value = "red" ;

74:          document.forms[0].submit() ;

75:       }

76:       else if ( nPopItem == 2 ) {

77:          document.forms[0].hiddenColor.value = "white" ;

78:          document.forms[0].submit() ;

79:       }

80:       else if ( nPopItem == 3 ) {

81:          document.forms[0].hiddenColor.value = "blue" ;

82:          document.forms[0].submit() ;

83:       }

84:       else if ( nPopItem == 4 ) {

85:          alert("Sorry, the yellow fringe is not implemented.")

86:       }

87:    }

88:

89: }
The Popup form demonstrates the integration of JavaScript, VBScript, and an ActiveX control. Like all IntraBuilder components, the form is a JavaScript class. One simple VBScript command is defined
within an HTML control. The ActiveX control is a popup menu that passes information back to the IntraBuilder Server.
Lines 26 through 36 define the ActiveX control and assign name-value
pairs to the control. Notice that the array defined in lines 32
through 35 is out of sequence. The order of the name-value pairs
is rearranged when you save the form in the Form Designer. This
order does not affect the appearance of the popup when run through
Internet Explorer.
The hidden control defined on lines 38 through 41 creates a property
that you can reference in both client-side and server-side events.
The control is not visible to the browser user. This control holds
the current color selection.
An onServerSubmit event fires when a client-side event
calls the submit() method. It does not fire when you
press a button linked to an onServerClick event. Lines
56 through 67 contain the Form_onServerSubmit() method.
This method checks the contents of the hidden variable to figure
out what color to use for the form background. It only responds
to settings of red, white, and blue. The color strings are set
in the popColors_Click() method.
The name given to the method on line 69 creates an implicit link
between the popColor control's Click event and
the popColors_Click() method. Although this style of
linking makes it difficult to reuse the same method for different
controls, it does provide for self-documenting code. IntraBuilder
does not use this implicit style of linking and requires the comment
on line 71 to export the method to the browser. For explicit links,
IntraBuilder automatically exports methods linked to client-side
events.
The ActiveX control passes the selected item number as a parameter
to the click event. As a client-side event, the popColors_Click()
event refers to the current form as document.forms[0]
rather than this.form. If the user selects Yellow Fringe
from the popup, the form is not submitted. Instead, line 85 opens
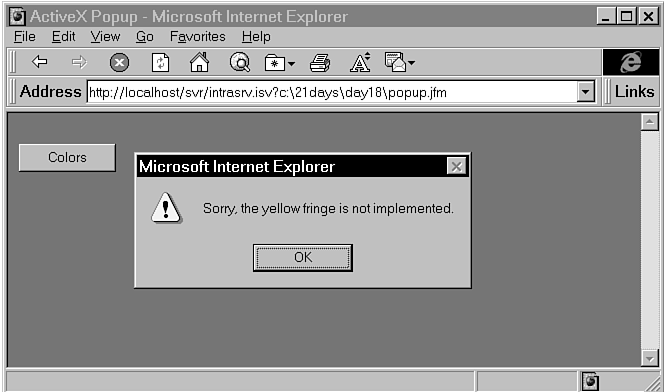
an alert to inform the user that the option is not implemented.
(See Figure 18.16.)
Figure 18.16 : The Yellow Fringe alert.
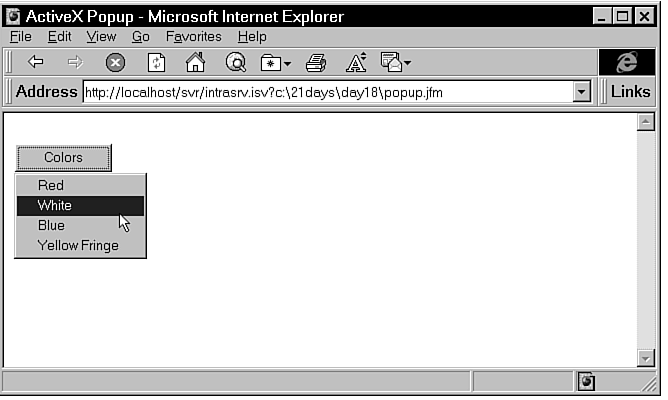
If the user selects Red, White, or Blue, popColors_Click()
sets the hiddenColor value and submits the form. This
fires the Form_onServerSubmit() method that uses the
hiddenColor value to change the form color. Figure 18.17
shows the ActiveX popup open on a form that changed from the default
silver to white.
Figure 18.17 : Selecting White from the ActiveX popup.
Today you learned how to integrate Java applets and ActiveX controls
into JavaScript forms. Along the way, you learned about the strengths
and weakness of Sun and Microsoft strategies. Both control types
let you expand the capabilities of your applications far beyond
what is possible with pure HTML.
The day began with an exploration of Java on the Web. Your first
Java-enhanced form was the Duke form. This enabled you to take
the Java mascot, Tumbling Duke, and place him in a JavaScript
form. If you were using a Netscape browser, you might have taken
advantage of LiveConnect to control the Java applet from client-side
JavaScript.
Your second Java-enhanced form was the Grid form. This demonstrated
how to integrate IntraBuilder data with a Java applet. The Grid
was based on JavaSoft simplified spreadsheet control.
By the end of the day, you moved from Sun's Java to Microsoft's
ActiveX. You learned how Microsoft is using ActiveX to leverage
OLE technology to create a tight bind between Web applications
and the Windows platform. You worked with the ActiveX popup control
and client-side VBScript to create a form that could pass popup
menu selections back to an IntraBuilder Server.
| Q: | What is JBuilder, and how can I use it with IntraBuilder?
|
| A: | JBuilder is a Java development environment that you can use to create a wide variety of Java applications. It can create complete Java database systems using JDBC, as well as small applets that you can
integrate with an IntraBuilder application.
|
| Q: | I see how to use ActiveX controls and Java applets, but what about Netscape plug-ins? How can I embed a plug-in into a JavaScript form?
|
| A: | All you need to do to embed a plug-in is create an HTML control with the appropriate <EMBED> tag. The following form works with the popular Shockwave plug-in. It runs the James Borland Shockwave
file from the IntraBuilder Web site within a JavaScript form. This form works within both Netscape Navigator and Internet Explorer.
var f = new pluginForm();
f.open();
class pluginForm extends Form {
with (this.plugin = new HTML(this)){
height = 1.24;
width = 10;
text=
'<EMBED SRC="http://www.borland.com/intrabuilder/jamesb.dcr"'+
' width=176 height=252>';
}
}
|
The Workshop section provides questions and exercises to help
you get a better feel for the material you learned today. Try
to answer the questions and at least think about the exercises
before moving on to tomorrow's lesson. You'll find the answers
to the questions in Appendix A, "Answers to Quiz Questions."
- Give two reasons why Java has quickly gained widespread industry
support.
- Which browser supports LiveConnect, and what does it do?
- When working with a Java applet, what is the difference between
the code and codeBase properties?
- What are the file extensions for Java source and compiled
files?
- What class works with the params property?
- Microsoft refers to its own implementation of JavaScript as
what?
- Download the JavaGRID and use it to create a new grid form.
Try populating the JavaGRID with the data from the Invoice table.
You can download the control from the following URL:
http://www.vincent.se/Products/JavaGRID/JavaGRID.html
- If you have a Java development environment such as JBuilder
or Visual CafŽ, try modifying the JavaSoft spreadsheet class.
If you examine the SpreadSheet.java file, you see that
the cellWidth is set to 100 and cannot be overwritten
by a parameter. This fixed width is too small to display the Title
field from the Titles table. Modify the init() method
to accept cellWidth as a parameter and adjust the Grid
form to use your new Java class.


