An aggregate is a summary field-a subtotal or other summation of your data. If you total, count, or otherwise summarize a field on a report, you aggregate it. |
by Ken Henderson
Today you'll explore the details of building reports with IntraBuilder. As we did with forms, we'll approach report building from two different directions. First you'll learn to build reports the "easy" way, using the Report Expert. Then, you'll learn to construct them from scratch, using the Report Designer. Learning to use both methods should provide you with valuable experience in the details of IntraBuilder report design. The approach you take when building real-world reports will vary based on your needs.
Today's tasks consist of
If you haven't already done so, start IntraBuilder now and click the Reports tab in the IntraBuilder Explorer. After the Reports page is visible, click the New button on the IntraBuilder toolbar and select Report from the shortcut menu. You'll then be asked whether to create the new report using the Report Designer or the Report Expert. Click the Expert button to begin the seven-step process of building a new report using the Report Expert.
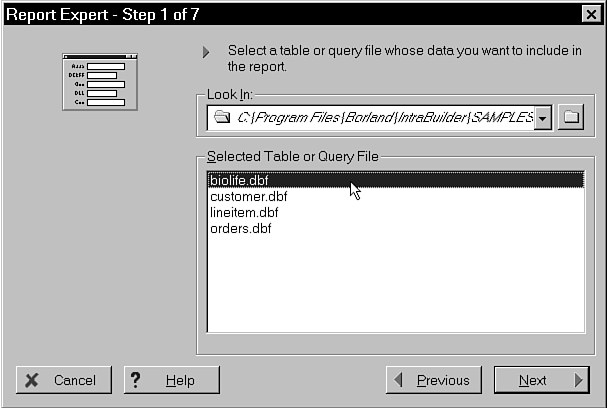
As illustrated by Figure 5.1, the first order of business is to select a table or query for your new report. This can be a table, SQL script, or query generated by Query Builder. You can tell the Expert where to locate these objects by selecting a directory folder in the Look In drop-down list. For our purposes, make sure that the Look In list points to the SAMPLES directory under your main IntraBuilder directory and double-click the BIOLIFE.DBF table to select it.
Figure 5.1 : Begin a report by adding a table or query.
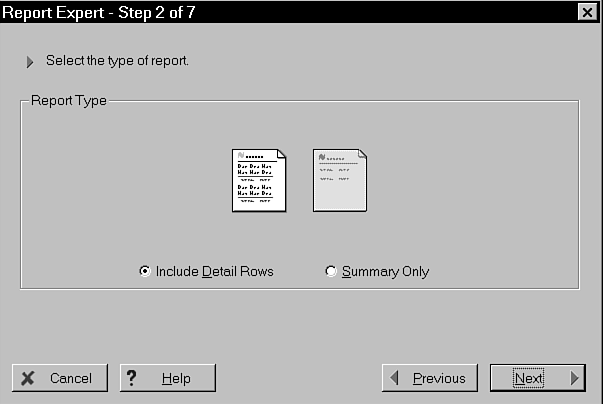
After you've selected a table or query, you're ready to choose which type of report you'd like to build. You have two choices. You can build a report that includes detail-level information or one that includes summary information only. Click Next to accept the default and include detail rows on the report. Figure 5.2 shows the second step of the Report Expert.
Figure 5.2 : You can create either detail-level or summary reports.
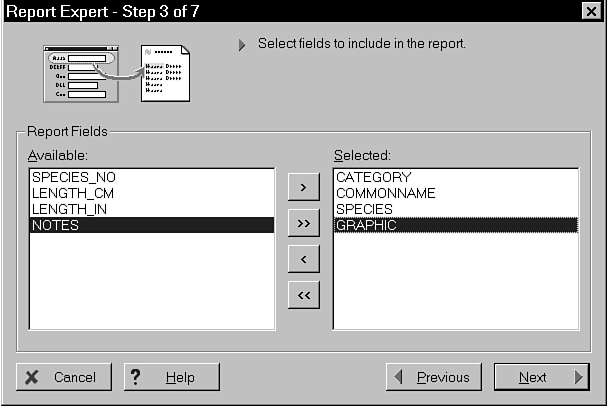
Now that you've specified both your base table and what type of report to create, you're ready to choose the fields you want to include on the report. Step 3 presents a dialog box in which you can select which fields you want on the new report. Select the CATEGORY, COMMONNAME, SPECIES, and GRAPHIC fields. Figure 5.3 shows the Report Expert's Step 3 dialog.
Figure 5.3 : You can specify which fields to include on the report.
| TIP |
You can double-click a field to move it from the Available to the Selected list or vice versa. |
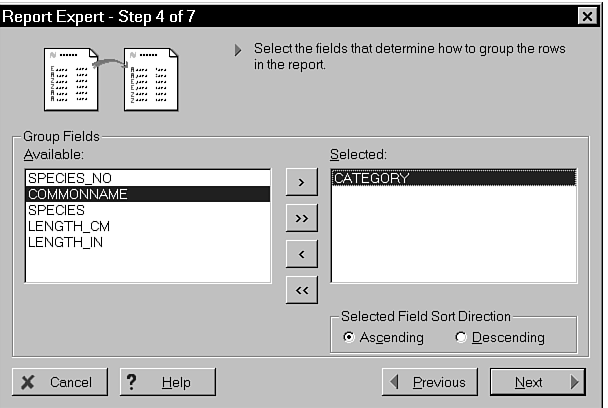
After you've identified the fields that are to appear on the report, you're ready to select the report's grouping fields. Click Next to proceed to Step 4.
The dialog box presented in Step 4 is very similar to the one shown in Step 3. A list of fields is displayed, from which you can select grouping fields for the report. Selecting a field for grouping causes the report to be sorted on the field. First and foremost, this means that the rows displayed on the report will be ordered using its grouping fields. In addition, you can link the report's subtotals to specific grouping fields so that they return totals based on them. For example, suppose you have a CUSTOMER table that you want to list in a report. You might group the report by its State field. Your customer list would then be ordered alphabetically by state, and subtotals and summary fields could be rendered for each state.
Notice that BIOLIFE's GRAPHIC field is missing from the list. This is due to the fact that it's very difficult to derive a value for BLOB data types such as graphics and free-form text. This makes them unsuitable for grouping and summarization on reports. Note, however, that this limitation doesn't prevent you from including BLOB fields in report detail.
Double-click the CATEGORY field now to select it as a grouping, as illustrated by Figure 5.4. After you've done this, click the Next button.
Figure 5.4 : Selecting a field for a group band.
| NOTE |
Notice that you can choose to order each grouping in either ascending or descending order. To specify the ordering for a particular grouping, click it in the Selected list and click the Ascending or Descending radio button in the lower-right of the dialog. Each grouping can have its own ordering designation, so feel free to order each group individually. |
Beyond merely ordering the report, you can use groups to summarize
and aggregate your report's detail data. The Report Expert's Step
5 is where you do this.
An aggregate is a summary field-a subtotal or other summation of your data. If you total, count, or otherwise summarize a field on a report, you aggregate it. |
You need to do three things to set up a summary field:
| NOTE |
The aggregate operations available to you vary based on the type of field you're summarizing. For non-numeric data, you're limited to calculating the minimum or maximum value in a set or to simply counting them. For numeric data, you can also total the values in a set of values or determine its variance or standard deviation. |
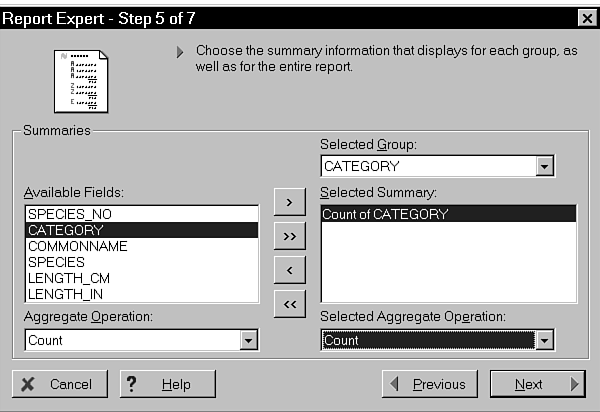
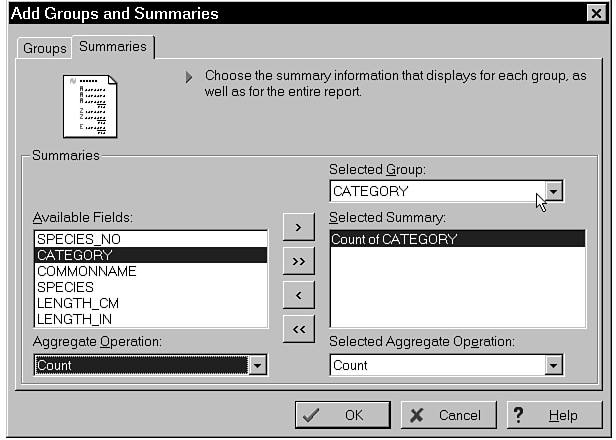
Click the CATEGORY field (if it isn't already selected) and select the Count operation in the Aggregate Operation drop-down list. Next, ensure that the CATEGORY field is selected in the Selected Group list and click the right arrow (>) to add your summary definition to the Select Summary list. Figure 5.5 shows what the completed dialog box should look like.
Figure 5.5 : You create report summary fields in Step 5 of the Report Expert.
After you've defined the Count of the CATEGORY summary field, click Next to continue.
Though the Report Expert consists of seven steps, Step 6 is actually the last one where you configure what the report will look like. Step 7 is reserved for deciding whether to run the report or load it in the Report Designer; you don't actually make any changes to the report.
In Step 6, you specify a number of details regarding the final appearance of the report. For example, you can decide whether to include the current date and the page number on the report. You can specify whether to arrange the report in a tabular or columnar fashion. You also can specify a report title, and you can decide whether to print one row per page or print them one after another in a continuous fashion. All these details dramatically affect the report definition you end up with, so it's important to understand what they do.
The best way to understand the impact of the various settings is to try them out. Let's make a few changes to the defaults presented in the Step 6 dialog. The first thing you'll change is the report's title. The default title should be Biolife. Convert it to uppercase by changing it to BIOLIFE. Next, change the report from its default tabular layout to the columnar layout. Figure 5.6 shows the dialog box for the sixth step.
Figure 5.6 : You can specify a number of report attributes in Step 6 of the Report Expert.
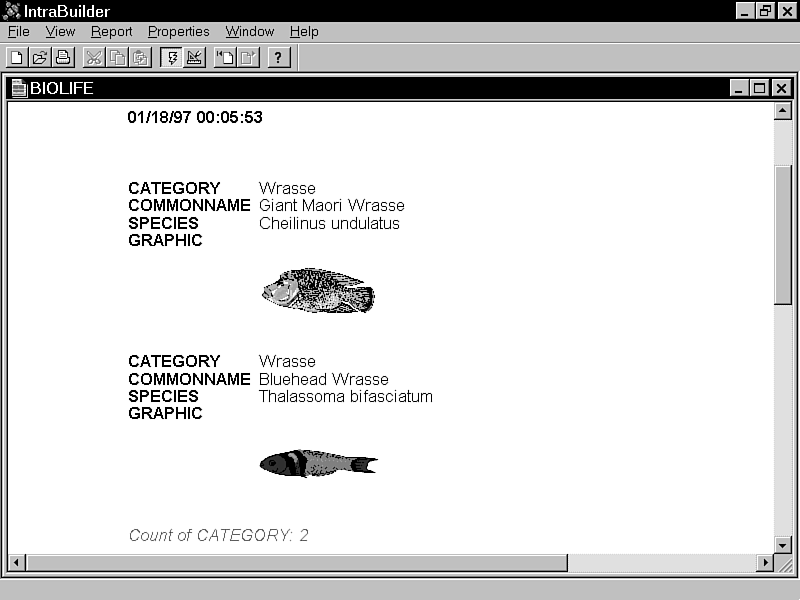
After you've completed Step 6, click Next to proceed to Step 7 and click the Run Report button to run your new report. As with the Form Expert, you'll be asked to supply a name for the new report before it's executed so that it can be saved to disk. Name the report BIOLIFE and click Save. Figure 5.7 shows what your new report will look like.
Figure 5.7 : The Report Expert allows you to build complete reports with minimal effort.
After the report is on-screen, you can use the page buttons on the IntraBuilder toolbar to move around in the report. You can either move forward to the next page or backward to the first page of the report. Note that IntraBuilder supports moving backward only to the first page of the report; you can't, for example, move backward from page three to page two.
If you want to print the report, click Print on the IntraBuilder toolbar. You can print just the current page or opt to print all pages. Close the report when you're done viewing it and return to the IntraBuilder Explorer.
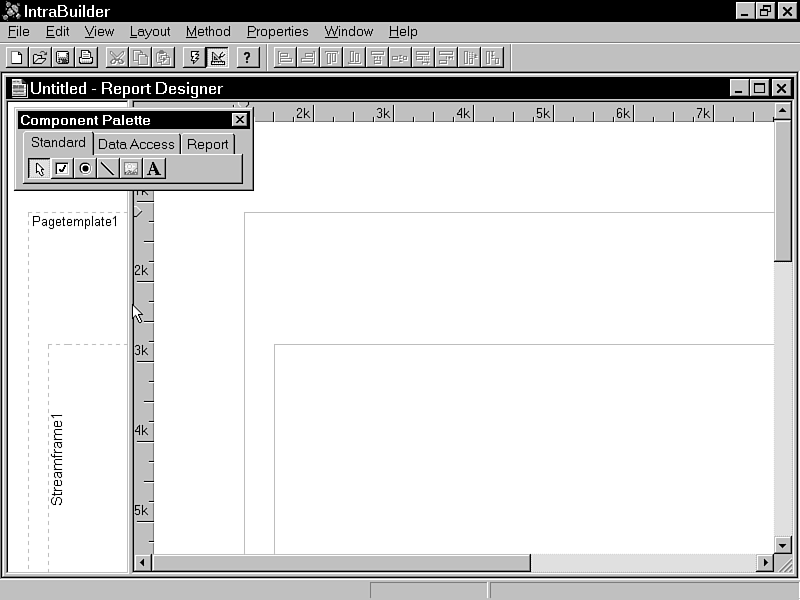
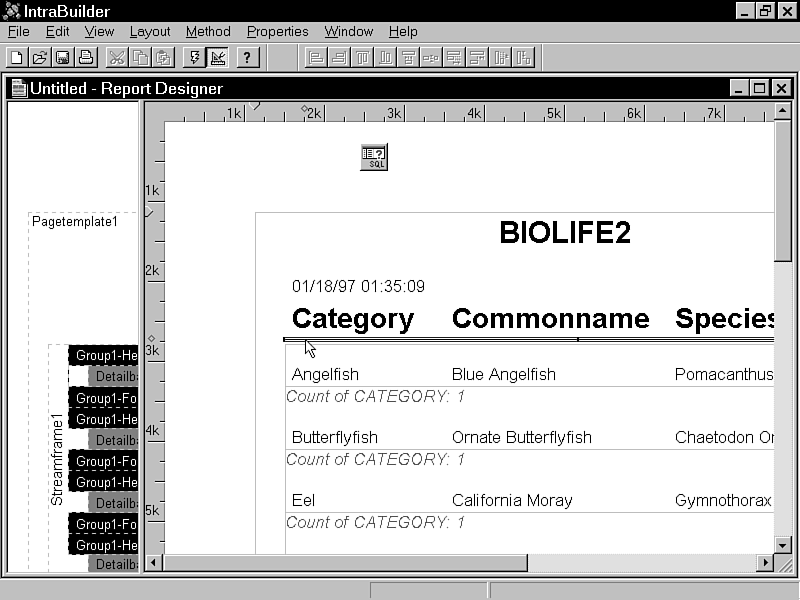
Having quickly whipped out a report using the Report Expert, you're now ready to build one from the ground up. Begin by clicking the New button on the IntraBuilder toolbar and selecting Report. This time, click the Designer button in the ensuing dialog box to start the IntraBuilder Report Designer. As illustrated by Figure 5.8, you're immediately presented with a blank report form. The blank report is visually divided into two areas-the header/footer area and the detail area. The detail area is a StreamFrame object and is the inner of the two rectangular areas that you see on the blank form. A StreamFrame object is simply a container for streams-report data-on your reports. Dropping items into the header/footer area will cause them to be printed in the report's page header or footer. Dropping them into the detail StreamFrame will cause them to be printed as part of the report's detail data.
Figure 5.8 : A blank report form showing the group pane.
| TIP |
You can get a better view of the report bands by opening the group pane. By default, this pane is closed. Open it by moving the divider from the left edge of the Report Designer. |
Begin by dropping a Query object onto the report surface. The actual location of the component is unimportant, because it won't be visible when the report is run. Next, right-click the Query component and choose the Inspector option on the shortcut menu. Select the Query's sql property and set it to
select * from 'BIOLIFE.DBF' order by CATEGORY
You need to create the report in the folder that contains the BIOLIFE table. You will not be able to activate the query if the Explorer Look In folder is not set to the Samples folder. |
Next, click the object's active property and set it to true. This will open the table and make its fields available for placement on the report. You can now close the Inspector and return to the Report Designer.
The order by CATEGORY clause lets you set up the report to be grouped by the CATEGORY field. This will cause a group break each time the CATEGORY field changes in the rowset. If the rows returned from the BIOLIFE.DBF table aren't ordered by the CATEGORY field, you'll get nonsensical group breaks and inaccurate group aggregates on your report.
If the table had an index on the CATEGORY field, you
could leave out the ORDER BY clause and set the rowset
indexName property. Setting the indexName is
faster than using an ORDER BY clause when using dBASE
and Paradox tables. The BIOLIFE table does not come with any predefined
indexes.
| NOTE |
You can also add the query by dragging the BIOLIFE table from the IntraBuilder Explorer. This will set the sql and active properties for you. If you use the drag-and-drop method, you will need to deactivate the query to edit the SQL command and add the ORDER BY clause. |
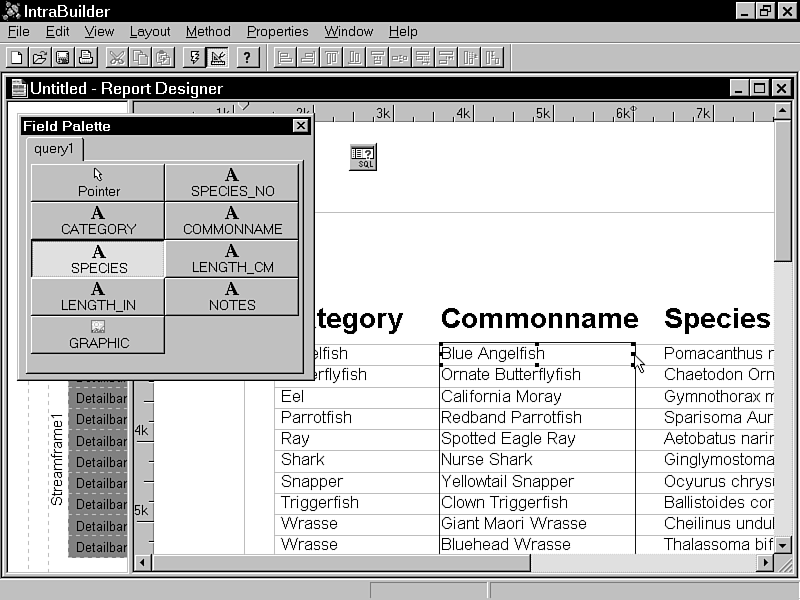
The next step is to open the Field Palette so that you can place fields on the report. Right-click the report surface and select Field Palette on the shortcut menu. You should then see a palette containing the fields in the BIOLIFE.DBF table. Drag the CATEGORY, COMMONNAME, and SPECIES fields onto the detail StreamFrame. Orient them horizontally, in a side-by-side fashion. You might want to widen the resulting Text controls to prevent the field values from wrapping. Figure 5.9 shows the result of adding three fields from the Field Palette.
Figure 5.9 : Adding fields from the Field Palette.
| NOTE |
You can move a column and its heading by moving just the column. When you do this, the column's heading will automatically move with it. If, on the other hand, you move the column's heading first, the column itself will stay put. |
You add groups to reports by using the Group object. Click the Group object now in the IntraBuilder toolbar and drop it within the page template.
You should immediately notice that dropping the Group object onto the report has had the effect of also creating a header object and a footer object, which correspond to the group. Click the HTML control that serves as the label for the header (it should contain the text Header Text for Group1) and delete the control. This will keep your group from having a label in the header, which is what you want.
Next, bring up the Inspector and select form.StreamSource1.Group1 from the drop-down list. Set the groupBy property to the CATEGORY field. As I mentioned when we first began building it, the report will be grouped by the CATEGORY field. You establish this by setting your Group object's groupBy property. When you're finished, close the Inspector.
The Layout menu also has an option for adding groups. When you
add groups through the Layout menu, IntraBuilder sets the groupBy
property for you.
| TIP |
Deleting a Group object is not as obvious as it could be. Follow these steps to delete a Group object: |
Now that you have a Group object in place, you can add an aggregate that depends on the Group. In this example, you add a count aggregate that renders a count of the rows in each group. Think of this group aggregate as a subtotal-a calculation, which corresponds directly to a particular report group.
You can add group and summary components to existing reports the same way you add them in the Report Expert. To add a summary, select Layout|Add Groups and Summaries from the menu. Select the Summaries tab and add a count of the CATEGORY fields for the CATEGORY group. Figure 5.10 shows the completed dialog. For information on how to create summaries from HTML controls, see Day 14, "Checking Out."
Figure 5.10 : Adding a group count through the Layout menu.
After you've finished the real work of building your report, you'll want to give the report a more professional appearance by adding a few items to its page heading. In this section, you'll add a report title, a control that displays the current date and time, and one that prints the current page number.
To set up your report title, follow these steps:
Figure 5.11 shows the report with a title.
Figure 5.11 : You add items, such as report titles, using the HTML control.
Next on the list is the addition of a field that lists the current date and time. Placing the date and time on your reports allows users to easily determine when the report was printed. To set up your date/time control, follow these steps:
Figure 5.12 illustrates what your new control should look like.
Figure 5.12 : You can set up basic report elements using HTML controls and CodeBlocks.
| TIP |
You can left align the date/time control with the first column title by selecting both and clicking the Left Align toolbar button. You can also use the Layout menu to align controls. |
Now that you've successfully set up the report title and date/time fields, you're ready to add the page number control to the report's page footer. To do this, follow these steps:
Figure 5.13 demonstrates what your new page number control should look like.
Now that your page number control is in place, let's add one more enhancement to the report before running it. Let's add a Rule control to the report's header to separate column headings from column data. To add the Rule control, follow these steps:
Figure 5.14 shows what your new Rule control might look like.
Figure 5.14 : You can use Rule lines to break a report into different sections.
| TIP |
When creating reports for browsers, it is a good idea to make the margins smaller and set the form.PageTemplate1.gridLineWidth to 0. The default margins work well for laser printers but are not necessary if you are only targeting a browser. The default gridLineWidth is 1. |
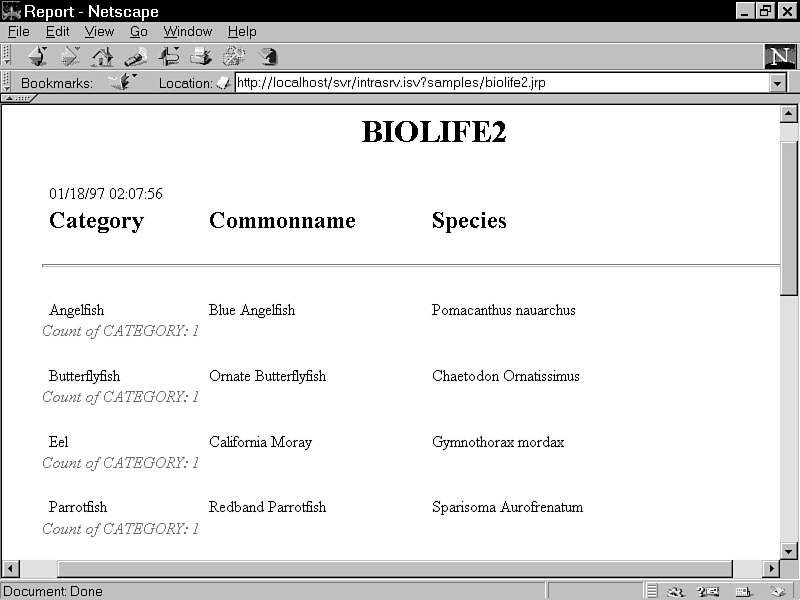
Now that you've finished setting up the report's header and footer, you're ready to test the report itself. Click Run on the IntraBuilder toolbar to execute the report. As with the Report Expert, you'll be asked to save the report before it runs. Name the report BIOLIFE2 and click Save. Figure 5.15 shows what the finished product looks like after setting the page template margins to 520 and the gridLineWidth to 0.
Figure 5.15 : The BIOLIFE2 report running in Netscape Communicator.
| NOTE |
When running a report in the IntraBuilder Designer, you can select the Save Snapshot as Static HTML option from the shortcut menu. This lets you create an HTML file that you can publish on Web servers that are not running IntraBuilder Server. |
You've now learned to create detailed reports using two different approaches. You've quickly cranked out a report using the Report Expert, and you've created one from scratch using the Report Designer. Now that you know how to put together detailed reports, let's build a summary report just for completeness.
Click New on the IntraBuilder toolbar and select Report from the shortcut menu. We'll begin by creating the report using the Report Expert, and then customize it later in the Report Designer. Click Expert to proceed.
To begin, you'll be asked what table or query to reference in the report's Query object. Double-click the BIOLIFE.DBF table to proceed to Step 2 of the Report Expert.
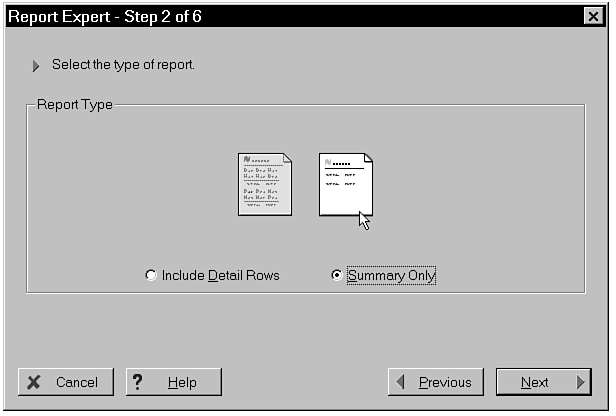
Next, you're asked to select what type of report to build. Click the Summary Only radio button and click Next to proceed to Step 3. As with other Expert dialogs, you can select options by clicking the images as well as the radio buttons. Figure 5.16 shows the second step dialog box.
Figure 5.16 : Click Summary Only to build a summary report.
Because this is a summary report, you won't be asked which fields to include on the report, as you were the first time you went through the Report Expert. This time, you proceed directly to specifying grouping fields for the report. As you did the first time, select the CATEGORY field as the report's grouping field and proceed to the Expert's next step.
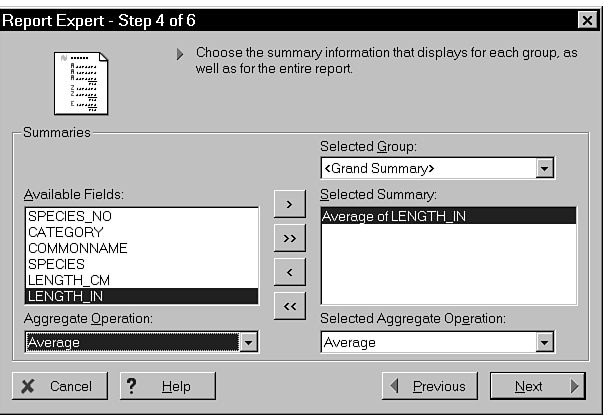
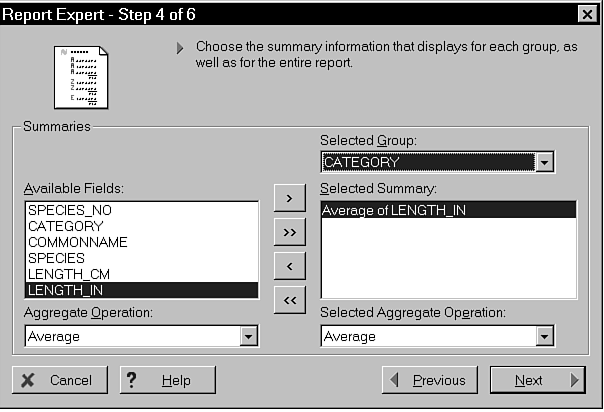
Unlike the first report you built, you won't count merely the items in each group in this new report. Instead, you'll list the average length (in inches) of the fish in each group. You'll also include an average length computation for the entire BIOLIFE table. To do this, follow these steps:
Figure 5.17 shows the fourth step's dialog box.
Figure 5.17 : Begin by creating an average length calculation for the entire BIOLIFE table.
Now that you have your grand summary calculation in place, setting up the group-based computation is easy. Simply click the CATEGORY field in the Selected Group drop-down list box and click the right arrow to add the new calculation. Figure 5.18 shows the highlighted selections.
Click Next to proceed to the Report Expert's Step 5. Now that you've defined your grouping fields and aggregations, you're ready to finish the report definition by specifying a few additional details. The only alteration you'll make to the Step 5 dialog box is to change the report name from Biolife to BIOLIFE SUMMARY. Make that change now and click Next.
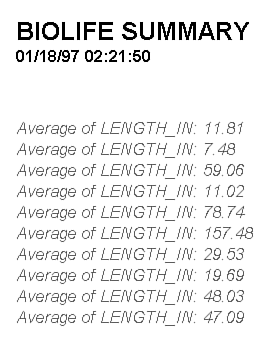
Now that the report definition is complete, click Run Report to execute it. You'll then be prompted for a name for your new report. Name the new report BIOSUM and click the Save button. Figure 5.19 shows what your new report should look like.
Figure 5.19 : Your new summary report as it appears at runtime.
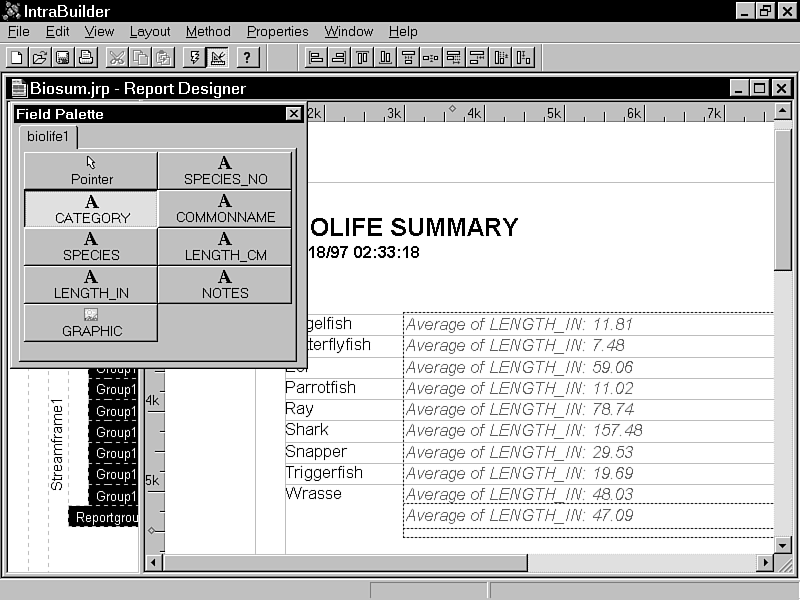
Your new summary report lists the data you asked it to list, but there's one problem: Each group aggregate fails to list its corresponding CATEGORY value. For this reason, the items listed on the report are virtually useless. You need to know the actual name of the CATEGORY to which each average computation corresponds. You'll therefore need to customize the report so that each group footer lists the necessary information. To accomplish this, follow these steps:
In this chapter, you learned how to create three different types of reports using the IntraBuilder Report Expert and Report Designer and how to add fields onto reports. You customized header and footer information and worked with groups and group aggregates. You also learned how to create summary fields and how to customize the report definitions created for you by the Report Expert.
| Q: | What types of files can you use with a Query component? |
| A: | Tables, SQL queries, and Query Builder queries. |
| Q: | What's the best way to visually separate the parts of a report from each other? |
| A: | Place a Rule line between the report's various sections for a neater appearance. |
| Q: | Is it possible to navigate backward from the last page of a report to a previous page using the IntraBuilder page buttons? |
| A: | This will work only if the report is no longer than two pages. IntraBuilder supports moving backward to the report's first page; you cannot arbitrarily move backward. |
| Q: | What's the name of the object that's used as a container for the report's detail data? |
| A: | That's the StreamFrame object. |
The Workshop section provides questions and exercises to help you get a better feel for the material you learned today. Try to answer the questions and at least think about the exercises before moving on to tomorrow's lesson. You'll find the answers to the questions in Appendix A, "Answers to Quiz Questions."


