The Pre-built Solution applications might cease to work properly if you make changes to the table structures. Be careful that you don't break the applications with changes to their underlying data. |
by Ken Henderson
Today we'll explore the Samples and Solutions that ship with IntraBuilder. Samples are individual programs and data, such as forms and tables, included as examples with IntraBuilder. The Pre-built Solutions, on the other hand, are complete applications-some consisting of many individual forms and tables-that you can use just as they are or you can customize to fit your needs.
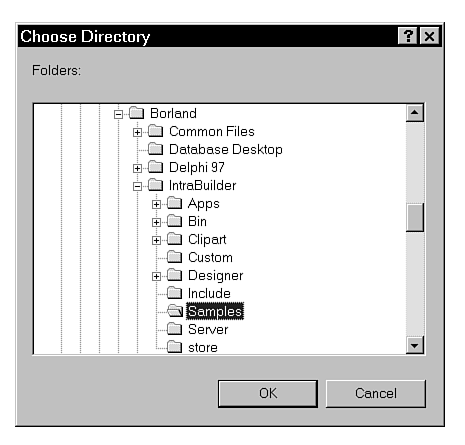
By default, IntraBuilder's Samples are located in the C:\ProgramFiles\Borland\IntraBuilder\Samples folder. If you haven't already done so, fire up IntraBuilder and click on the folder button to the right of the Look In drop-down list box. After the folder list is displayed, select the Samples folder under your IntraBuilder folder, as demonstrated by Figure 2.1.
Figure 2.1 : You can find the sample objects in IntraBuilder's Samples folder.
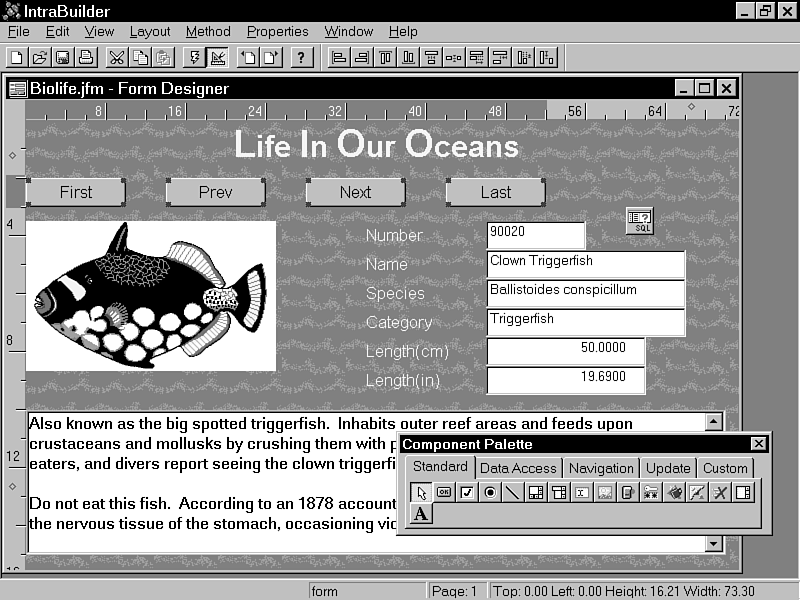
If you click the All tab, you'll see all the objects in the Samples folder. If you click one of the individual object type tabs, you'll see the objects that match the type you select. You can double-click an object to run it, or double-right-click it to open it in design mode. Figure 2.2 shows the Biolife.jfm sample form opened in design mode.
Figure 2.2 : Double-right-click a form to open it in the IntraBuilder Designer.
As with the Sample forms, the forms, reports, and other objects that make up IntraBuilder's Pre-built Solution applications can be opened by simply double-clicking them from the IntraBuilder Explorer. By default, the Solution applications are located in the C:\Program Files\Borland\IntraBuilder\APPS folder. Click the folder button to the right of the Look In drop-down list box, and then click the APPS folder. At this point, you should see a number of folders within the APPS folder. IntraBuilder comes with five Pre-built Solution applications: a guest book application, a contacts manager, an employee phone book, a security system, and a knowledge base. Click the guestbk folder within the APPS folder and then click OK.
As you can see, there are a number of individual objects within
the guest book application. It consists of six forms, one report,
and five images. The application tables reside in a separate folder.
| NOTE |
IntraBuilder Professional and IntraBuilder Client/Server come with additional solution applications, including some Web utilities and an InterBase version of the Knowledge Base. |
As mentioned earlier, you can run the forms and other objects that make up Solution applications by opening them in the IntraBuilder IDE (Integrated Development Environment). You can also open them via a JavaScript-enabled Web browser. Let's start with running them from the IDE.
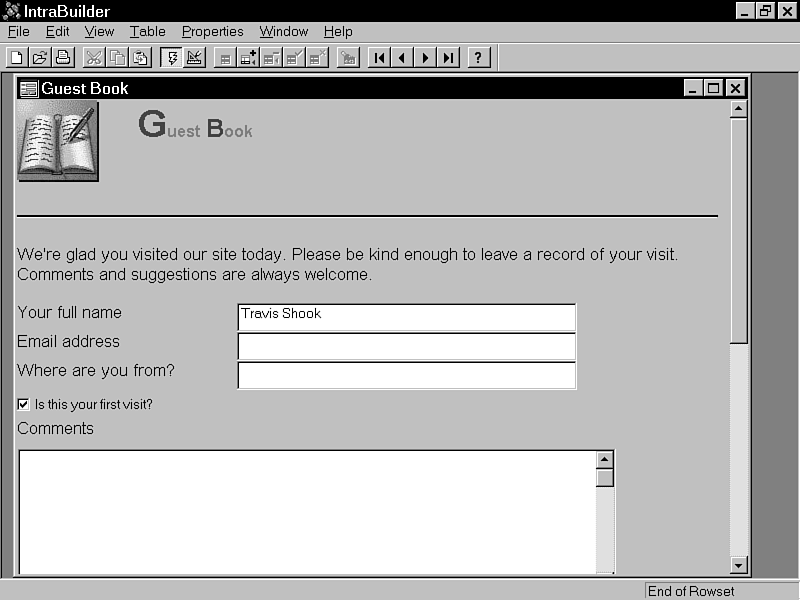
Double-click the Guest.jfm form to open it now. IntraBuilder runs the form, and you can access it just as you did the Sample forms earlier. Figure 2.3 illustrates what you should see.
Figure 2.3 : The Guest.jfm form opened in run mode.
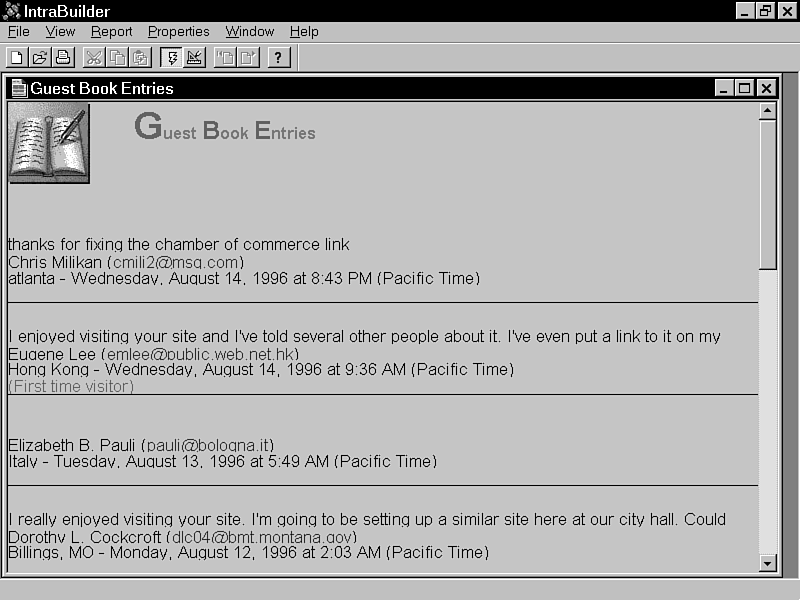
You can also run and design the reports that are included with the Solution applications from within IntraBuilder. Close the Guest.jfm form and double-click the Entries.jrp report to run it. Figure 2.4 illustrates what you should see.
Figure 2.4 : You can open reports from the IntraBuilder IDE.
After an object has been executed from the IDE, you can easily switch to design mode by clicking the Design mode button on the IntraBuilder toolbar. This button is immediately to the right of the lightning bolt Run button on the toolbar. You can also press Shift+f2 to switch to design mode or select the object Design option on the IntraBuilder View menu.
There's a bit of setup that has to occur before you can open the Solution applications from your Web browser. Normally, this setup is done automatically when you install IntraBuilder. However, if you later install a new Web server, you'll have to configure it manually. Check this section if you have problems viewing your IntraBuilder forms and reports from a Web browser.
To begin with, you'll need to tell your Web server where it can find your IntraBuilder Server and the Solution INDEX.htm file (the opening page of the Solution applications). To do this, follow these steps:
a. Right-click the WebSite server icon and select WebSite server properties from the context menu. You can also double-click the WebSite Server Properties icon in the WebSite folder. b. When you are in the properties editor, click the Mapping tab. c. Type /ibapps/ in the Document URL Root field. d. Type C:\Program Files\Borland\IntraBuilder\APPS\ in the Directory field. (Obviously, you'll need to type a different path if you changed IntraBuilder's default installation folder.) e. Click the Add button, and then click OK. To Configure Netscape FastTrack 2.0, use the following steps:
a. Execute the Administer Netscape Servers program. b. Click your server's link. c. Click the top frame's Content Mgmt button. d. Click the left frame's Additional Documents link. e. Type ibapps in the URL Prefix field. f. Type C:\Program Files\Borland\IntraBuilder\APPS in the Map to Directory field. (You'll need to type a different path if you changed IntraBuilder's default installation folder.) g. Click OK, and then click the Save and Apply button. h. Click OK on the confirmation message that appears momentarily. Configure Microsoft Internet Information Server with these steps:
a. Double-click the Internet Service Manager icon in the Microsoft Internet Server folder (or group if you're running under Program Manager). You should see the Microsoft Internet Service Manager window. b. Double-click your Web server's icon. Click OK if you're asked whether to start the server. You should then see the Service Properties dialog. c. Click the Directories tab and then click the Add button. d. Type C:\Program Files\Borland\IntraBuilder\APPS in the Directory field. (You'll need to type a different path if you changed IntraBuilder's default installation folder.) e. Type /ibapps in the Alias field. f. Click the Execute checkbox. g. Click OK, and then click the Apply button. h. Click Add once more and type C:\Program Files\Borland\IntraBuilder\Server\ into the Directory field. (You'll need to type a different path if you changed IntraBuilder's default installation folder.) i. Type /svr into the Alias field, and then click the Execute checkbox. j. Click OK, and click the Apply button. k. Click OK again to exit the Service Properties dialog. l. Right-click your Web server's icon in the administration window and choose Stop from the context menu. m. Double-click the IntraBuilder Server icon. You should see a minimized IntraBuilder icon appear for the broker. In Windows NT 4.0, this icon will appear on the taskbar; under Windows NT 3.51, it will appear as a simple minimized icon on the Program Manager desktop. n. Right-click your Web server's icon in the administration window and choose Start from the context menu.
After your Web server is properly configured, accessing forms via your browser is fairly straightforward. You'll begin by opening the INDEX.htm file. To do this, type the URL of your Web server, followed by your ibapps alias and the filename INDEX.htm, into your browser's URL entry field (it's labeled "Location" in Netscape Navigator and "Address" in Microsoft Internet Explorer) like so:
http://serveripaddress/ibapps/index.htm
In this syntax, serveripaddress is either the IP address of your server, or its name as specified on your DNS server or in your HOSTS file. If you've changed your Web server's port number (the default is 80), you'll need to specify it as well, like so:
http://serveripaddress:nn/ibapps/index.htm
In this syntax, nn is the port number you selected. If your server and browser are running on the same machine, you can use the localhost designation in place of the server's IP address, like so:
http://localhost/ibapps/index.htm
Figure 2.5 shows the INDEX.htm page as it should appear in your browser.
Figure 2.5 : The Solution index page as it appears in Netscape Navigator.
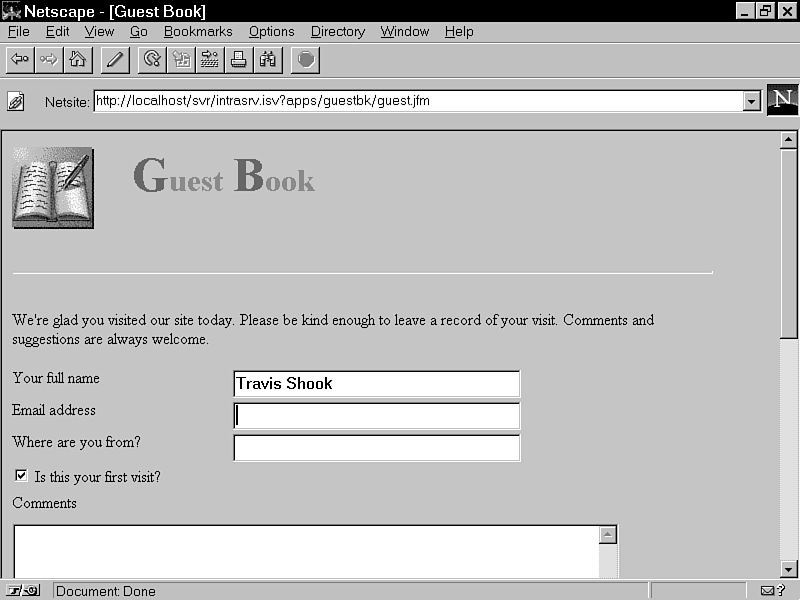
After INDEX.htm is opened, you can click any of the links to the Solution applications to view their forms and reports. Click the Guest Book link now to view the Guest.jfm form. Figure 2.6 shows what you should see.
Figure 2.6 : Guest.jfm as it appears in Netscape Navigator.
| TIP |
You don't have to go through the INDEX.htm page in order to access the Solution applications. You can go directly to a form or report page by simply keying in its full URL, like this: http://localhost/svr/intrasrv.isv?apps/guestbk/guest.jfm Perhaps this is a good time to explain what the ? is for. Users often get confused and try to use an alias such as /ibapps/ as part of the path to the .JFM after the ?. Web server aliases are only used before the ? (/svr/) or when accessing an HTML document (/ibapps/). The ? specifies that a parameter is being passed to intrasrv.isv. |
In addition to forms, you can also access IntraBuilder reports via your browser. To check this out, click the View Current Guest Book Entries link toward the bottom of Guest.jfm to run the Entries.jrp report. Figure 2.7 shows what you should see.
Figure 2.7 : Entries.jrp as it appears in Netscape Navigator.
You can now return to the Solutions index page by clicking the Return to Home Page link at the bottom of the report page.
Now that you've seen how easy it is to access the Solution applications from your Web browser, you can tour each one of them separately. Let's begin with the Employee Phone Book app.
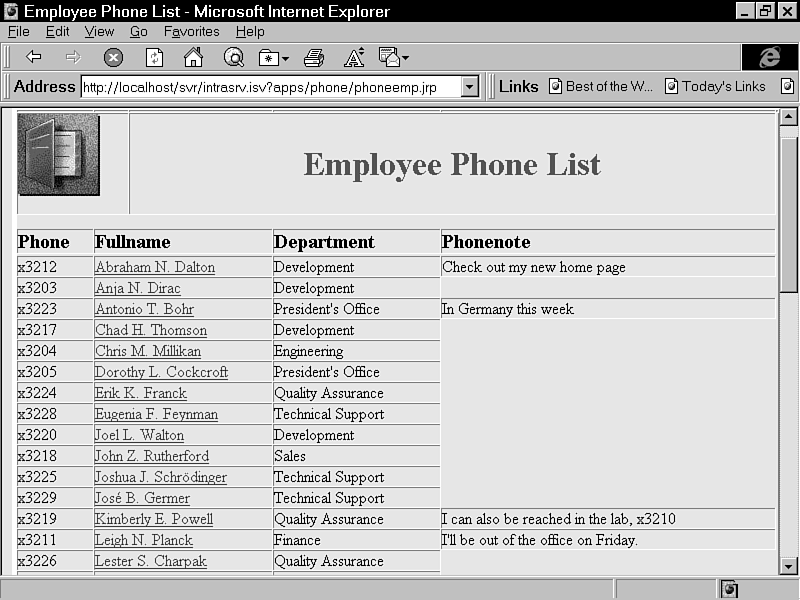
You can use the Phone Book application to easily access basic employee information, such as an employee's full name, phone extension, or department. This information is centralized on your Web server and can be accessed by anyone within your company or department with a browser. You can view the phone book sorted alphabetically by employee name or by department. Click the Phone List By Employee link on the IntraBuilder home index page to view it by employee name, as shown in Figure 2.8.
Figure 2.8 : Opening the Phone List By Employee report page lists employees alphabetically by name.
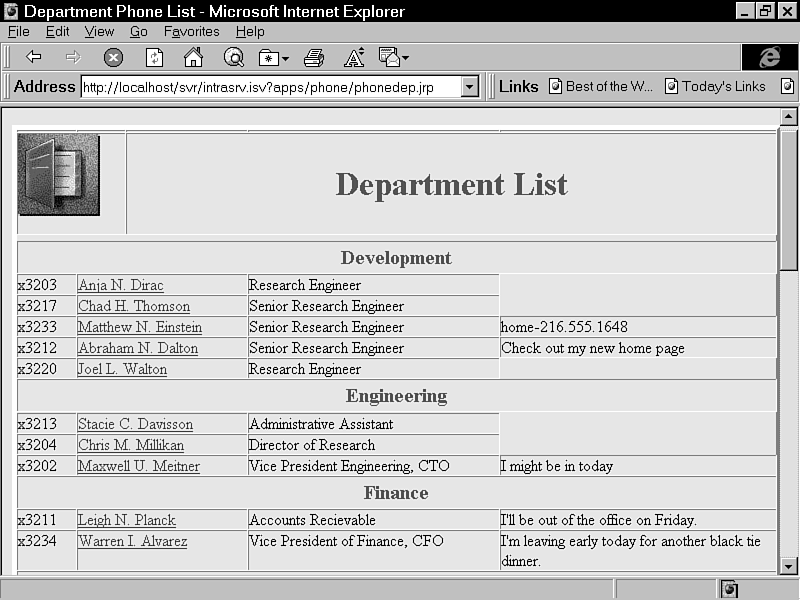
Now return to the home index page and click the Phone List By Department link. Figure 2.9 shows what you should see.
Figure 2.9 : The Phone List By Department report as it appears in Internet Explorer.
To view additional information about a given employee, click one of the employee name links on the report. Figure 2.10 illustrates what you should see.
Figure 2.10 : You can view information for a specific employee by clicking his or her link.
The name link references a document specific to the employee and includes a photo as well as other information.
The phone list reports consist of two different IntraBuilder reports, Phoneemp.jrp and Phonedep.jrp. You can open these reports in IntraBuilder to see how they're actually constructed.
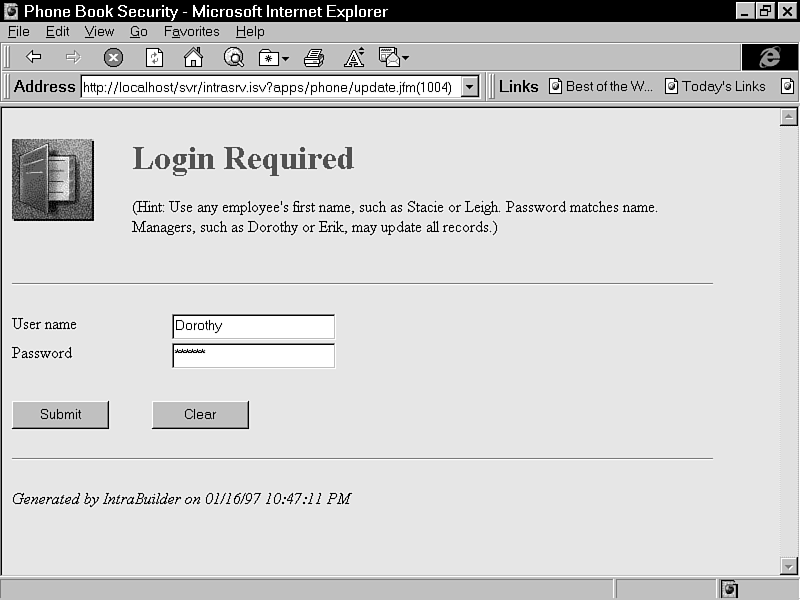
If you inspect the lower portion of either report, you'll notice an Update link. This link enables you to update a given employee's phone book information. Click the update link to log in as illustrated by Figure 2.11. The login is part of the Solution application's security system. See Day 16, "Debugging and Error Handling," to learn how to integrate the security system into your own applications.
Figure 2.11 : Using the Login form to get to the employee Update form.
| NOTE |
To see how Update link works, you must run the phone list reports from a Web browser. The links are inactive within the IntraBuilder Designer. |
Using the Knowledge Base application, you can build a "knowledge" database and then search it using a form. A knowledge database is simply a collection of facts or documents deemed important by an organization. These need not be related to one another in any particular fashion and tend to be rather freeform. You use the Knowledge Base app's search form to locate entries in the knowledge database and its update form to add, change, and delete those entries.
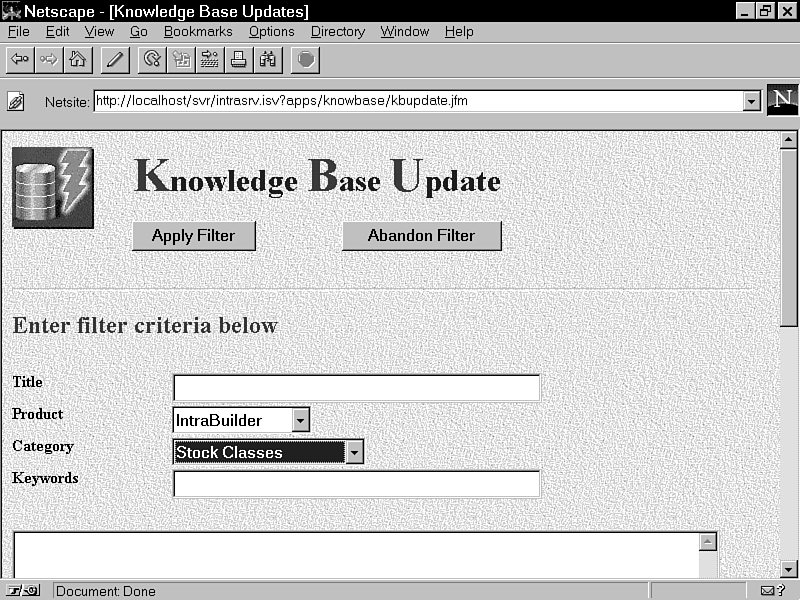
From the index page, click on the Document Administration link to open the Knowledge Base Update form. After you log in, the form will appear as shown in Figure 2.12. You can enter Mark as the name and password to complete the login.
Figure 2.12 : The Knowledge Base Updates form lets you modify records in the knowledge base table.
After you've opened the Update form, you can enter a title, product,
category, and set of keywords for knowledge base entries. Selecting
the All option for either the product or category fields causes
the document to show up only in searches looking specifically
for All. You put the actual text of the entry in the TextArea
box.
| NOTE |
If you search the knowledge database using a keyword search, IntraBuilder will search both the title and keywords entries, so you need not list words from a document's title in its keywords field. |
Checking the "Allow HTML formatting of this document" checkbox causes the knowledge base entry to be streamed directly to the client browser as normal text. Extra spaces and hard returns will be removed from the text as it's sent. Because the document is sent as HTML text, you can include HTML tags in it. Leaving this box unchecked will cause the document text to be sent as preformatted text. Of course, if you don't allow your document to be treated as HTML text, you'll need to be sure to format it yourself, placing hard returns as needed.
Note the database navigation and manipulation buttons at the top of the form. You can move to the first or last record in the database, and add, update, or delete individual records. If you make changes to an entry in the database, be sure to click either the Save or Abandon button when you finish.
You can use the New Filter button (which is the rightmost of the buttons at the top of the form) to restrict the documents that can be viewed. When you click New Filter, you're prompted for filter criteria. These criteria are similar to query-by-example criteria in that specifying them will restrict the rows you can access in the knowledge database. Figure 2.13 shows the New Filter criteria form.
| NOTE |
The default Knowledge Base contains information for IntraBuilder only. Searching for information on other products will result in an empty result set. You can submit a blank search to restore the unfiltered view. |
After you've specified your filter criteria, click the Apply Filter button to activate it. If you wish to cancel a filter (either the one you've just specified or a previous one), click the Abandon Filter button. Note that the filter you specify is not case-sensitive and will match field values from the left of each field (but you can't search for the middle or right of a given field).
You can use the New Query button to locate the next entry that matches a specified set of criteria. Unlike the filter facility, the query facility is designed to locate records, not restrict your view of them. After you specify your query criteria and apply them, you're positioned at the next record that meets the criteria.
Beyond updating the entries in your knowledge database, you also
might need to make changes to the tables used to build the category
and product lists shown on various knowledge base forms. Because
no forms are provided in the Knowledge Base app for doing this,
you'll have to edit these tables in the IntraBuilder designer
itself. The names of the product and categories tables are Kbprod.db
and Kbcat.db, respectively. You can simply double-click
these tables (which are found on the All and Tables tabs in the
IntraBuilder Explorer) to open them in IntraBuilder.
The Pre-built Solution applications might cease to work properly if you make changes to the table structures. Be careful that you don't break the applications with changes to their underlying data. |
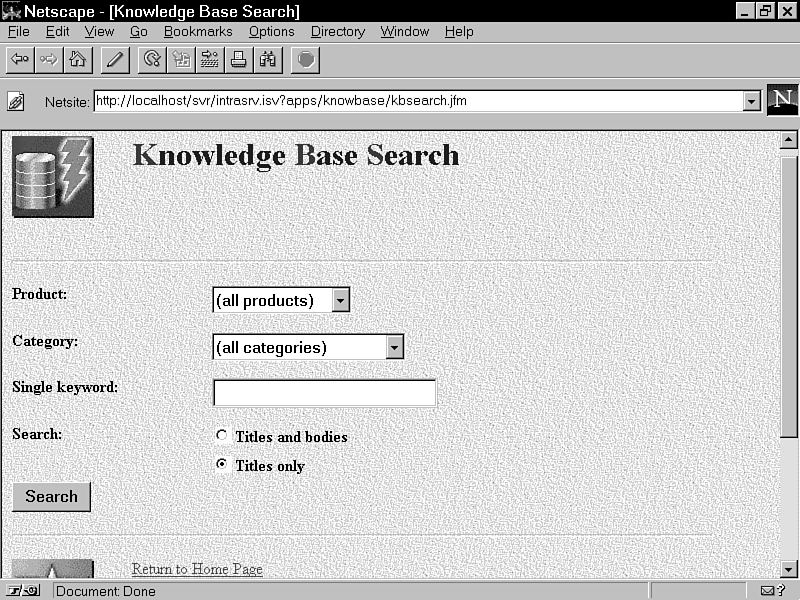
You can search the knowledge database by clicking the Knowledge Base Search link on the home index page. Figure 2.14 shows what the search form should look like.
Figure 2.14 : The Knowledge Base Search form in Netscape Navigator.
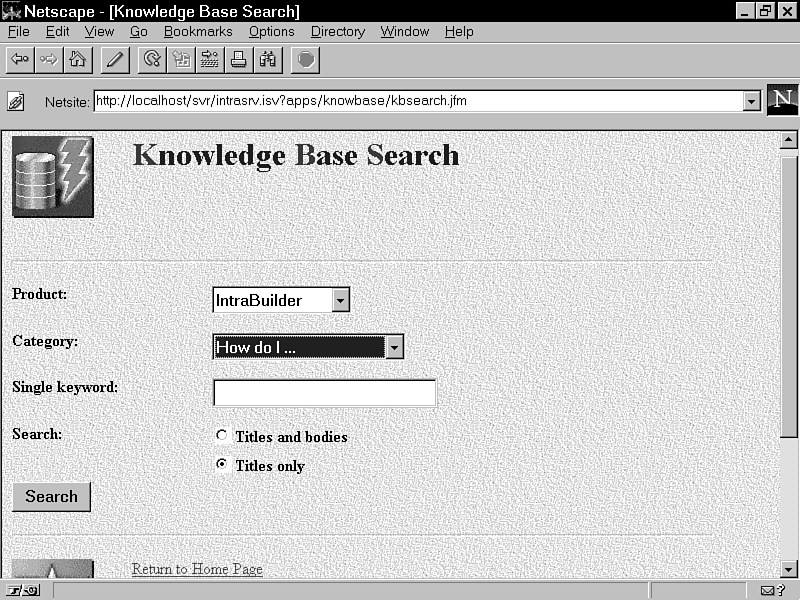
By using the search form, you can search using a particular category, product, or set of keywords. You could, for example, search for knowledge database entries that contain "IntraBuilder" in the product field and "How do IÉ" in the category field, as illustrated in Figure 2.15.
Figure 2.15 : You can specify individual products and categories as search criteria.
Beyond products and categories, you can also search the database using document keywords. As with the filter and query facilities on the Knowledge Base Update form, keyword searches scan document titles as well. In addition to document titles, you can tell IntraBuilder to search the document's text itself. Although the keyword search is case-insensitive when searching keyword lists and document titles, it is case-sensitive when searching the actual document text.
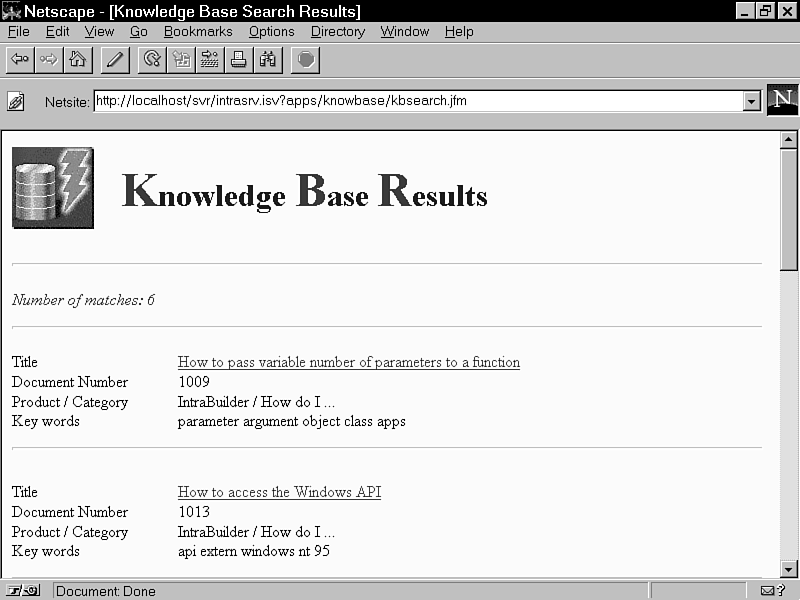
You can click the Search button to search the database for entries that match your specified search criteria. The search itself is performed by the Kbsearch.jfm form. Basically, Kbsearch creates an SQL SELECT statement, which is then passed to the Kbresult.jrp report for processing. After the SELECT statement is executed, Kbresult returns the rows from the knowledge database that match your criteria. Figure 2.16 shows what this output looks like.
Figure 2.16 : The Kbresult.jrp report lists the results of your Knowledge Base search.
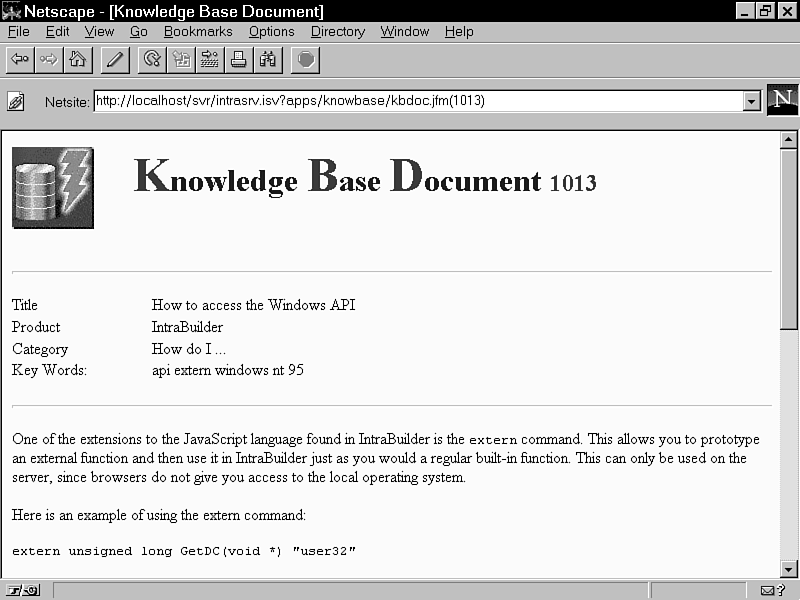
The title of each document listed is a link to the document itself. You can click it to quickly jump to the related document, as illustrated by Figure 2.17.
Figure 2.17 : You can access Knowledge Base articles from the Kbresults.jrp report.
Click the Return to Home Page link to return to the Solutions index page.
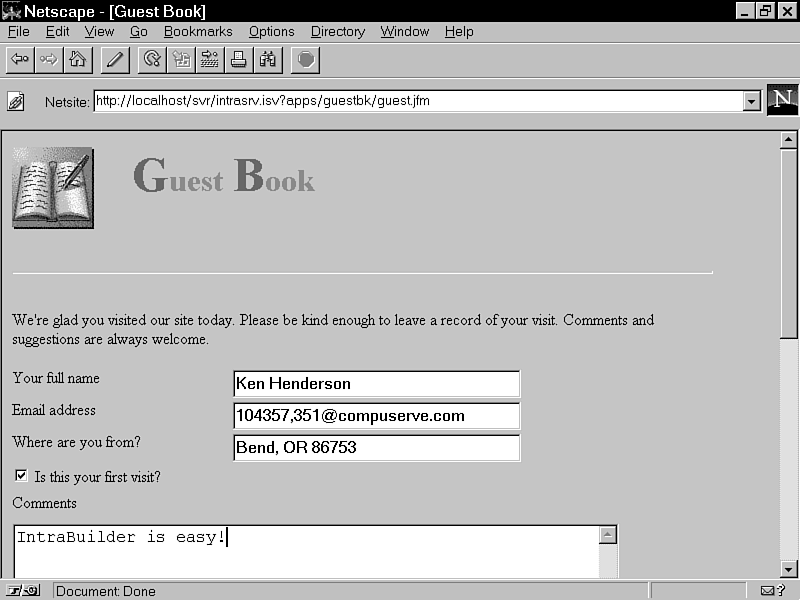
The Guest Book application is used to enable visitors to log records of their visits to your Web site. Visitors can view other users' comments along with their own. Like a real guest book, the Guest Book application can provide valuable information regarding who's accessing your server.
Click the Guest Book link on the home index page to open the Guest.jfm form file. Figure 2.18 illustrates what it should look like.
Figure 2.18 : The Guest Book form in Netscape Navi-gator.
At this point, you can either enter your own guest book information or click the View Current Guest Book entries link to view a report form listing the entries on file. On the Guest.jfm form itself, you can specify your name and e-mail address, as well as your location. You can also specify whether this is your first visit to the site. After you've entered your basic information, you can key comments regarding your visit in the Comments box. When your entry is complete, click the Submit button to send it to the server.
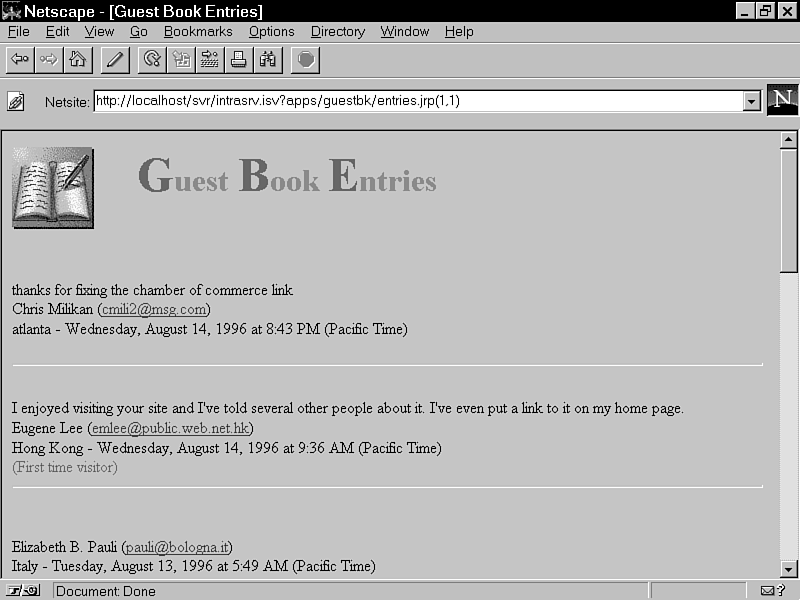
Note that if you opt to make your own guest book entry before viewing the others, viewing the list of guest book records will show your entry along with the others, as shown in Figure 2.19.
Figure 2.19 : The current Guest Book entries in Netscape Navigator.
The report itself is contained in the file Entries.jrp, which you visited briefly earlier. You can open it in the IntraBuilder designer to see how it's actually constructed.
The entries in the report are listed in descending order based on the date and time of the visit. This means that the most recent visits will be listed first. If you have an entry in the guest book, it should be at the top of the list.
Each entry in the list of guest book records contains a mail link to the person who posted the entry. This means that you can click the mail link and send the person a message using an Internet mail program. After you finish exploring the Guest Book application, click the Return to Home Page link.
In this chapter, you learned how to locate and open the Sample forms and reports, and how to locate and open the pre-packaged Solution applications. You saw how to access applications both through IntraBuilder and via a browser. You also learned the specifics of the Employee Phone Book, Knowledge Base, and Guest Book Solution applications.
| Q: | Can I use the Solution applications included with IntraBuilder as they are? Do I owe Borland anything for using them? |
| A: | Yes, you can use the Solution applications just as they are-that's one of the reasons they're included with IntraBuilder. And, no, you do not have to pay Borland royalties for making use of them. |
| Q: | What types of database tables are in the Solution applications? |
| A: | Most of the Solution applications use Paradox tables. The contact manager uses an Access database. IntraBuilder Professional and IntraBuilder Client/Server come with an InterBase application and a Microsoft SQL Server sample form. Other sample forms work with dBASE tables. |
| Q: | Do the tables that service the Solution applications have to reside on my Web server? |
| A: | No, they do not. You can modify the forms and reports that make up the Solution applications to point to tables on an SQL server or to local tables located across a network. |
| Q: | What types of information can go into the Knowledge Base databases? |
| A: | You can use any type you like. Because you can edit both the products and the categories tables (Kbprod.db and Kbcat.db, respectively), you can customize the Knowledge Base app to meet your needs. |
The Workshop section provides questions and exercises to help you get a better feel for the material you learned today. Try to answer the questions and at least think about the exercises before moving on to tomorrow's lesson. You'll find the answers to the questions in Appendix A, "Answers to Quiz Questions."


